
Specifications


Step by Step: Configuration of the LAN-to-LAN Link
28 AVM Access Server – 2 Installation and Initial Configuration
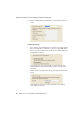
6. Enter the network address of the local network. In the example,
the local network addresses are:
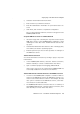
7. Enter the network address of the remote network. In the example,
the remote network addresses are:
8. Click “Next”, then “Finish” to complete the configuration.
The new remote network is shown in the “Remote networks” fold-
er in the AVM Access Server window.
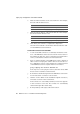
Test the VPN Connection from Both LANs
1. In order for the VPN connection to be activated, the Internet connec-
tions of the AVM Access Server at both locations must be active. In
the example, the “flat rate” option is activated both in Berlin and in
London, so the Internet connections are active all the time.
2. Open a command prompt on the AVM Access Server computer at
either location and ping the domain name of the remote loca-
tion’s AVM Access Server. In the example, the command entered
on the AVM Access Server computer in the London office is:
ping company-abc-berlin.dns4biz.de
If the responses to the ping are received, then the remote AVM
Access Server is reachable over the Internet.
3. Now switch to the Monitoring View in the AVM Access Server win-
dow and select the “Connection control” folder.
4. Click the “London Office” in the list with the right mouse button,
and select “Connect” in the context menu.
If the connection is successfully activated, a blue arrow appears
in the connection control list. The connection is automatically
cleared down again after a brief delay.
5. Now repeat Steps 2 through 4 at the other location.
In Berlin In London
Network address 192.168.10.0 192.168.20.0
Subnet mask 24-255.255.255.0 24-255.255.255.0
In Berlin In London
Network address 192.168.20.0 192.168.10.0
Subnet mask 24-255.255.255.0 24-255.255.255.0