
Specifications


Step by Step on the User’s Home Computer
AVM Access Server – 2 Installation and Initial Configuration 25
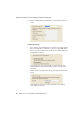
4. Select the desired Internet Service Provider.
5. Enter a name for your Internet connection.
6. Enter the authentication information for your Internet access ac-
count.
7. Click “Next”, then “Finish” to complete the configuration.
An icon representing the Internet connection now appears in the
NetWAYS/ISDN window.
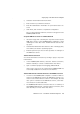
Set up the AVM Access Server as a Remote Network
1. Insert the floppy disk containing the export file created by the
AVM Access Server. In the NetWAYS/ISDN configuration, select
“VPN import” in the “File” menu. The Windows file selection dia-
log opens.
2. Select the file with the file name extension .EFF on the floppy disk,
and confirm your selection by clicking “Open”.
3. Enter the password you chose for the export file on creating it in
the AVM Access Server.
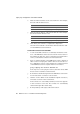
Test the Internet Connection
You can test the Internet connection by sending a “ping” to any server
in the Internet.
1. In the NetWAYS/ISDN window, select the Internet connection,
then the “Standby to connect” command in the “File” menu.
2. Open a command prompt and enter ping www.avm.de.
If the server's responses are received, then NetWAYS/ISDN has
successfully established a connection to the Internet.
Test the VPN Connection from the Home PC to the AVM Access Server
1. In order for the NetWAYS/ISDN computer to activate a VPN con-
nection to the AVM Access Server, the AVM Access Server’s con-
nection to the Internet must be active. In the example, the “flat
rate” option is activated on the AVM Access Server, so the Inter-
net connection is active all the time.
2. The NetWAYS/ISDN Internet connection must be on stand-by. In
the NetWAYS/ISDN window, select the Internet connection, then
click “Standby to connect” in the “File” menu.