
Specifications


Step by Step: AVM Access Server Installation and Basic Configuration
18 AVM Access Server – 2 Installation and Initial Configuration
5. In the dialog that appears, enter the Product Identification Code
that is printed on the back of the CD.
6. In the “Choose Destination Location” dialog, specify the folder in
which you want to install the AVM Access Server’s program files.
If you are installing the software on a computer running Windows
XP, messages about the Windows logo test may appear. Click
“Continue Anyway”.
7. Click “Finish” to close the Setup program and restart your com-
puter. Before the computer restarts, remove the CD from the CD-
ROM drive.
After the computer has restarted, the AVM Access Server’s Config-
uration Wizard starts automatically to support you in configuring
the basic settings.
The AVM Access Server starts automatically as an operating sys-
tem service each time the computer starts up.
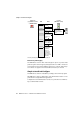
Select ISDN and ADSL-Controllers
1. In the Configuration Wizard’s sign-on dialog, click “Next”.
2. Select the controllers you want the AVM Access Server to use. To
configure a controller, select it in the list and click the “Proper-
ties” button. The controller properties dialog appears. This dialog
allows you to specify the properties of the ISDN line to which the
controller is connected.
In the example, no controllers need to be selected for configura-
tion here, since the Internet connection takes place over ADSL.
ADSL-Controllers such as FRITZ!Card DSL are configured automati-
cally, and do not need to be set up using the Configuration Wiz-
ard.