
Specifications


Step by Step: AVM Access Server Installation and Basic Configuration
AVM Access Server – 2 Installation and Initial Configuration 17
In the example, the following settings must be entered:
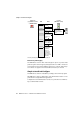
6. If no DNS server address is configured, you must enter addresses
of the AVM Access Server’s virtual DNS servers. These addresses
are as shown in the example.
7. Confirm your settings by clicking “OK”.
8. If you want to use any other additional LAN adapters with the AVM
Access Server, you must enter a fixed IP address for each such
adapter as described above.
Install the AVM Access Server
In the example, the AVM Access Server is installed at two locations.
Before installing the AVM Access Server software, make sure the
required Service Pack is installed for your operating system, as
specified in the chapter “System Requirements” on page 14. If you are
using Windows NT 4.0, you must also install Microsoft Jet 4.0 with
Service Pack 6. All of the service packs listed are provided on the AVM
Access Server installation CD, so that you can install those you require
before you proceed.
1. Insert the AVM Access Server CD in your CD-ROM drive.
A CD introduction starts automatically.
2. Select the language and the product you want to use. Then select
the operating system in use on the computer on which you want
to install the AVM Access Server.
Install the required Service Pack for your operating system, and if
you are using Windows NT 4.0, install the Microsoft Jet 4.0 soft-
ware with the accompanying service pack.
3. Start the AVM Access Server installation.
4. Click “Next” in the Setup program’s sign-on dialog to proceed
with the installation.
In Berlin In London
IP address 192.168.10.1 192.168.20.1
Subnet mask 255.255.255.0 255.255.255.0
Default gateway 192.168.10.2 192.168.20.2
Preferred DNS server Alternative DNS server
192.168.116.252 192.168.116.253