
Specifications


Step by Step: AVM Access Server Installation and Basic Configuration
16 AVM Access Server – 2 Installation and Initial Configuration
Step by Step: AVM Access Server Installation and Basic
Configuration
The instructions below describe the installation and first configuration
steps for the AVM Access Server. The general instructions are accompa-
nied by examples using the settings for the hypothetical scenario.
Verify the Network Settings in the Windows Control Panel
Before you begin installing the AVM Access Server, you must make sure
that certain network settings are present in the Windows Control Panel.
In the example, these settings must be verified on both of the comput-
ers on which the AVM Access Server is to be installed: one in Berlin and
one in London.
Make sure that the following conditions are met:
A default gateway must be entered in the TCP/IP properties for at
least one LAN adapter.
If no DNS server address settings are present, then the addresses
of the AVM Access Server’s virtual DNS servers must be entered.
All LAN adapters to be used in conjunction with the AVM Access
Server must be configured with fixed IP addresses.
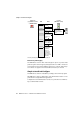
Proceed as follows:
1. In the Control Panel, open the “Network Connections”.
2. Select the LAN connection to be used in conjunction with the AVM
Access Server.
3. Click it with the right mouse button and select “Properties” in the
context menu.
4. Select “Internet Protocol (TCP/IP)” in the list of network compo-
nets and click “Properties”.
5. Enter the following settings:
Field
IP address The IP address of the AVM Access Server
computer in the LAN
Subnet mask The subnet mask of the LAN network address.
Default gateway Any IP address in the AVM Access Server’s
subnetwork.