
User Manual

5
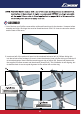
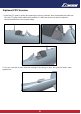
3. Insert the rudder and connect the rudder LED connector to the fuselage extension lead. Then pull the
extension lead from the battery hatch end gently until it stops, then snap the rudder hinge halves to the
fuselage hinge halves. The bottom hinge is the key to secure the rudder into place, please check to
make sure that the rudder can move freely with no catching or resistance.
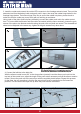
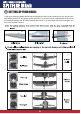
Using a pair of the pliers (ball link pliers preferably) connect the rudder push rod to the rudder control
horn. To ensure both the elevator and the rudder are neutral (with the servo centered), loosen the grub
screws of the piano wire fastener and slide along the push rods until both are neutral. The steerable tail
wheel can be adjusted in the same way, tighten all the grub screws firmly when done.
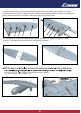
4. Connect the ballinks to the balls first.
With the aileron control horn at 90° to the wing surface (neutral) insert the aileron push rod into the
top hole of the control horn, adjust the length of the push rod as necessary so that the aileron remains
neutral. Secure the push rod to the servo horn with the supplied plastic keeper. Repeat this process
for the flaps, the only exception is that the flap servo horns must be positioned as far forward as
possible. This will ensure the flaps are up when the push rods are connected.