
Manual


Identity Enrollment and Credentialing User Guide
44
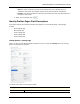
Title From the drop-down list, select the title of this profile.
To define more options, refer to “User-Defined Lists - Adding Items” in the on-line help
or the Workflow User Guide.
Department From the drop-down list, select the department to which this profile is affiliated.
To define more options, refer to “User-Defined Lists - Adding Items” in the on-line help
or the Workflow User Guide.
Division From the drop-down list, select the company division with which this profile is affiliated.
Status Select the option from the pick list that describes the current status of this new profile.
The options include:
Active - this profile is currently active.
Inactive - this profile is currently inactive.
This field is required.
Type From the drop-down list, select the type of identity this is. Values include <Blank>,
Employee, Contractor, and Visitor.
To define more options, refer to “User-Defined Lists - Adding Items” in the on-line help
or the Workflow User Guide.
Issue Date Specify the date this profile was issued. Click the field to bring up the calendar and
specify the date on which this profile is issued.
Address Information
Street Address Enter the street address where this profile lives.
City Enter the city where this profile lives.
State Enter the state where the profile lives.
Zip Code Enter the zip code where the profile lives.
Site Location From the drop-down list, select the location where this profile works.
To define more options, refer to “User-Defined Lists - Adding Items” in the on-line help
or the Workflow User Guide.
Building From the drop-down list, select the building where this profile works.
To define more options, refer to “User-Defined Lists - Adding Items” in the on-line help
or the Workflow User Guide.
Phone Enter the phone number this profile has. This can be either cell phone or home phone.
Work Phone Enter the phone number where this profile works.
Email Address Enter the profile's email address.
Account Information
Remote
Authentication?
Check this box to indicate that this identity can access this system remotely. The
password and confirm fields disappear.
Remote authenticate is achieved by defining a default domain and server from the
Remote Authentication page.
Remote Domain From the drop-down list, select an external domain (a domain outside this security
system) from which this identity can seek authentication.
Only those external domain previously defined by the system appear in this list.