
Manual
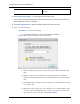
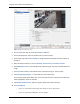
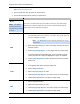
Table Of Contents
- Table of Contents
- Introduction
- Accessing the Web Client
- Views
- Video
- Search
- Export

Avigilon Control Center Core Web Client
46
Figure A. Export tab for still image export
2. In the Format drop down list, select Print Image or PDF File.
3. In the System Explorer, select the camera video you want to export.
4. (Print Image only) Click Printer Settings to change the printer and paper size that the image is
printed on.
5. Select the image overlays you want: Timestamp, Camera name, and Camera location.
6. Click Add Export Notes to add notes about the exported image. The notes are added below the
image.
7. In the Time field, enter the exact date and time of the video image you want to export.
8. Click Change Image Region... to only export part of the video image.
In the Change Image Region dialog box, move and resize the green overlay then click OK. Only
areas highlighted in green are exported.
9. Click Display Adjustments to adjust the gamma, black level and/or white level.
10. Click Start Export.
o If you are exporting a Print Image, the image is sent to the printer.
o If you are exporting a PDF File, save the image.