Avigilon Control Center Web Client User Guide Version: 4.
Copyright © 2013 Avigilon. All rights reserved. The information presented is subject to change without notice. No copying, distribution, publication, modification, or incorporation of this document, in whole or part, is permitted without the express written permission of Avigilon. In the event of any permitted copying, distribution, publication, modification, or incorporation of this document, no changes in or deletion of author attribution, trademark legend, or copyright notice shall be made.
Table of Contents Introduction .............................................................................................................................. 1 What is the Avigilon Control Center Web Client ....................................................................................... 1 For More Information ................................................................................................................................. 1 Avigilon Training Center .....................................
Avigilon Control Center Core Client User Guide Bookmarking Recorded Video ............................................................................................................ 21 Adjusting Video Display in Image Panels ............................................................................................... 23 Maximizing an Image Panel ................................................................................................................
Introduction What is the Avigilon Control Center Web Client The Avigilon Control Center Web Client is a simplified, web-based version of the Avigilon Control Center Client software. The Web Client allows you to access any camera that is connected to an Avigilon Control Center Server. Through the Web Client you can monitor live and recorded video, and search or export events in the camera's recording history.
Avigilon Control Center Core Client User Guide For emergency technical support 24 hours a day, 7 days a week, please call the Avigilon Emergency Technical Support Hotline at +1.604.506.3117. Upgrades Software and firmware upgrades will be made available for download as they become available. Check http://avigilon.com/#/support-and-downloads/ for available upgrades. Feedback We value your feedback. Please send any comments on our products and services to feedback@avigilon.
Accessing the Web Client Note: The Web Client is only compatible with the Internet Explorer browser. To access the Web Client, you need the Avigilon server's IP address and port number. This information is available in the Avigilon Control Center Admin Tool installed on the server. See the Avigilon Control Center Server User Guide for more information. 1. To access the Web Client, open Internet Explorer and enter the following address: http://:/ (For example, http://192.
Avigilon Control Center Core Client User Guide Figure A.
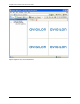
Views What are Views? A View is a tab composed of image panels that allows you to organize how video is displayed. For example, you can choose to display video from multiple cameras at the same time by using different layouts. Selecting a Layout for a View You can organize how video is displayed by selecting a View layout. The figure shows the default View layouts. On the toolbar, select the Change Layout button then select one of the layout options.
Avigilon Control Center Core Client User Guide Figure A. Layouts on the toolbar Editing a View Layout If the default View layouts do not fit your surveillance requirements, you can customize a View layout. 1. On the toolbar, select the Change Layout button then select Edit Layouts.
Views Figure A. Layouts on the Toolbar 2. In the Edit Layouts dialog box, select the layout you want to change. 3. Enter the number of Columns and Rows you want in your layout. 4. In the layout diagram, do any of the following to further customize the layout.
Avigilon Control Center Core Client User Guide Figure B. Edit Layouts dialog box o To create a larger image panel, select a grey line to delete the border between two image panels. When a line is highlighted in red, the line can be deleted. o To restore an image panel, select a dotted line to divide a large image panel into two. When a dotted line is highlighted in green, the line can be restored. o To restore all default View layouts, click Restore Defaults.
Views Ending Full Screen Tip: On the toolbar at the top left of the screen, click End Full Screen. The toolbar is hidden when the application is idle. Move your mouse to display the toolbar.
Video The Avigilon Control Center Web Client allows you to monitor video from any computer that is connected to your local network. You can configure View tabs to display video in multiple image panels, zoom in on the video image, or use the Timeline to control the playback of recorded video, etc. Note: Some features are not displayed if the server does not have the required license, or if you do not have the required user permissions.
Video Removing a Camera From a View Perform one of the following: Right-click the image panel and select Close. Inside the image panel, click Close. Displaying Live Video Once a camera has been added to an image panel, you can choose to watch the live video stream. You can set the entire View to display live video, or only set specific image panels to display live video. Live video have a blue border around the image panel.
Avigilon Control Center Core Client User Guide 1. Select a Zoom tool: o On the toolbar, click Zoom In Tool or Zoom Out Tool. 2. Click the image panel until you reach the desired zoom depth. Using the Pan Tools You can right-click and drag inside an image panel to pan the video image. Or, you can use the Pan tool: 1. Select the Pan tool: o On the toolbar, click Pan Tool. 2. Drag the video image in any direction inside the image panel.
Video Figure A. PTZ Controls 2. To pan or tilt, perform one of the following: o Click the round Pan/Tilt arrow buttons in the PTZ Controls. The speed of the pan/tilt movements can be adjusted using the Speed slider. o In the image panel, drag your mouse from center to move the camera in that direction. The farther the cursor is from the center of the image panel, the faster the camera will move.
Avigilon Control Center Core Client User Guide Action To zoom To control the Iris or Focus Control Procedure • Click the • Click the image panel and use the mouse scroll wheel to zoom in and out. • If the camera supports Drag to Zoom, click and drag to create a green box to define the area you want to zoom in and see. • Right-click the image panel and select Zoom Out Full. Click the and and buttons. buttons. 1. Move the camera's field of view into position. To program a PTZ preset 2.
Video 3. Click . In the PTZ Controls pane, select a pattern number and click . To activate a PTZ pattern The pattern will repeat until the pattern is stopped or another pattern is run. In the PTZ Controls pane, select a tour number and click . To activate a PTZ tour The tour will repeat until stopped or until other PTZ controls are used. To program a PTZ tour, see Programming PTZ Tours. 1. Select an aux command To activate an auxiliary command number and click . 2.
Avigilon Control Center Core Client User Guide Programming PTZ Tours If the PTZ camera supports guard tours, the tours can be programmed through the PTZ Controls pane. Tours allow the PTZ camera to automatically move between a series of preset positions, and can be set to pause at each preset for a specific amount of time for video monitoring. 1. Create all the PTZ presets you need for this tour. See Controlling PTZ Cameras for more information. 2.
Video 5. In the Tour Mode drop down list, select one of the following: o Sequential: the PTZ camera will go to each preset in the set order. o Random: the PTZ camera will go to each preset in random order. 6. Select the Set as default tour check box if you want this tour to run automatically. o The Default Tour Idle Start Time field is now enabled, enter the amount of time the PTZ camera must be idle for before this tour automatically begins. 7.
Avigilon Control Center Core Client User Guide The record indicator is highlighted in blue to show that the camera is recording. Manual recording continues until it is stopped, or until the maximum manual recording time is reached. Click the record indicator again to stop manual recording. Monitoring Recorded Video While monitoring recorded video, you can perform any of the following procedures in the Web Client. Adding and Removing Cameras in a View To monitor video, add a camera to a View.
Video Displaying Recorded Video Once a camera has been added to an image panel, you can choose to watch the camera's recorded video. You can set the entire View to display recorded video, or only set specific image panels to display recorded video. Recorded video have a green border around the image panel. To display recorded video in a View, click To switch a single image panel to display recorded video, right-click the image panel and Recorded. select Recorded.
Avigilon Control Center Core Client User Guide The colored bars on the Timeline show the camera's recording history: A red bar shows the camera recorded an event. A blue bar shows the camera recorded video. White areas show that the camera did not record any video. An orange bar is a bookmark in the camera's recording history. Figure A.
Video Drag the slider to the right to move the video forward. Drag the slider to the left to move the video backward. To control the playback direction and speed The farther away the slider is from center the faster the playback speed. On the Timeline, click one of the Go Forward or Go Back buttons to move to different points on the Timeline.
Avigilon Control Center Core Client User Guide The Edit Bookmark dialog box appears, and the bookmark time range is highlighted on the Timeline Figure A. Add Bookmark dialog box 2. Enter a name for the bookmark. 3. In the Cameras pane, select all the cameras that are attached to this bookmark. Note: You can only bookmark multiple cameras from the same server. 4. In the Time Range to Bookmark area, enter the time you want to bookmark.
Video Editing, Deleting or Exporting a bookmark 1. Click the bookmark on the Timeline then perform one of the following: Figure B. Bookmark properties To Do this... Edit a bookmark Click Edit then make your changes. Delete a bookmark Click Delete. When the confirmation dialog box appears, click Yes. Export a bookmark Click Export then complete the Export tab. Adjusting Video Display in Image Panels You can adjust the image panel display settings to improve the video display on your monitor.
Avigilon Control Center Core Client User Guide Maximizing an Image Panel Perform one of the following: Right-click an image panel and select Maximize. Inside the image panel, click Double-click the image panel. Maximize. Restoring an Image Panel Perform one of the following: Right-click the maximized image panel and select Restore Down. Inside the image panel, click Double-click the image panel. Restore Down.
Video o Maximum: displays the full video resolution with the lowest image rate. o High: displays 1/4 of the full video resolution. o Medium: displays 1/16 of the full video resolution. o Low: displays 1/64 of the full video resolution with the highest image rate. 3. Select the Monochrome check box to display the video in black and white. 4. Click OK.
Searching You can search for recorded video by events, thumbnails or POS transactions. Note: Some features are not displayed if the server does not have the required license, or if you do not have the required user permissions. Performing an Event Search The Event Search allows you to search for a specific motion events and digital input events. 1. Click Search to open the Search tab. 2. In the Search tab, select Event Search. The Search:Event tab is displayed.
Searching Figure A. Search: Event tab 3. In the Camera to Search area, select all the cameras you want to include in the search. 4. In the Time Range to Search area, set the date and time range of your search. The time range is highlighted on the Timeline by the black time range markers. You can also drag the time range markers to modify the time range. 5. In the Events to Search For area, select the types of events to include in the search. 6. Click Start Search. Viewing Event Search Results 1.
Avigilon Control Center Core Client User Guide 2. Use the Timeline controls to review the event. See Playing Back Recorded Video for more information. 3. If you want to further refine your search, click Perform a pixel search on this event. You can now search for any pixel movement in the selected result. See Performing a Pixel Search for more information. 4. Click Export this event to export the selected event video. See Exporting Recorded Video and Images for more information. 5.
Searching Figure A. Search:Bookmark tab 3. In the Search field, enter any text that may appear in the bookmark's title, description, linked camera name or the name of the user who created the bookmark. The search is automatically performed on all the listed bookmarks until only the matches are displayed. Viewing Bookmark Search Results 1. In the Bookmark list, select a bookmark. The bookmark is highlighted on the Timeline and the video is displayed in the image panel.
Avigilon Control Center Core Client User Guide See Performing a Pixel Search for more information. 5. Click Edit this bookmark to edit the bookmark. See Bookmarking Recorded Video for more information. Performing a Pixel Search The Pixel Search allows you to search for tiny pixel change in specific areas in the camera’s field of view. 1. Click Search to open the Search tab. 2. In the Search tab, select Pixel Search. The Search:Pixel tab displays. Figure A.
Searching 4. In the Time Range to Search area, set the date and time range of your search. The time range is highlighted on the Timeline by the black time range markers. You can also drag the time range markers to modify the time range. 5. Define the pixel search area by using the motion detection tools above the image panel. Only areas highlighted in green are searched. 6. In the Pixel Search Options area, drag the Threshold slider to select the amount of motion required to return a search result.
Avigilon Control Center Core Client User Guide Figure A. Search:Thumbnails tab 3. In the Camera to Search area, select a camera. 4. In the Time Range to Search area, set the date and time range of your search. The time range is highlighted on the Timeline by the black time range markers. You can also drag the time range markers to modify the time range. 5. In the image panel, move or drag the edges of the green overlay to focus the search on one area in the video image.
Searching Figure B. Search:Thumbnail results tab 2. Select a thumbnail to highlight the video on the Timeline. 3. Click Step In, or double-click the thumbnail to perform another search around the thumbnail. Click Back to return to the previous results page. 4. Click Open In View to open the recorded video in a new View. 5. Click Change Search to change the search criteria.
Exporting You can export video in multiple video and image formats. You can also export snapshots of an image panel as you monitor video. Exporting a Snapshot of an Image You can export a snapshot of any image panel with video. When you export a snapshot, you are exporting whatever the image panel is currently displaying. 1. To export a snapshot, perform one of the following: o o In the image panel, click the Save Snapshot icon. Right-click the image panel and select Save Snapshot.
Exporting Figure A. Export tab for Snapshot export 2. In the Format drop down list, select an export format. 3. For the selected export format, define your preferences: Format Native Note: The Native format requires the Avigilon Control Center Player to view. Image options This is the recommended export format because the exported image maintains its original compression and can be authenticated against tampering in the Avigilon Control Center Player.
Avigilon Control Center Core Client User Guide 3. Select the image overlays you want: Timestamp, Camera name, and Camera location. 4. Click Display Adjustments to adjust the Gamma, Black Level and/or White Level. 1. In the Quality field, select an image quality level. 2. Set the image Resolution. 3. Click Change Image Region to only export a part of the video image. JPEG 4. Select the image overlays you want. 5. Click Display Adjustments to modify the image quality. 1. Set the image Resolution. 2.
Exporting 6. When the export is complete, click OK. Exporting Recorded Video and Images Use the Export tab to export recorded video in different video and image formats. Accessing the Export Tab The Export tab can be accessed in any of the following ways: On the toolbar, click While performing a search, select a search result and click Export this event. While reviewing bookmarked video, right-click a bookmark on the Timeline and select Export. Export.
Avigilon Control Center Core Client User Guide Figure A. Export tab for recorded video export 2. In the Format drop down list, select Native. 3. In the Camera to Export list, select the camera video you want to export. 4. Enter the time range you want to export. The time range is highlighted on the Timeline by black time range markers. You can also drag the time range markers to modify the time range. 5.
Exporting Export one image every __ min __sec Select this option to control the time between each exported video image. For example, if you enter 5 min. 0 sec., only one image will be exported every 5 minutes. 6. To automatically divide the export into separate files that can be stored on optical media (like a CD or DVD), select the Split file into sizes of: check box. Then, manually enter a maximum file size in MB or select a pre-configured option from the drop down list. 7. Click Start Export. 8.
Avigilon Control Center Core Client User Guide Figure A. Export tab for recorded video export 2. In the Format drop down list, select AVI video. 3. In the Camera to Export list, select the camera video you want to export. 4. Enter the time range you want to export. The time range is highlighted on the Timeline by black time range markers. You can also drag the time range markers to modify the time range. 5.
Exporting Export one image every __ min __sec Select this option to control the time between each exported video image. For example, if you enter 5 min. 0 sec., only one image will be exported every 5 minutes. 6. In the Encoder field, select the compression used. The VC-1 (Windows Media Video) compression is included by default because it is tailored for high-resolution AVI encoding. 7. In the Quality drop down list, select the exported image quality level. 8.
Avigilon Control Center Core Client User Guide Figure A. Export tab for still image export 2. In the Format drop down list, select PNG Images, JPEG Images, or TIFF Images. 3. In the Camera to Export list, select the camera video you want to export. 4. Enter the time range you want to export. The time range is highlighted on the Timeline by black time range markers. You can also drag the time range markers to modify the time range. 5.
Exporting Export one image every __ min __sec Select this option to control the time between each exported video image. For example, if you enter 5 min. 0 sec., only one image will be exported every 5 minutes. 6. Select the Export at most __ images check box and enter a number to limit the amount of images that are exported. 7. (JPEG only) In the Quality drop down list, select the exported image quality level. 8. In the Resolution field, select a resolution for the video image.
Avigilon Control Center Core Client User Guide Figure A. Export tab for still image export 2. In the Format drop down list, select Print Image or PDF File. 3. In the Camera to Export list, select the camera video you want to export. 4. In the Time field, enter the exact date and time of the video image you want to export. 5. Click Change Image Region... to only export part of the video image. In the Change Image Region dialog box, move and resize the green overlay then click OK.
Exporting 8. Click Add Export Notes to add notes about the exported image. The notes are added below the image. 9. Click Display Adjustments to adjust the gamma, black level and/or white level. 10. Click Start Export. 11. In the Save As dialog box, name the export file and click Save. The Preview area displays the video you are exporting. 12. When the export is complete, click OK.