
Manual


Avigilon Control Center Core Client User Guide
78
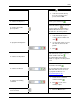
6.
a. In the Preset column, select a preset from the drop down list.
b. In the Move Speed column, enter how fast you want the PTZ camera to move to this
preset. The speed is 80% by default.
c. In the View Time column, enter the amount of time you want the PTZ camera to stay at
this preset position. The view time is 10 seconds by default.
d. Repeat step 7 until all the presets for this tour have been added.
7. To remove a preset, select the preset then click .
8. To re-order a preset, select the preset then click or . The preset order only affects tours
that use Sequential mode.
9. Click OK to save the tour.
Triggering Manual Recording
Cameras are set to follow a recording schedule. If an event occurs outside the camera's recording
schedule, you can click the record indicator icon to force the camera to record the event. See Schedule
for more information about recording schedules.
The Record Indicator overlay must be enabled for manual recording to work. See Displaying Video
Overlays for more information.
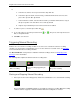
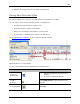
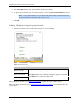
The following table explains the different camera recording states.
Blue = recording
Red = recording triggered by an
event
Grey = not recording
Starting and Stopping Manual Recording
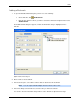
In the top-left corner of the image panel, click the Record Indicator icon to start manual recording.
The record indicator is highlighted in blue to show that the camera is recording. Manual recording
continues until it is stopped, or until the maximum manual recording time is reached.