Specifications
Table Of Contents
- Contents
- Introduction
- Installation and Authorization
- Session and Track Features
- Advanced Editing Features
- Advanced Automation Features
- AutoJoin with Latch Mode
- Touch/Latch Mode
- Trim Mode
- Composite Automation Playlist
- Copy Track Automation to Sends
- AutoMatch
- Prime Controls for Writing Automation in Latch Mode
- Glide Automation
- Trim Automation
- Write Automation to the Start, End, or All of a Track or Selection
- Write Automation to the Next Breakpoint or to the Punch Point
- Overwrite or Extend Mute Automation
- Snapshot Automation
- Preview Automation
- Capture Automation
- VCA Master Track Automation
- Surround Features
- Pro Tools Audio Connections for 5.1 Mixing
- Configuring Pro Tools for Multichannel Sessions
- Default I/O Selectors in I/O Setup
- 5.1 Track Layouts, Routing, and Metering
- Routing Audio for Surround Mixing
- Multichannel Audio Tracks
- Multichannel Signal Routing
- Paths in Surround Mixes
- Example Paths and Signal Routing for a Surround Mix
- Introduction to Pro Tools Surround Panning
- Output Windows
- Surround Panner Controls
- Panning Modes
- Divergence and Center Percentage
- LFE Faders in Multichannel Panners
- Pan Playlists
- Surround Scope Plug-In
- Video Features
- Included Plug-Ins
- Index

Complete Production Toolkit 2 Guide60
Capture Automation
You can capture current automation values at
one location in a session and quickly apply
them in another location with the Capture and
Punch Capture commands. The Capture com-
mand temporarily stores the value of all controls
currently writing automation, and the Punch
Capture commands writes those stored values to
all enabled automation types.
ICON Systems allow for the capture of up to
48 different values, or snapshots.
All other systems allow for the capture of a
single value.
Capturing Automation Values
You can capture the current automation values
of actively writing controls.
To capture automation values:
1 Make sure all tracks whose automation values
you want to capture are in a write-enabled state
(Write, Touch, Latch, Touch/Latch or Latch).
2 Make sure the automation types you want to
capture are enabled in the Automation window
(Volume, Pan, Mute, Send level, Send pan, Send
mute, or Plug-In).
3 Start playback. When you reach a location
where you want to capture the current automa-
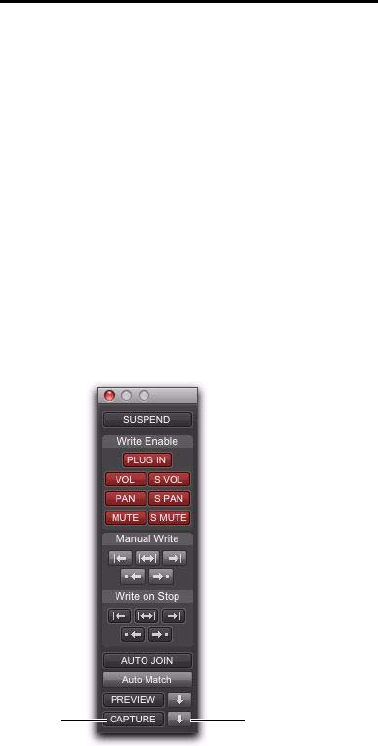
tion states, click the Capture button in the Auto-
mation window.
The Punch Capture button in the Automation
window lights to indicate a captured value is
available to punch.
Capture controls in the Automation window
Capture
Punch
Capture


