
Specifications


Table Of Contents
- Contents
- Introduction
- Installation and Authorization
- Session and Track Features
- Advanced Editing Features
- Advanced Automation Features
- AutoJoin with Latch Mode
- Touch/Latch Mode
- Trim Mode
- Composite Automation Playlist
- Copy Track Automation to Sends
- AutoMatch
- Prime Controls for Writing Automation in Latch Mode
- Glide Automation
- Trim Automation
- Write Automation to the Start, End, or All of a Track or Selection
- Write Automation to the Next Breakpoint or to the Punch Point
- Overwrite or Extend Mute Automation
- Snapshot Automation
- Preview Automation
- Capture Automation
- VCA Master Track Automation
- Surround Features
- Pro Tools Audio Connections for 5.1 Mixing
- Configuring Pro Tools for Multichannel Sessions
- Default I/O Selectors in I/O Setup
- 5.1 Track Layouts, Routing, and Metering
- Routing Audio for Surround Mixing
- Multichannel Audio Tracks
- Multichannel Signal Routing
- Paths in Surround Mixes
- Example Paths and Signal Routing for a Surround Mix
- Introduction to Pro Tools Surround Panning
- Output Windows
- Surround Panner Controls
- Panning Modes
- Divergence and Center Percentage
- LFE Faders in Multichannel Panners
- Pan Playlists
- Surround Scope Plug-In
- Video Features
- Included Plug-Ins
- Index
Chapter 3: Session and Track Features 19
Numeric Keypad Set to
Shuttle
Pro Tools offers another form of shuttling, dif-
ferent from that of Shuttle Lock mode. With the
Numeric Keypad mode set to Shuttle, playback
of the current Edit selection is triggered by press-
ing and holding the keys on the numeric key-
pad—playback stops once the keys are released.
Various playback speeds are available in both
forward and reverse. In this mode, pre- and post-
roll are ignored.
To shuttle with the Numeric Keypad mode set to
Shuttle:
1 Choose Setup > Preferences and click the Oper-
ation tab.
2 Set the Numeric Keypad mode to Shuttle and
click OK.
3 With the Selector tool, click in the track where
you want playback to begin. To shuttle on two
tracks, Shift-click in a second track.
4 Press and hold any of the following keys (or
key combinations) on the numeric keypad to
trigger playback.
5 Press a different key to switch the playback di-
rection or speed. Release to stop.
AutoFades
Pro Tools can automatically apply real-time
fade-ins and fade-outs to all region boundaries
in the session. Specify the duration (0 to 10 ms)
for automatic real-time fades with the Auto Re-
gion Fade In/Out Length preference in the Opera-
tion Preferences page). These fade-ins and fade-
outs are performed during playback and do not
appear in the Edit window, and are not written
to disk.
The automatic fade-in/out option also has an ef-
fect on Voice borrowing in a session. Whenever
a lower-priority virtual track “pops thru” a si-
lence in a higher-priority track on the same
voice, a fade-in and fade-out is applied to the
transition.
This feature is especially useful in post produc-
tion situations such as dialogue tracking. For ex-
ample, you can assign both a dialogue track and
a “room tone” track with matching background
to the same voice. You can then set the AutoFade
option to a moderate length (4 ms or so) so that
whenever a silence occurs in the dialog, play-
back switches smoothly to and from the back-
ground track without clicks or pops.
Using automatic fade-ins/outs saves you the
trouble of editing to zero-crossings or creating
numerous rendered fades in order to eliminate
clicks or pops in playback. However, since these
autofades are not written to disk, those clicks or
pops still exist in the underlying sound file.
Consequently, those anomalies still appear if
the Duplicate AudioSuite plug-in or the Export
Regions As Files command (from the Region
List) are used to duplicate multiple regions as a
continuous file. To render these real-time auto
fades to disk, choose File > Bounce to > Disk.
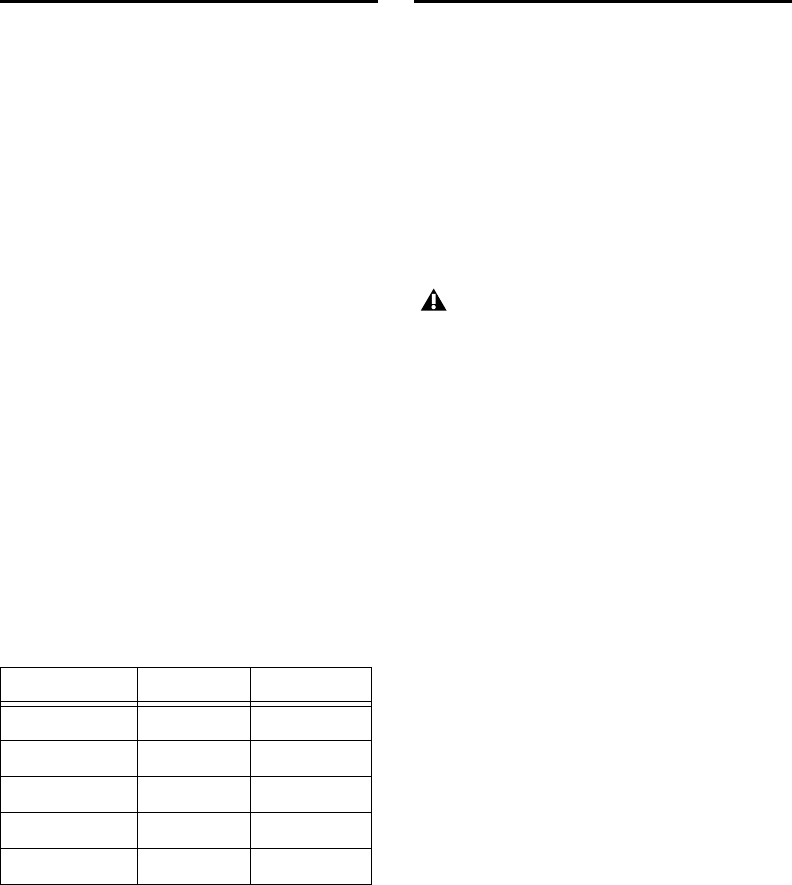
Shuttle Speed Rewind Key Forward Key
1 X Speed 4 6
4 X Speed 7 9
1/4 X Speed 1 3
1/2 X Speed 4+5 5+6
2 X Speed 7+8 8+9
AutoFades are not applied to AudioSuite
processing.