
Specifications


Table Of Contents
- Contents
- Introduction
- Installation and Authorization
- Session and Track Features
- Advanced Editing Features
- Advanced Automation Features
- AutoJoin with Latch Mode
- Touch/Latch Mode
- Trim Mode
- Composite Automation Playlist
- Copy Track Automation to Sends
- AutoMatch
- Prime Controls for Writing Automation in Latch Mode
- Glide Automation
- Trim Automation
- Write Automation to the Start, End, or All of a Track or Selection
- Write Automation to the Next Breakpoint or to the Punch Point
- Overwrite or Extend Mute Automation
- Snapshot Automation
- Preview Automation
- Capture Automation
- VCA Master Track Automation
- Surround Features
- Pro Tools Audio Connections for 5.1 Mixing
- Configuring Pro Tools for Multichannel Sessions
- Default I/O Selectors in I/O Setup
- 5.1 Track Layouts, Routing, and Metering
- Routing Audio for Surround Mixing
- Multichannel Audio Tracks
- Multichannel Signal Routing
- Paths in Surround Mixes
- Example Paths and Signal Routing for a Surround Mix
- Introduction to Pro Tools Surround Panning
- Output Windows
- Surround Panner Controls
- Panning Modes
- Divergence and Center Percentage
- LFE Faders in Multichannel Panners
- Pan Playlists
- Surround Scope Plug-In
- Video Features
- Included Plug-Ins
- Index
Chapter 7: Video Features 103
Selecting and Editing Across
Multiple Audio and Video Tracks
You can create a selection across multiple audio
and video tracks, and cut, copy, or paste audio
and video simultaneously.
Audio and video that is selected and cut, copied,
or pasted follow the current Edit mode.
Selecting within Video Frame
Boundaries
Pro Tools does not let you select, play back, or
edit a partial video frame. The following rules
apply when selecting or editing video:
• When you make a selection in a video track,
the selection boundaries follow the current
Grid setting but round to the nearest video
frame boundary, as follows:
• If the selection includes more than half of a
video frame, the full video frame is in-
cluded within the selection.
• If the selection includes less than half of a
video frame, that video frame is not in-
cluded in a video selection.
• When you paste a selection containing video
to a video track, the insertion point automat-
ically aligns with the closest video frame
boundary.
Using the Insert Silence Command
to Insert Space in Video Tracks
The Insert Silence command lets you make a se-
lection on a track (or tracks) and insert precisely
that amount of space. You can also select across
video and audio tracks, and use the Insert Si-
lence command to insert audio silence and
space simultaneously.
In Shuffle mode, all video data on the track is
shuffled later in the track by an amount equal to
the selection. In Slip, Grid, or Spot mode, the In-
sert Silence command works just like the Edit >
Clear command.
To insert space into a video track:
1 Make a selection in a track or tracks. The
length of the selection determines the duration
of the space inserted.
2 Choose Edit > Insert Silence.
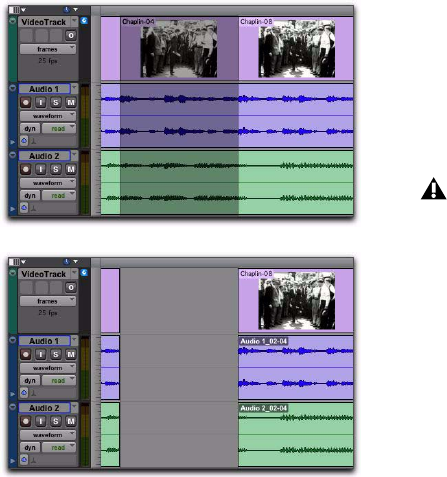
Selecting and editing across multiple tracks (Slip mode
shown)
before
after
When you paste audio and video simulta-
neously, this video frame re-alignment may
result in the audio not being positioned ex-
actly where you placed it. A warning dialog
displays when this occurs.