
Specifications


Table Of Contents
- Contents
- Introduction
- Installation and Authorization
- Session and Track Features
- Advanced Editing Features
- Advanced Automation Features
- AutoJoin with Latch Mode
- Touch/Latch Mode
- Trim Mode
- Composite Automation Playlist
- Copy Track Automation to Sends
- AutoMatch
- Prime Controls for Writing Automation in Latch Mode
- Glide Automation
- Trim Automation
- Write Automation to the Start, End, or All of a Track or Selection
- Write Automation to the Next Breakpoint or to the Punch Point
- Overwrite or Extend Mute Automation
- Snapshot Automation
- Preview Automation
- Capture Automation
- VCA Master Track Automation
- Surround Features
- Pro Tools Audio Connections for 5.1 Mixing
- Configuring Pro Tools for Multichannel Sessions
- Default I/O Selectors in I/O Setup
- 5.1 Track Layouts, Routing, and Metering
- Routing Audio for Surround Mixing
- Multichannel Audio Tracks
- Multichannel Signal Routing
- Paths in Surround Mixes
- Example Paths and Signal Routing for a Surround Mix
- Introduction to Pro Tools Surround Panning
- Output Windows
- Surround Panner Controls
- Panning Modes
- Divergence and Center Percentage
- LFE Faders in Multichannel Panners
- Pan Playlists
- Surround Scope Plug-In
- Video Features
- Included Plug-Ins
- Index
Complete Production Toolkit 2 Guide96
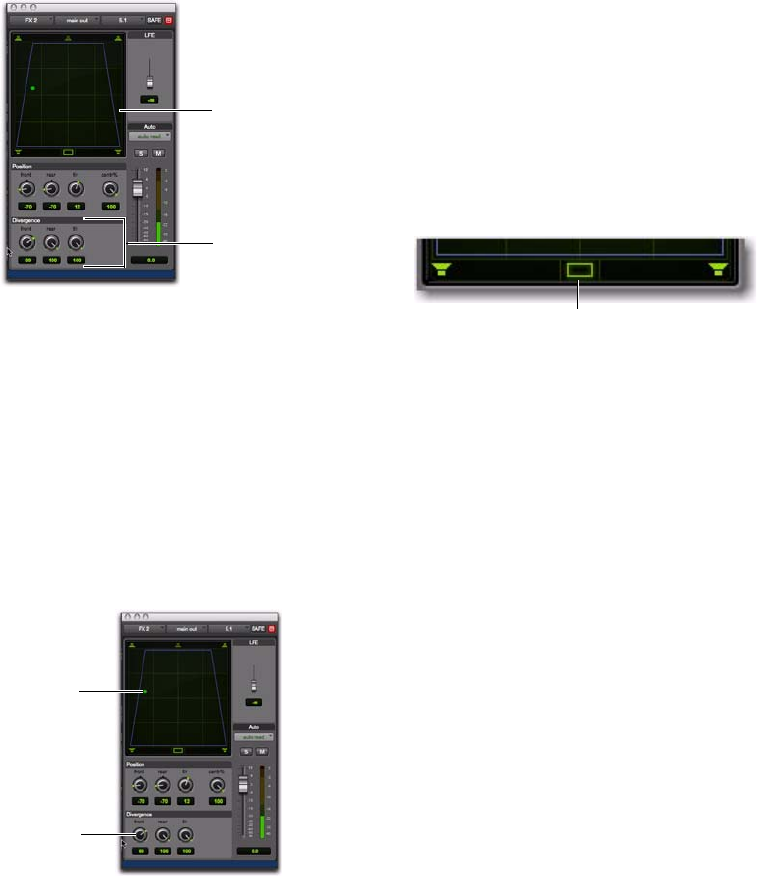
Divergence
In the Panner Grid, the current divergence val-
ues are displayed using a purple outline.
By default, Pro Tools surround panners are
100% or fully divergent, meaning that a signal
that is panned completely to one speaker will
only be audible in that speaker.
Lower divergence settings result in a progres-
sively wider source signal. When Divergence is
less than 100%, tracks will be routed to neigh-
boring speakers to some degree, even when the
Pan Location cursor is positioned next to a sin-
gle speaker.
To adjust divergence:
Adjust the Front, Rear, and Front/Rear Diver-
gence controls as necessary.
Divergence Editing Mode
In Divergence Editing mode, you can adjust the
divergence boundaries by dragging directly in
the Divergence Grid.
To adjust divergence graphically:
1 Click on the Panning Mode button until the
Divergence Editing icon is displayed.
2 Drag in the Grid to resize the divergence
boundaries.
Center % (Percentage)
Center Percentage controls whether there is a
discrete center channel for the track or a phan-
tom center channel.
Center Percentage Example
In film and video production, the center chan-
nel often contains dialog. To enhance the clarity
of dialog, it is often beneficial to keep elements
such as music out of the center speaker. By re-
ducing the Center Percentage on music tracks,
music panned to the front of the sound field can
be panned to only the left and right speakers,
forcing them to have a variable phantom center
image.
Divergence display and controls
Front Divergence at less than 100% for wider panning
Divergence display
Divergence controls
Front
Divergence
Pan Location
cursor
Panner Mode button set to Divergence Editing
Divergence Editing icon