
Setup guide

Chapter 2 Configuring the Windows Ethernet Client
24
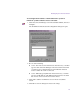
6. Do one of the following:
t If you are using static IP addressing, specify the IP address
assigned by your network administrator:
a. Select “Use the following IP address.”
b. Type a unique IP address in the IP address text box, and press
Enter. The subnet mask should fill in automatically. If not,
type the subnet mask in the Subnet mask text box.
c. If necessary, type a gateway IP address in the Default gateway
text box.
d. Continue with step 7.
t If you are using dynamic IP addressing and are obtaining the DNS
server addresses automatically:
a. Select “Obtain an IP address automatically.”
b. Select “Obtain DNS server address automatically.”
c. Continue with step 7.
t If you are using dynamic address allocation and must manually
specify the addresses of preferred and alternate DNS servers
obtained from the network administrator:
a. Select “Obtain an IP address automatically.”
b. Select “Use the following DNS server addresses.”
c. Type the Preferred and Alternate DNS server addresses in the
appropriate text boxes.
d. Continue with step 7.
7. Click OK to set the changes.
8. Close all open windows and dialog boxes.
9. Click the Start button, and select Shut Down.
The Shut Down Windows dialog box opens.
10. Select Restart, and then click OK to reboot the Windows Ethernet
client.
The client restarts with its new IP address.