
User guide


Table Of Contents
- Contents
- Introduction to System 5
- Master Facilities and Channel Strip
- Control, Layouts and Snapshots, and Linking
- Chapter 8: Machine Control (S5P Only)
- Chapter 9: Control Groups and Multi Format Masters
- Chapter 10: Layouts and Snapshots
- Chapter 11: Linking (S5P Only)
- Chapter 12: Dynamic Automation (S5P Only)
- Chapter 13: GPI/O Event System
- Chapter 14: CM403 Film/Post Module (S5 Only)
- Chapter 15: Hybrid Pilot and System 5 Fusion Options
- Appendix A: Compliance Information
System 5 Digital Audio Mixing System User Guide14
To create a new Title:
1 Click the Drives tab to see a list of available Drives.
2 Select the desired Drive and click the Projects tab.
– or –
Double-click the Drive.
The Projects Window appears with a list of Projects on that Drive.
3 Select a Project and click the Titles tab.
– or –
Double-click the Project.
The Titles Window appears with all Titles in that Project.
4 Click the New button on the right side of the Titles window.
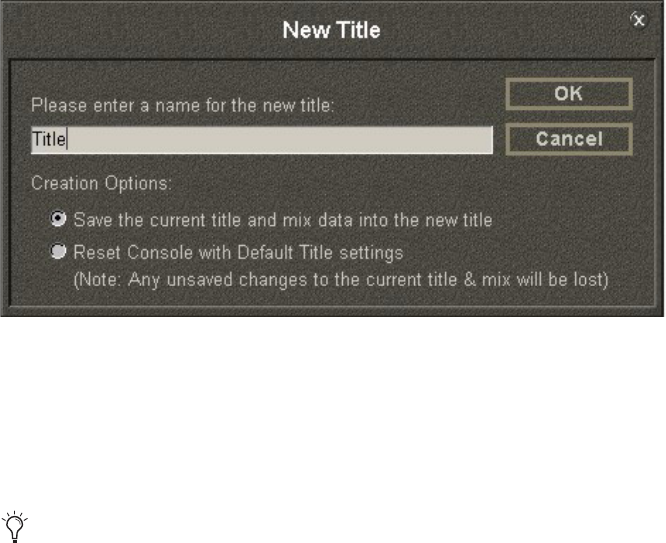
The New Title dialog appears.
5 Name the new Title and select one of the Creation Options radio buttons:
• Save the current title and mix data into the new title: Uses the current state of the console for new Title. If a mix is open, that mix
is saved in the new title.
• Reset Console with Default Title settings: Uses settings for Default Title to reset console. See page 17 to see how to change the de-
fault settings. There is no mix in the new Title; one must be explicitly created.
To open an existing Title:
1 Click the Drives tab to see a list of available Drives.
2 Select the desired Drive and click the Projects tab.
– or –
Double-click the Drive.
The Projects Window appears with a list of Projects on that Drive.
3 Select a Project and click the Titles tab.
– or –
Double-click the Project.
The Titles Window appears with all Titles in that Project.
New Title dialog
A Title appears as a folder but is actually a single file with multiple Mixes.