
Install guide


Media Application Controller Multiple DAW Install Guide Hardware Connections and MC Client Setup
6
1.2 Network Configuration
1.2.1 MC Standalone
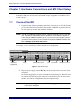
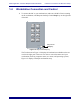
Using the RJ-45 Ethernet (included) cables, connect your workstations to the LAN
ports on the Netgear RP614 router. Then connect the MC to one of the other LAN ports
on the Netgear router. Because the Netgear has four LAN ports, you must use an addi-
tional Ethernet switch if you have more than three workstations.
NOTE: You have now created a small local area network comprised of just the MC
and your workstations.
The MC ships with DHCP enabled, allowing it to automatically obtain an IP address.
The Netgear RP614 has a DHCP server and hands out IP addresses to the devices con-
nected to its LAN ports (the MC and your workstations). This allows for easy plug and
play network configuration. For this reason, the Netgear router must be turned on be-
fore the MC and your workstation.
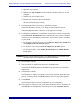
1.2.2 System 5-MC
1. Connect the MC and CM408T modules to LAN ports on the SonicWALL 1260
router.
2. Connect your workstations to LAN ports on the SonicWALL.
The MC ships with DHCP enabled, allowing it to automatically obtain an IP
address. The SonicWALL ships from Euphonix with its DHCP server enabled,
such that it hands out IP addresses to the MC, CM408T modules, and your
workstations. For this reason the SonicWALL must be turned on before the
MC, CM408T modules, and your workstations.
1.3 EuCon Software Installation
Follow these instructions to install the EuCon Software on each workstation:
1. Insert the Euphonix MC Software Installation CD in your workstation’s CD/
DVD drive.
2. In Mac OS X, double-click the CD icon on the desktop, and double-click the
EuConWS package.
The Install program launches. Proceed to Step 4.
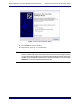
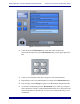
3. In Windows, if AutoRun is enabled, the setup program starts from the CD au-
tomatically. If AutoRun is not enabled: