
Avid TRIAD Evo B6.1 Instructions
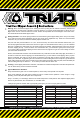
Table Of Contents

Warning: Don’t over-heat the slipper clutch. Setting the clutch by xing the rear wheels is extremely stressful and
you should only do short bursts of throttle to check the setting. If you cannot get the setting after 3 checks, let your
slipper clutch cool for 5 minutes and then re-check. AVID is not responsible for over-heating the clutch from exces-
sive full-throttle and xed wheel slipper action.
Setting Procedure: Pre-set the spring tension as recommended to get the slipper setting close. Get your car ready
to run and remove the slipper adjustment plug (to give access to the adjustment nut). There are 2 recommended
methods to set your clutch, the track test and the popular “wheelie” test .
First, the track test (recommended for 17.5, SC, and stock racers). This is the least stressful method since your
tires can slip against the track surface if the clutch is too tight. In a secluded area of the track (or you can substitute
astro-turf or a parking lot), stand near your car and do some punch-o starts. Adjust the tension so that you can hear
the clutch slipping for only 1-2 feet on launch from a stand-still. Also, you should have good power for the jumps.
If your clutch makes a high pitch slipping sound for more than 2 feet, tighten it to get the correct setting. Re-check
your clutch after the rst 2 runs.
Second, the wheelie test should be used for Mod Racers only. Hold both rear tires and slowly apply the throttle 1-2
seconds to conrm the clutch is slipping (not a full throttle burst). If you can hear the clutch slipping, then try a quick
burst to full throttle. The goal is to set the clutch so that there is enough drag to lift the front tires about 2 inches
(50mm) o of the table. Try tightening the nut if needed to increase the drag and re-check. Adjust to get the desired
result, taking breaks to let the clutch cool after every 3 full throttle burst checks. With new pads, there will initially be
a bit more drag until they are broken in… so re-check your clutch after the rst 2 runs.
Cleaning: As the slipper pads break-in and wear, a small amount of white PTFE powder is normal as the pads wear.
You can brush o any excess in-between re-builds.
Typical Maintenance Schedule:
Every week: Remove gear cover for visual inspection; brush o any white powder from the pads.
Every month: Manually spin gear when holding rear tires to conrm smooth operation. If clutch is tight or rough
operating, remove all parts and replace worn components.
Every 1-2 months ( or 8 track days): Remove nut and all components. Check pads for wear. Replace slipper pads if
there is any discoloration, dirt contamination, or noticeable wear.
*Change spur gears as needed. With a good quality pinion gear, you can run a spur gear for months.
1
2
3
4
Visit us at avidrc.com | Follow us on facebook.com/avidrc or twitter.com/avidrc
Visit us at avidrc.com | Follow us on facebook.com/avidrc or twitter.com/avidrc
Part Number Description Qty
AV1020-4-MOD Triad EVO Slipper | Mod 81/84 | B6.1 Kit
AV1020-4-STK Triad EVO Slipper | Stk 72/76 | B6.1 Kit
AV1020-4-UK Triad EVO Slipper | Uk 78/81 | B6.1 Kit
AV1020-4-YOK Triad EVO Slipper | 72/78 | YZ-2 Kit
AV1020-1-4 Triad EVO Drive Plates | YZ-2 3
AV1020-4-RBC Triad Rebuild / Conversion | B6.1 Pack
AV1081-TRD Triad CPD Slipper Pads 3
AV1020-2-R Triad Drive Pads | Red 3
AV1061-4-BSC Triad Direct Drive | Basics | B6.1 Pack
AV1061-4-KIT Triad Direct Drive | 69/72 | B6.1 Kit
AV1095 B6.1 Slipper Screw | Titanium 1
Part Number Description Qty
AV1020-66 Triad Slipper Gear, 66 T 1
AV1020-69 Triad Slipper Gear, 69 T 1
AV1020-72 Triad Slipper Gear, 72 T 1
AV1020-75 Triad Slipper Gear, 75 T 1
AV1020-76 Triad Slipper Gear, 76 T 1
AV1020-78 Triad Slipper Gear, 78 T 1
AV1020-81 Triad Slipper Gear, 81 T 1
AV1020-84 Triad Slipper Gear, 84 T 1
AV1020-87 Triad Slipper Gear, 87 T 1