
Installation Manual


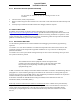


Table Of Contents
- 17001_0_Frt-Matr
- 17001_1_Gen-Info
- 1.1 INTRODUCTION
- 1.2 FUNCTIONAL DESCRIPTION
- 1.2.1 Software Release Summary
- 1.2.2 Transponder Functional Overview
- 1.2.3 GPS Functional Overview
- 1.2.4 Lightning Detection (optional)
- 1.2.5 ADS-B System Overview
- 1.2.6 Traffic Display Functional Overview
- 1.2.7 FISB System Overview
- 1.2.8 Traffic Awareness System (option) Overview
- 1.2.9 ADS-B Traffic Advisory System Overview (optional)
- 1.2.10 Traffic Alert and Collision Avoidance System (option) Overview
- 1.2.11 Terrain Awareness and Warning System Overview (optional)
- 1.2.12 TerrainVisionTM
- 1.2.13 Discrete Inputs and Outputs Functional Overview
- 1.3 EQUIPMENT DESCRIPTIONS
- 1.4 INTERFACES
- 1.4.1 ADS-B Out Fail
- 1.4.2 AHRS Input
- 1.4.3 Altitude Encoder Input
- 1.4.4 Audio Out
- 1.4.5 Standby Mode
- 1.4.6 Audio Mute In and Out
- 1.4.7 Audio Acknowledge
- 1.4.8 RF Suppression Input/output
- 1.4.9 Traffic Alert
- 1.4.10 TAWS Caution and Warning Alert
- 1.4.11 WiFi Interface
- 1.4.12 WOW Input
- 1.4.13 Maintenance Interface
- 1.4.14 GPS Antenna
- 1.4.15 L-Band (978/1030/1090 MHz) Antenna
- 1.4.16 Directional Antenna
- 1.4.17 Traffic Display
- 1.4.18 Weather Display
- 1.4.19 Lightning Detection (WX-500)
- 1.4.20 Control Panel
- 1.5 INSTALLATION CONSIDERATIONS
- 1.6 SPECIFICATIONS
- 1.7 TSO INFORMATION
- 1.8 MODIFICATIONS
- 1.9 SOFTWARE REVISIONS
- 1.10 EQUIPMENT REQUIRED NOT SUPPLIED
- 1.11 EQUIPMENT INTERFACES
- 1.12 OBTAINING SOFTWARE
- 1.13 INSTALLATION PROCEDURE FOR LYNXMSS USB DRIVER
- 1.14 INSTALLATION APPROVAL AND LIMITATIONS
- 17001_2_Instal
- 2.1 INTRODUCTION
- 2.2 UNPACKING AND INSPECTING
- 2.3 INSTALLATION PROCEDURES
- 2.3.1 Panel Mount Location
- 2.3.2 Remote Mount Location
- 2.3.3 Electrical Connections
- 2.3.4 Compatible Equipment Installation Information
- 2.3.5 Discrete Inputs and Output Connections
- 2.3.6 Installation Guidelines for the DCM
- 2.3.7 P1 Mating Connector Assembly
- 2.3.8 Panel mount NGT-9000 Installation
- 2.3.9 Remote Mounted Lynx NGT-9000 Installation
- 2.3.10 CP-2500 Installation Guidelines
- 2.3.11 Antenna Installation Guidelines
- 17001_3_Inst_Check
- 3.1 INTRODUCTION
- 3.2 BASIC OPERATION
- 3.3 MPC (MAT) OPERATION
- 3.4 INSTALLATION PROCEDURE FOR LYNXMSS USB DRIVER
- 3.5 MAINTENANCE MODE
- 3.6 VERIFY SOFTWARE VERSION
- 3.7 SELECT CONFIGURATION OPTIONS
- 3.8 CALIBRATION SETUP
- 3.9 INTERFACE CHECK
- 3.10 SETUP PIM-9000 WIFI MODULE
- 3.11 INSTALLATION CHECKOUT
- 3.11.1 Functional Checks
- 3.11.2 Ground Checks
- 3.11.3 Electromagnetic Interference (E.M.I.) Check
- 3.11.4 Panel mount NGT-9000 Display Check
- 3.11.5 Flight Test
- 3.11.6 Installation Checkout Complete
- 17001_4_Maint
- 17001_5_App-A_signal
- A.1 INTRODUCTION
- A.2 INPUT AND OUTPUT INTERFACES
- A.2.1 Input Power
- A.2.2 RF Suppression Bus
- A.2.3 Audio Output
- A.2.4 Gillham Input (Altitude Input)
- A.2.5 RS-232 Interface
- A.2.6 RS-422 Interface
- A.2.7 ARINC 429 Input
- A.2.8 ARINC 429 Output
- A.2.9 Discrete Input
- A.2.10 Discrete Output
- A.2.11 I2C Serial Bus (Detachable Configuration Module)
- A.2.12 Antenna Connections
- A.3 PIN DEFINITION SUMMARY
- A.4 [J1 CONNECTOR]
- 17001_6_App-B_Environmental
- 17001_7_App-C_Compatibility
- 17001_8_App-D_TSO
- 17001_9_App-E_Questionaire

Lynx NGT-9000
Installation Manual
0040-17001-01 (Revision W) Maintenance Page 4-9
Table 4-1: Troubleshooting The Panel Mount NGT-9000
SYMPTOM
SCREEN
CAUSE/CORRECTIVE ACTIONS
• No data on the weather
display.
• ADS-
B Out Fail lamp is OFF.
Weather The FIS-B data is not being transmitted to the weather
display.
Note: NEXRAD data is only transmitted every 5 minutes.
CONUS data is only transmitted every 15 minutes.
1. No ground station is in range.
2. The ground station may not provide FIS-B service.
FIS-B No Coverage Indicator
It is located on the Weather
screens at the bottom center.
Note: It can be disabled via
configuration options.
Weather The No Coverage Indicator is shown on the weather display
for the following reasons:
1. No FIS-B data available in the area
• Aircraft is not within range of an ADS-B ground
station. Move aircraft in location where information
can be received.
2. UAT-In test fails (indicator seen after 15 minutes of
test failure)
• Try clearing the failure performing a warm startup
by tapping the Restart button or cycling power to
the unit.
• Check the L-Band antenna or cables for possible
errors.
• If the problem continues, replacement of the L-
Band antenna or the unit may be required. Contact
ACSS Field Service before removal.
• Display indicator
INITIALIZING (white text)
showing on FIS-B
application screen.
• ADS-B Out Fail lamp is Off
for 2 minutes and then
flashes (1 second On/Off)
indefinitely until a GPS
position is acquired.
• Compatible displays may
indicate “STANDBY” or
"DATA-FAIL" and WI-FI
information is not available.
Weather The indication is shown on the weather map indicating that
GPS is Acquiring (On Ground – no previous position fix).
1. This is a normal condition. It continues to be shown
until internal operations have completed. The GPS
may
need up to 4 minutes to provide a position after power
is applied to the unit.
2. The GPS signal may be weak. Move the aircraft into an
area where the unit can acquire the GPS signal.
3. Make sure nothing is covering or blocking the GPS
antenna.
4. Cycle power to the unit.
5. Check System Status Messages.
6. Check the MPC (MAT) fault log.
7. Check for a short to ground on the GPS Antenna pin.
8. Observe the GPS Receiver Information MPC (Service –
GPS) for correct signal strength (C/No) of the GPS
satellites. This has a range from 30 dB to 50 dB. If this
is not the case, then check if the antenna cable loss is
more than 10 dB.
9. Check if 12V power is available at GPS antenna port,
when the unit is powered on.
10. Contact ACSS Field Service before removal of unit.