
User manual


A V G 9.0 Internet Sec urity Bus iness Edition © 201 0 C opyright A V G T ec hnologies C Z, s .r.o. A ll rights res erved. 19 1
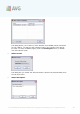
Connect to AVG DataCenter item.
2. Enter a new server address and port number, alternatively also a username and
password, if required.
3. Confirm your choice by clicking the OK button.
10.6. Proxy Server
This chapter describes internet proxy server related issues.
Generally, the proxy server term refers to a server, typically on a private network that
allows access to external network resources.
Within the AVG Internet Security Business Edition, you have basically two options for
proxy server usage:
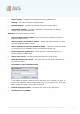
1. Use your own proxy server to connect to the AVG update servers. In this case,
you need to define the proxy server settings for all your stations. To do so,
follow these steps:
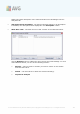
· In the AVG Admin Console select the Shared settings for stations item
from the upper menu Tools.
· Navigate to Update and select the Proxy item.
· In the right part of the dialog select Use proxy and define Manual or Auto
configuration, depending on your network settings.
· Click OK to confirm the changes.
· Wait until all stations have been synchronized. (Default synchronization
period is 60 minutes.)
Alternatively, you can force immediate synchronization of all stations: Right-click on
the Stations node and from the context menu select Synchronize settings.
2. Deploy the UpdateProxy role of the AVG Admin Server to work as a mediator
(i.e. a proxy server) between the official AVG update servers and your stations.
It downloads all necessary update files requested by AVG stations connected to
your DataCenter. By using this, you will preserve bandwidth. You can also
optionally deploy more than one UpdateProxy server and split the load among
two or more servers (depending on your network size).
To deploy the UpdateProxy role to your AVG Admin Server, simply select from
the Windows Start menu/All programs/AVG 9.0 Remote Administration/
AVG Admin Server Deployment Wizard item and in the second step of the
wizard tick the checkbox UpdateProxy role and complete the rest of the steps.