
User manual

A V G 9.0 Internet Sec urity Bus iness Edition © 201 0 C opyright A V G T ec hnologies C Z, s .r.o. A ll rights res erved. 20 3
Once you have your new AVG Datacenter ready, you need to provide a new
connection string for all stations you wish to connect to it.
To reflect the new settings of your stations, follow these steps:
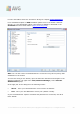
1. In the AVG Admin Console select Tools from the upper main menu and choose
the Shared settings for stations item.
2. Select the Remote Administration.
3. Fill in the new server address and port number. Close the dialog by clicking the
OK button.
4. Wait until all stations get synchronized. (Default synchronization period is 60
minutes.)
Alternatively, you can force immediate synchronization of all stations: In the
navigation tree right-click on the Stations node and select Synchronize settings
from the context menu.
To verify successful migration of the stations, connect to your new AVG DataCenter:
1. In the AVG Admin Console click on the upper menu DataCenter and select
the Connect To AVG DataCenter item.
2. Enter the new server address and port number, alternatively also a username
and password, if required.
3. Confirm your choice by clicking the OK button.
You can also export the whole existing content of your AVG DataCenter and then
import it to the newly created one. To do so, follow these steps:
Note: This procedure applies to version 9.0!
1. To export the existing AVG DataCenter content navigate to the DataCenter/
Database export upper menu item.
2. You will be asked to choose a destination folder. Once you confirm your choice,
the export will begin.
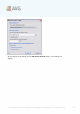
3. To import the data back to a new AVG DataCenter, start AVG Admin Server
Deployment Wizard on the server, where you wish to import the data back. Go
through the wizard and in the Database update/creation step select Create
new empty DataCenter database.
4. Continue to the Data import step, check the Import data into the database
from folder checkbox and fill-in the path to the recently exported/saved backup
folder.