
User manual
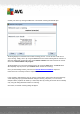

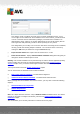

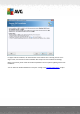


Table Of Contents
- Introduction
- AVG Internet Security Business Edition Installation
- AVG Admin Deployment Wizard
- AVG Network Installer Wizard Basic Mode
- AVG Network Installer Wizard Advanced Mode
- AVG Admin Console
- AVG Admin Server
- AVG Admin Lite
- AVG Settings Manager
- Configuration
- How to...
- How to Connect Stations to AVG Datacenter
- How to Migrate Stations from/to Different DataCenter
- How to Synchronize Stations
- How to solve Update related issues
- How to Change User Interface Language
- How to use Microsoft SQL Server database system
- How to Control station users actions
- Requests handling and status messages
- How to manage access rights
- How to maintain the DataCenter database
- List of AVG Setup Parameters
- AVG DataCenter
- Updates
- AVG Admin Server 2012 for Linux
- FAQ and Technical Support

A V G Internet Security Business Edition 2012 © 2012 C opyright A V G Tec hnologies C Z, s.r.o. A ll rights reserved. 14 1
Confirm your choice by clicking the OK button. The Network scanning window will open:
The dialog displays an overview of the network scanning process. You do not have to wait for it to
stop scanning - simply close it by using the Close button and continue working with the Console. To
open this dialog again, simply right-click on the Network installer node name and from the context
menu select Show network scan progress.
The dialog allows you to stop the scanning process by using the Abort button. The Pause button
will temporarily stop the process (use Continue button resume the scanning).
Once you finish adding stations, proceed to the Remote Network Installation chapter for
instructions how to remotely install the required stations.
If your network is domain-based, you can choose to add stations selected from the Active Directory.
A new dialog will pop up (standard Windows dialog for selecting computers). You can choose
multiple stations (separate the values by a semicolon) either by entering the station names manually
or by using the dialog advanced features for searching.
Once done, the network scanning dialog will appear: