
User manual


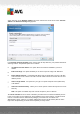


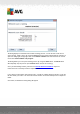
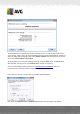
Table Of Contents
- Introduction
- AVG Internet Security Business Edition Installation
- AVG Admin Deployment Wizard
- AVG Network Installer Wizard Basic Mode
- AVG Network Installer Wizard Advanced Mode
- AVG Admin Console
- AVG Admin Server
- AVG Admin Lite
- AVG Settings Manager
- Configuration
- How to...
- How to Connect Stations to AVG Datacenter
- How to Migrate Stations from/to Different DataCenter
- How to Synchronize Stations
- How to solve Update related issues
- How to Change User Interface Language
- How to use Microsoft SQL Server database system
- How to Control station users actions
- Requests handling and status messages
- How to manage access rights
- How to maintain the DataCenter database
- List of AVG Setup Parameters
- AVG DataCenter
- Updates
- AVG Admin Server 2012 for Linux
- FAQ and Technical Support

A V G Internet Security Business Edition 2012 © 2012 C opyright A V G Tec hnologies C Z, s.r.o. A ll rights reserved. 13 2
If you want to send the report or notification by e-mail when it is generated, enable the Send e-mail
after report generation checkbox.
In order to be able to use the e-mail feature, you must first configure the SMTP settings in the AVG
Admin Server (E-mail tab).
Click on the AVG Admin Server settings to configure the SMTP/E-mail settings now.
Note: To learn more about configuring the AVG Admin Server settings for sending E-mail, see the E-
mail tab topic in the Configuration/AVG Admin Server Settings chapter.
If you have already previously configured the E-mail tab in the AVG Admin Server configuration, you
should see predefined values already in the correct fields. If not, please check the AVG Admin
Server settings or fill in your custom values.
If you want to receive reports directly as an attachment, enable the Send report as attachment
checkbox.
If you do not select to receive the report as an attachment, you will only receive a notification e-mail
and will have to review the report manually within the AVG Admin Console.
Once ready, proceed to the final screen by pressing the Next button.
In the next screen check, if all settings are correct and complete the process by pressing the Finish
button.
6.9.3. Generated Reports
This group contains a list of all currently generated reports.
To open a report, right-click on the chosen line and from the context menu select the Show item.
To delete a report right-click on the chosen line and from the context menu select the Remove item.
Once you have opened one of your generated reports, you can then also print it on your printer or
save it as a zip archive containing html files and related pictures.
6.9.4. Filtering
You can apply various listing filters to the Generated reports view. The filters are available by default
from the bottom left Filter panel.
The Filter panel is located by default in the bottom left part of the screen. If the panel is not visible,
you can activate it by clicking on the Filter window item in the View/Panels menu.
Within the text filters you can use simple wildcard asterisk character (*). The wildcard character
substitutes for any character or a string. For example Stat* string applied within the Station name
filter will display also Station01, Station02 etc.
The filtering options for the Generated reports are as follows:
Note: To use a filter, simply tick the checkbox next to its name and double click the line to insert a