AVG Internet Security Business Edition 2012 User Manual Document revision 2012.07 (3/1/2012) C opyright AVG Technologies C Z, s.r.o. All rights reserved. All other trademarks are the property of their respective owners. This product uses RSA Data Security, Inc. MD5 Message-Digest Algorithm, C opyright (C ) 1991-2, RSA Data Security, Inc. C reated 1991. This product uses code from C -SaC zech library, C opyright (c) 1996-2001 Jaromir Dolecek .
Contents ........................................................................................................................ 5 1. Introduction .......................................................................................................... 5 1.1 AVG Internet Security Business Edition scheme .......................................................................................................... 6 1.2 Key features and functions 7 1.3 Operating..................................................
52 4.5 Remote .......................................................................................................... network installation - final steps 54 4.6 Creation.......................................................................................................... of AVG Installation Script ........................................................................................................................ 60 5. AVG Network Installer Wizard Advanced Mode .....................................
.......................................................................................................... 204 10.5 Connection String 205 10.6 Proxy.......................................................................................................... Server .......................................................................................................... 206 10.7 AVG Admin Console .......................................................................................................... 216 10.
1. Introduction This user manual provides comprehensive documentation for AVG Internet Security Business Edition. Important notice: The document may contain references to other user guides, especially the Internet Security guide. If you are not familiar with the AVG User Interface and AVG advanced/Firewall settings we strongly recommend that you download all relevant guides in advance from the http://www.avg.com/ww-en website, Support Center/Download/Documentation section.
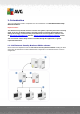
1) AVG DataCenter consists of a database, and AVG Admin Server. The AVG Admin Server performs the role of a mediator between the AVG DataCenter and AVG stations. The AVG Admin Console uses the AVG Admin Server to approach the AVG DataCenter database, and to centrally define settings for stations and system parameters. AVG stations approach the AVG Admin Server to read the setup parameters; and to save their currently defined setting and scan results into the AVG DataCenter.
Network communication between AVG Admin (AVG Admin Server) and stations is completely encrypted.
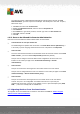
MS Windows Server 2003 SP1 MS Windows Server 2003 x64 MS Windows 2008 Server MS Windows 2008 Server x64 MS Windows Vista, all editions MS Windows Vista x64, all editions MS Windows 7, all editions MS Windows 7 x64, all editions The AVG Admin console, AVG Admin Server and related components are supported in the following operating systems: MS Windows XP Professional SP2 MS Windows XP Home SP2 MS Windows XP Professional x64 SP1 MS Windows Server 2003 SP1 MS Windows Server 2003 x64 MS Windows 2008 Server MS Wi
512 MB of RAM memory 1.5. Recommended Hardware Requirements Recommended hardware requirements for AVG Internet Security Business Edition are as follows: Intel Pentium CPU 1.8 GHz 900 MB of free hard drive space (plus up to 200 MB for downloaded installation package) 512 MB of RAM memory 1.6. Network Requirements To be able to successfully install AVG on stations remotely, it is necessary to take some steps in advance.
For proper functioning of WMI (Windows Management Instrumentation) used by the AVG Network Installer, you have to open the DCOM port. The DCOM port is TCP 135. To open it, follow these steps: 1. 2. 3. 4. 5. 6. Click Start, and then click Control Panel. Double-click Windows Firewall, and then click the Exceptions tab. Click Add Port. In the Name box, type DCOM_TCP135, and then type 135 in the Port number box. Click TCP, and then click OK. Click OK. 1.6.2.
2. AVG Internet Security Business Edition Installation In order to be able to remotely install AVG on stations, you must first install AVG 2012 Remote Administration and its components.
2.1.4. AVG Admin Lite AVG Admin Lite is the name given to a simplified installation of AVG Internet Security Business Edition, providing only a local update source and script AVG installations on stations, without the benefits of AVG DataCenter and AVG Admin Console. 2.1.5. AVG Admin Server The AVG Admin Server stores data in a database (AVG DataCenter) and performs the role of a mediator between the AVG DataCenter and stations. AVG Admin Server may also work as a local update source.
2.3. Welcome Dialog The welcome dialog appears in the language of the operating system to which AVG Internet Security Business Edition is being installed. You can switch to another language by using the roll-down menu. This dialog also offers the full wording of the AVG Internet Security Business Edition license agreement. You can either scroll down to read the text or click the Printable version button to open it in your internet browser window and optionally have the whole agreement printed.
2.4. License Activation In this dialog enter your License number. Click the Next button to continue. 2.5. Installation Type A V G I nternet Sec urity Bus ines s E dition 2 0 1 2 © 2 0 1 2 C opyright A V G T ec hnologies C Z, s .r.o. A ll rights res erved.
In this dialog select which type of Remote Administration you wish to install. You have the following options: Quick Install This is the recommended option. It will install the application with standard configuration and components. Custom Install This option allows you to select, which components you wish to install. Lite Install This choice installs the product with simplified wizards that contain predefined settings for UpdateProxy role only.
2.6. Custom Options If you chose Custom install in the Installation Type dialog, you will experience the following screen: You have to specify the destination folder where AVG Internet Security Business Edition (and its components) will be installed. If you want to select another directory, specify the directory path or choose a directory from your local disk by pressing the Browse button. Then proceed to select AVG Internet Security Business Edition components you want to install.
Press the Finis h button to finalize the installation. If the installation went through correctly, one of the following Wizards will launch automatically depending on your previous choices during the installation process: AVG Admin Deployment Wizard This Wizard will start automatically if you chose Quick or Custom installation in the Installation type dialog. For more information see the AVG Admin Deployment Wizard chapter.
3. AVG Admin Deployment Wizard The AVG Admin Server Deployment Wizard is launched immediately after the installation of AVG Internet Security Business Edition. It can also be launched any time later from the Start menu program folder, i.e. All programs/AVG 2012 Remote Administration/AVG Admin Server Deployment Wizard. The Wizard guides you through the configuration process for the AVG DataCenter database on a selected database engine.
Next button to proceed to the next step. Note: We strongly recommend you complete this wizard in order to mak e the AVG Admin Server run correctly. 3.2. Deploying multiple UpdateProxy roles Before you deploy AVG Internet Security Business Edition roles to your server, you may need to consider the following: You can deploy the UpdateProxy role to more than one server and distribute updates from different sources to avoid your server overloading or having bandwidth issues.
something). If there is a configuration problem, you will be briefly informed about the reasons, and the information will be highlighted in red color. In such cases you need to go through the whole wizard to correct the problem. In the Server roles section you must choose which server role(s) you want to run on this server. You need to select at least one option, but you can also select both.
Select the database system corresponding to your needs. These options are available: Firebird This solution is appropriate for smaller networks with up to 150 stations. The database is a standard part of AVG Internet Security Business Edition installation. Additionally, you can choose a specific database character set from the roll down menu corresponding to your language needs.
This database engine can serve over 1000 stations in large networks. It is not a standard part of AVG Internet Security Business Edition and a commercial license may be needed for use in a commercial environment. If you choose a database type that is different to the one you have been currently using, the Wizard can import the contents of the previously exported AVG DataCenter into the newly chosen database type. Continue to the Databases Overview chapter. 3.6.
Create new empty DataCenter database Select this option to create completely new database (the originally stored data will be lost). We strongly recommend to backup the DataCenter database before proceeding! On the other hand, if the DataCenter database will be outdated, you will be asked, if you wish to update the existing one or create a new one: Update existing DataCenter database This option will update the database to the current version.
Note: If you set an username and password here, you should also manually define the same values on all existing stations in order to allow them correctly connect to your Datacenter! Depending on your previous choices, you can continue to one of two dialogs: If you kept the existing database, continue to the UpdateProxy Role chapter.
Select the database system corresponding to your needs. These options are available: Firebird This solution is appropriate for smaller networks with up to 150 stations. The database is a standard part of AVG Internet Security Business Edition installation. Additionally, you can choose a specific database character set from the roll down menu corresponding to your language needs.
This database engine can serve over 1000 stations in large networks.. It is not a standard part of AVG Internet Security Business Edition and a commercial license may be needed for use in a commercial environment. If you choose a database type that is different to the one you have been currently using, the Wizard can import the contents of the previously exported AVG DataCenter into the newly chosen database type. Continue to the DataCenter Role - Databases Overview chapter. 3.7.
one instance installed on the station.
Administrator’s password – password for the database administrator - must be filled in. Database name - shows the predefined database name. Username - type in a preferred new login name for the database (to be used for AVG Admin Server connection). User password - type in a preferred new password for the database (to be used for AVG Admin Server connection).
Administrator’s username – database administrator user name - must be filled in. Administrator’s password – password for the database administrator - must be filled in. Instance name – enter your Oracle instance name. Username - shows the predefined login name for the database (to be used for AVG Admin Server connection) User password - type in a preferred new password for the database (to be used for AVG Admin Server connection) Press the Next button and continue to the next step - Data Import. 3.7.5.
Username - type in a preferred new login name for the database (to be used for AVG Admin Server connection) User password - type in a preferred new password for the database (to be used for AVG Admin Server connection) Please note the following information before proceeding: MySQL Server 5 uses max_allowed_packet variable to set the maximum size of one packet. Its default value is 1048576 bytes (1 MB) which is too low for AVG Admin Server to work properly in most cases.
3.8. DataCenter Role - Data Import Once you confirm your database selection, you can also choose to import some existing data into the newly created database. If your network supports Active Directory, you will experience these two options: Import stations from Active Directory This option will allow you to automatically import all station names from the Active Directory into the database. Later on you will be able to choose which stations to install.
Import data into the database from a folder To do so, tick the Import data into the database from folder checkbox. The folder selection field becomes available. Choose your backup folder by clicking this button folder, where the original files for import are stored. and find the If you are currently upgrading from the former 2011 version, you can import your AVG DataCenter 2011 data in this dialog. For more information please consult Importing Stations and Settings from AVG DataCenter 2011 chapter.
Note: If you set an username and password here, you should also manually define the same values on all existing stations in order to allow them correctly connect to your Datacenter! 3.10. UpdateProxy Role This dialog will appear, if you chose to deploy the UpdateProxy role in the Role Selection dialog. A V G I nternet Sec urity Bus ines s E dition 2 0 1 2 © 2 0 1 2 C opyright A V G T ec hnologies C Z, s .r.o. A ll rights res erved.
You must choose a folder, into which the update files will be downloaded and stored. If the folder does not exist, you will be asked if you want to create it. Click this button to select the folder. Once finished, click the Next button to continue. 3.10.1. Update Servers This dialog lets you choose update servers, from which the update files will be downloaded by AVG Admin Server (for further distribution). If you are unsure about these settings, we recommend keeping the default configuration.
If you for some reason do not wish to download Anti-Spam updates, uncheck the Allow downloading of Anti-Spam updates item (only available for stations with AVG 2012). This check box indicates, that Anti-Spam updates will be downloaded directly from the Mailshell servers. Additional information about the Anti-Spam updates can be found in the Configuration/Shared Settings for Stations/Groups/Anti-Spam chapter.
In this dialog, you have the option to add the currently deployed AVG Admin Server URL into the list of update servers applicable for station settings. Again, two separate tabs are available - one for stations with AVG 2012 and one for stations with older AVG 2011. From the drop down menu select one of the following: Do not write to DC - the currently deployed AVG Admin Server URL will not be written to any of the DataCenter settings.
Shared Settings - the currently deployed AVG Admin Server URL will be saved into the Shared Settings for Stations. New group... - the currently deployed AVG Admin Server URL will be saved to a new group. If you choose this option, you will need to select a group name and optionally its description too. New stations - the currently deployed AVG Admin Server URL will be saved to the New stations group settings. Note: You can only use one option from the drop down menu.
server dumps automatically to analysis checkbox in order to send potential AVG Admin Server crash dumps directly to our technical support for further analysis. Confirm your choices by pressing the Deploy button. The deployment process will start. It may take some time, so please be patient. Once the process is completed, click the Finish button to close the Wizard. The AVG Admin Server will then be started.
4. AVG Network Installer Wizard Basic Mode Note: This chapter describes the standalone version of AVG Network Installer Wizard. As it is also included directly within the AVG Admin Console, it might be more convenient to use it from there. More information can be found in the AVG Admin Console/Network Installer chapter. The AVG Network Installer Wizard allows you to remotely install AVG on stations or to create installation scripts for on-site installation.
not recommended. Note: These exceptions do not apply if you only use a computer with some server operating system installed (e.g. Windows Server 2003 etc.) as a standard work station without server features enabled. 4.2. Welcome If you have already used the AVG Network Installer Wizard before and saved a customized configuration into a configuration file (available in the final step), you can load the settings now by choosing the Load settings button.
4.3. Installation Method To continue in the Basic Mode leave the option Advanced mode unselected, otherwise proceed to Advanced Mode chapter. The dialog window offers the selection between two options for creating and using the installation script: Remote network installation This option allows you to install AVG on stations available in the local network (computers selected from the domain, Active Directory, according to IP ranges, imported from a list etc.).
4.4. Remote Network Installation For proper remote installation, the wizard will first check whether AVG is already present on the target station, then transfer the AVG installation files and process the installation accordingly. Before you proceed, please review the network requirements and exceptions regarding remote AVG installation. You can find more detailed information on the ports settings in the Network Requirements chapter.
During this step it is necessary to define the following installation parameters: License information – type in the license data such as Name, Company, and License number (mandatory value). If you wish to take the Windows username for the Name field, do not select the respective check box, and leave the default system settings to be used. Folder with the AVG installation package - type in the full path to AVG installation package or use this button to select the proper folder.
The following options are available in this step. Note: If you are unsure about these settings, we recommend k eeping the default ones. Remote administration - Enter the AVG DataCenter connection string into the AVG DataCenter connection string field. If applicable, also enter the Username and Password. If you do not want to manage the stations via the AVG Admin Console, simply uncheck this option.
The wizard needs to scan some stations first to find out their status and then install AVG on them. In the Network scanning method section choose from the drop down list, your preferred method for selecting stations. The possible options are as follows: All stations from the domain - this option will scan all stations available in your local domain. Note: This option is available only if the current computer is part of a domain.
login name and password) you will be asked separately for every station. This section allows you to create a list of accounts that will be used during remote installation; this way you will avoid entering multiple credentials. You can add accounts to the list by clicking the Add button (or delete them using the Remove button). If you wish to keep your list of accounts for further use, check the Save list of accounts box. However, this is not recommended for safety reasons.
become active. Select stations without AVG - will select only stations that do not have AVG already installed, or where AVG could not be detected. The Refresh button will reload the state of all stations in the list by scanning them again. Continue to the Remote network installation - final steps chapter and complete the remote installation process. 4.4.2.
Right-click to view additional options: Retrieve the installation log - this option will try to obtain the installation log from the station (if available). Export stations without AVG to a file - this option will create a file with list of stations that do not contain AVG installation. Select all stations - will select or unselect all stations in the list and the Install button will become active.
Right-click to view additional options: Retrieve the installation log - this option will try to obtain the installation log from the station (if available). Export stations without AVG to a file - this option will create a file with list of stations that do not contain AVG installation. Select all stations - will select or unselect all stations in the list and the Install button will become active.
4.4.4. Select a Single Station If you choose to install AVG remotely only on a single station, the following dialog will appear: Click either the Computer name or IP address field and fill in the proper name or IP address. Confirm your choice by clicking the OK button. The process of checking the chosen station for an AVG installation will begin.
Export stations without AVG to a file - this option will create a file with list of stations that do not contain AVG installation. Select all stations - will select or unselect all stations in the list and the Install button will become active. Select stations without AVG - will select only stations that do not have AVG already installed, or where AVG could not be detected. The Refresh button will reload the state of all stations in the list by scanning them again.
Export stations without AVG to a file - this option will create a file with list of stations that do not contain AVG installation. Select all stations - will select or unselect all stations in the list and the Install button will become active. Select stations without AVG - will select only stations that do not have AVG already installed, or where AVG could not be detected. The Refresh button will reload the state of all stations in the list by scanning them again.
Enter an username with the administrator privileges (an username that is member of the administrator's group). Confirm by clicking OK. If there is no common administrator account for all stations (with the same login name and password) you will be asked separately for every station. Pressing the Cancel button will cause the current station installation to be skipped, and the wizard will continue installation on the next station in the list. AVG will then be transferred to the station and installed.
The Save settings button allows you to save the previously selected configuration. You can then reuse it when running this wizard again simply by loading the settings at the very beginning. Click Finish button to close the wizard. 4.6. Creation of AVG Installation Script Selecting the Creation of AVG installation script option, the wizard will create an installation script in a selected directory.
The first step contains an overview of this option. Click Next to continue. During this step it is necessary to define the following installation parameters: License information – type in the license data such as Name, Company, and License number (mandatory value). If you wish to use the Windows username for the Name field, do not select the respective check box, and leave the default system settings to be used.
If you have not downloaded the package yet, click the Download button and use the wizard to download the installation file for you into the selected folder. You can view the download progress above the Download button. Proxy settings button - If you need to use a proxy server to connect to the Internet, you can fill in the proxy server details by clicking the Proxy settings button. License number change - Use this button to input a new license number to be used for remote installations of AVG.
In this step you may specify names of the installation script files, their storage and other options. In the File names definition define these options: Name of the file to launch installation - type in a custom name for the file, that will be used for launching the installation. The file extension must be .bat. Name of the script file with parameters - type in a custom name for the script parameters file. The file extension must be .ini.
This step contains a preview of both setup and configuration files. The first tab contains information about the setup file and the second contains information about the presets. If you have not done so already, fill in the output path in the Select folder where the script will be stored section. Click the Create script button to compile and save the installation script to the selected location. The Save settings button allows you to save the previously selected configuration.
Click the Finish button to close the wizard. There are several options for how to use the produced script file. Here are the two most common examples: To use the script saved to a folder: 1. Copy the whole contents of the previously chosen folder to your station. Note: If you used a network folder for storing the script, you can navigate to that folder directly over the network . 2. On the station navigate to this folder and run the AvgSetup.bat file. 3.
5. AVG Network Installer Wizard Advanced Mode Note: This chapter describes the standalone version of AVG Network Installer Wizard. As it is also included directly within the AVG Admin Console, it might be more convenient to use it from there. More information can be found in the AVG Admin Console/Network Installer chapter. The AVG Network Installer Wizard in Advanced mode allows you to remotely install AVG on stations or to create installation scripts for on-site installation.
5.1. Welcome If you have already used the AVG Network Installer Wizard before and saved a customized configuration into a configuration file (available in the final step), you can load the settings now by choosing the Load settings button. To revert to the original settings preset by default, press the Default settings button. During the whole installation process you can decide to save the configuration progress at any time by pressing F2 key or CTRL+S combination.
5.2. Installation Method To continue in the Advanced mode check the Advanced mode checkbox, otherwise proceed to the Basic Mode chapter. The dialog window offers the selection between two options for creating and using the installation script: Remote network installation This option allows you to install AVG on stations available in the local network (computers selected from the domain, Active Directory, according to IP ranges, imported from a list etc.).
5.3. Remote Network Installation For correct remote installation, the wizard will first check if AVG is present on the target station, then transfer the AVG installation files and process the installation accordingly. Before you proceed, please review the network requirements and exceptions regarding remote AVG installation. You can find more detailed information on the port settings in the Network Requirements chapter.
During this step it is necessary to define the following installation parameters: License information – type in the license data such as Name, Company, and License number (mandatory value). If you wish to use the Windows username for the Name field, do not select the respective check box, and leave the default system settings to be used. Folder with the AVG installation package - type in the full path to the AVG installation package or use this button to select the proper folder.
In this step, you can choose if you wish to install AVG with default settings or select custom components. Install AVG with default settings - Choose this option if you prefer the default components to be installed. Select installation components - Select this option to view a tree structure offering a list of AVG components that can be either installed or uninstalled.
In the Setup parameters section you can choose from the following options: Enable Windows Firewall after installation - in case you are not going to install AVG Firewall component, you can choose to enable Windows Firewall as soon as the installation is completed. Quit setup if AVG 2012 is already installed - the remote administration will not proceed if AVG 2012 is already present on the target station.
but the progress will be fully visible on the station. o show installation wizard - the installation will be visible on the station and the currently logged user will need to manually confirm all steps. In the Setup properties section you can choose from the following options: Where to install - if you prefer a customized target location for installation, you can choose it by entering the path here. We recommend keeping the default settings.
use for your stations, check this checkbox and fill in its address now. The wizard needs to scan some stations first to find out their status and then install AVG on them. In the Network scanning method section choose from the drop down list, which method for selecting stations you prefer. The possible options are as follows: All stations from the domain - this option will scan all stations available in your local domain. Note: This option is available only if the current computer is part of a domain.
to enter a username that has administrator privileges (a username that is member of an administrator's group). If there is no common administrator account for all stations (with the same login name and password) you will be asked separately for every station. This section allows you to create a list of accounts that will be used during remote installation; this way you will avoid entering multiple credentials.
Retrieve the installation log - this option will try to obtain the installation log from the station (if available). Export stations without AVG to a file - this option will create a file with list of stations that do not contain AVG installation. Select all stations - will select or unselect all stations in the list and the Install button will become active. Select stations without AVG - will select only stations that do not have AVG already installed, or where AVG could not be detected.
Once you have finished selecting the IP ranges, click the Next button to continue. Once done, the Station selection window will appear: Right-click to view additional options: Retrieve the installation log - this option will try to obtain the installation log from the station (if available). Export stations without AVG to a file - this option will create a file with list of stations that do not contain AVG installation.
station name per line in simple text format. Once done, the Station selection window will appear: Right-click to view additional options: Retrieve the installation log - this option will try to obtain the installation log from the station (if available). Export stations without AVG to a file - this option will create a file with list of stations that do not contain AVG installation. Select all stations - will select or unselect all stations in the list and the Install button will become active.
5.3.4. Select a Single Station If you choose to install AVG remotely only on a single station, the following dialog will appear: Click either the Computer name or IP address field and fill in the proper name or IP address. Confirm your choice by clicking the OK button. The process of checking the chosen station for an AVG installation will begin.
Export stations without AVG to a file - this option will create a file with list of stations that do not contain AVG installation. Select all stations - will select or unselect all stations in the list and the Install button will become active. Select stations without AVG - will select only stations that do not have AVG already installed, or where AVG could not be detected. The Refresh button will reload the state of all stations in the list by scanning them again.
Export stations without AVG to a file - this option will create a file with list of stations that do not contain AVG installation. Select all stations - will select or unselect all stations in the list and the Install button will become active. Select stations without AVG - will select only stations that do not have AVG already installed, or where AVG could not be detected. The Refresh button will reload the state of all stations in the list by scanning them again.
Enter a username that has administrator privileges (a username that is member of the administrator's group). Confirm by clicking OK. If there is no common administrator account for all stations (with the same login name and password) you will be asked separately for every station. Pressing the Cancel button will cause the current station installation to be skipped, and the wizard will continue installation on the next station in the list. AVG should be then transferred to the station and installed.
The Save settings button allows you to save the previously selected configuration. You can reuse it when running this wizard again simply by loading the settings at the very beginning. Click Finish button to close the wizard. 5.5. Creation of AVG Installation Script Selecting the Creation of AVG installation script option, the wizard will create an installation script in the selected directory.
The first step contains an overview of this option. Click Next to continue. During this step it is necessary to define the following installation parameters: License information – type in the license data such as Name, Company, and License A V G I nternet Sec urity Bus ines s E dition 2 0 1 2 © 2 0 1 2 C opyright A V G T ec hnologies C Z, s .r.o. A ll rights res erved.
number (mandatory value). If you wish to use the Windows username for the Name field, do not select the respective check box, and leave the default system settings to be used. Folder with the AVG installation package - type in the full path to the AVG installation package or use this button to select the proper folder. If you have not downloaded the package yet, click the Download button and use the wizard to download the installation file for you into the selected folder.
o Components that should be uninstalled or not installed, and mark them like this o The default settings will be used for components that you leave blank ( ). Remote AVG uninstallation - allows AVG removal. In the Setup parameters section you can choose from the following options: Enable Windows Firewall after installation - in case you are not going to install AVG Firewall component, you can choose to enable Windows Firewall as soon as the installation is completed.
following: o hidden installation - no information will be displayed to the currently logged user during the setup process. o show installation progress only - the installation will not require any user attention, but the progress will be fully visible on the station. o show installation wizard - the installation will be visible on the station and the currently logged user will need to manually confirm all steps.
option. Add new station into group - If you prefer to automatically add new station(s) into a custom group, you can choose the group name here. Custom update server - if you already have an existing update server, that you would like to use for your stations, check this checkbox and fill in its address now. In this step you may specify names of the installation script files, their storage and other options.
checkbox and the AUTORUN.INF file will be created. Enable relative paths - We recommend keeping this option checked. Relative path means, that it is relative to the current source directory (for example if your source disk drive and path is c:\avginstallation and you uncheck this option, the output script will then look for the installation files in exactly the same path, which will be most likely different on the target station, where you will execute it and the script would not work.
The Save settings button allows you to save the previously selected configuration. You can use it when running this wizard again simply by loading the settings in the very beginning. Click the Finish button to close the wizard. There are several options for how to use the produced script file. Here are the two most common examples: To use the script saved to a folder: 1. Copy the whole content of the previously chosen folder to your station.
2. If the autorun feature is enabled in the station's operating system and you chose to create the autorun.inf file during script preparation, the installation will start automatically. 3. If not, open the removable device disk letter and run the AvgSetup.bat file manually. 4. The command line window will appear and the installation will begin. 5. Once the installation is completed, the window will close automatically.
6. AVG Admin Console 6.1. What is AVG Admin Console AVG Admin Console is an interface for administrating stations remotely. It helps the network administrator to maintain the AVG Stations' configuration, status, and to remotely call various operations on AVG stations.
The general communication string structure is http://server_address:port, where: server_address is the name/address of a server where the AVG Admin Server runs port is the AVG Admin Server port number. The default port value is 4158. If the AVG Admin Server uses this default number, it is not necessary to include the number into the communication string. If the DataCenter is password protected, you must fill-in the Login name and Password into the appropriate fields.
6.2. AVG Admin Console Interface Overview The AVG Admin Console interface is completely customizable allowing users to move or enable/ disable individual panels according to their needs. Within the default view, four from overall five panels are visible (with the only exception being the Filter panel), in addition to a navigation toolbar and upper menu. 6.2.1.
The Station identification section contains a drop down menu, where you can select how you wish to display stations within the current view section. The Scan results options section lets you to choose which scan results you prefer to store and according to which severity. Check the including rootkits checkbox in order to include also storing of scan results with rootkits. Keep scan results for maximum period of - simply enter number of days you wish keeping the scan results received from stations.
contents to a file) and save it to a local folder on a computer, from which the AVG Admin Console is running. Exit - Quits AVG Admin Console. View menu The View menu offers the following options: Panels Here you can show or hide individual main interface panels (Toolbar, Navigation tree etc.) simply by checking or unchecking them. To restore the original position of all panels, use the Default position of panels item. The panels will be restored after you restart the application. Non-compliance conditions..
Default column setting - use this option to revert the interface column settings into the original state. Options In the General view options section choose the viewing preferences: o Periodical refresh of the current view in predefined time interval - check the checkbox and choose a time value in minutes to enable automatic periodical refresh of the currently opened view.
(this interval can be changed via View/Options/Periodical refresh of the current view in predefined time interval). Please note: The count of rows can be affected also by filtering options (if available and defined for the given view)! o Show time values in GMT - check the checkbox to convert all time values in all views to GMT (Greenwich Mean Time). Unchecking the checkbox returns the values back to your local time.
Use Select all button to mark all column names or select the requested ones manually. If you have selected only certain rows before entering this dialog and wish to export only those, you should check the Export only selected rows checkbox. To change location of the output file or its name, use the standard Save as dialog. button, which triggers a Confirm your choices by pressing OK button. Print... - opens the standard windows print dialog allowing you to print the currently opened view.
This dialog allows you to identify duplicate stations in your network (i. e. stations with identical names). Such duplicity can easily occur e.g. during MAC address identification (notebooks in your network may be displayed twice – once when network adapter is used for their connection, once when WiFi is used). There are several methods for duplicate stations to be identified. To change currently used method, use the roll-down menu in the upper right corner of this dialog.
The Information menu offers the following options: Help - opens the help file. What is new... - displays step-by-step summary of important news in the AVG Admin application. Check for updates... - AVG Admin Console automatically, during startup, checks if a newer version of AVG Admin Console is available. But you can also open this dialog and immediately see if a new version is available. You can also use the link in the dialog to directly download the latest installation package.
Within the navigation tree, you will find the following sets: Stations Servers Scan results Events Notifications Graphic reports Licenses Pending requests Network Installer You can find descriptions of individual items in their respective chapters. A V G I nternet Sec urity Bus ines s E dition 2 0 1 2 © 2 0 1 2 C opyright A V G T ec hnologies C Z, s .r.o. A ll rights res erved.
6.2.3. Records Section Within the central table in the Current view section of the screen you can view data of the group selected in the navigation tree. Some sets may contain a considerable amount of data for a specific view (e.g. station/user information); that is why the relevant data is arranged into groups, and every group can be displayed when you select the corresponding tab. To select a record from the central table you need to perform a mouse click over the desired record.
Fill-in your custom tab name, then choose columns you wish to display within the tab and confirm your choice by pressing OK. You can also use Select all button to choose all columns. Once you create your custom tab, you can easily remove it by right-clicking on any tab and selecting Delete the custom tab. To modify the existing tab, choose from the same menu Modify the custom tab. You can quickly search for a station name by holding down the CTRL and F keys at the same time.
messages. Show errors - The status window will display only error messages. Enable messages filtering This option allows you to filter out messages according to more extensive parameters. From the drop down menu select what type of messages you wish to display. In the Recipient/Sender section, there two checkboxes. Checking the upper one, only from sender, gives you access to the context menu that allows you to select a unique sender, whose messages will be displayed in the Status window panel.
6.2.5. Filter Panel The Filter panel contains a list of filtering options available for the current view. The list will become active only if there are any filters available for the selected view. Description of individual filters can be found in the tree items' respective chapters: Stations Servers (Application servers) Scan results Events Graphic reports Pending requests The Filter panel is hidden by default, but can be easily activated by clicking on the Filter window item in the View/Panels menu.
non-mandatory settings are transferred from the Station to the DataCenter. The synchronization is performed periodically. By default, the settings synchronization process is done every 60 minutes. To alter the synchronization period for all stations, follow these steps: 1. In the AVG Admin Console select Tools from the upper main menu and choose the Shared settings for stations item. 2. Select the Remote Administration node. 3.
6.3.3. Station Components States Synchronization This synchronization process sends data from the station to the AVG DataCenter. It takes place: every time the station powers on/goes online (immediately), every time a component state is changed (within 5 minutes). It is also possible to request immediate synchronization from the AVG Admin Console.
Component states tab Contains an overview of component states on each station. More information on other options and settings can be found in the Configuration/AVG Admin Console chapter. 6.4.1. Non-Compliant Stations The Non-compliance conditions dialog can be accessed from the application's upper menu by selecting the Non-compliance conditions... item in the View menu. In this dialog, you can specify which conditions a station must fulfill in order to be considered as non-compliant.
non-compliant if there was no communication with the station for a period longer than a specific amount of days or hours (insert plain digital value for hours and a digital value with d for days - i.e. 7d for seven days). Infections unremoved - if checked, stations with unremoved infections will be highlighted. Spyware unremoved - if checked, stations with unremoved spyware will be highlighted. Rootkits unremoved - if checked, stations with unremoved rootkits will be highlighted.
6.4.4. Filtering You can apply various listing filters to the current view. The filters are available by default from the bottom left Filter panel. The Filter panel is located by default in the bottom left part of the screen. If the panel is not visible, you can activate it by clicking on the Filter window item in the View/Panels menu. Within the text filters you can use simple wildcard asterisk character (*). The wildcard character substitutes for any character or a string.
To disable a filter, simply uncheck the checkbox next to its name or right-click in the filters window and from the context menu select Switch off all filters. Note: All filters are case insensitive! 6.5. Servers The Servers item contains an overview of all deployed servers and stations with an AVG application server component installed. 6.5.1. AVG Admin servers This item displays a list of AVG Admin servers installed.
If you right-click on the Application Servers item in the left tree, you can choose from the following options to be applied on application servers: Shared settings for application servers - will open shared advanced settings dialog for application servers.
Export - allows you to export the information into a .csv file. Close - closes the dialog. Station settings: o Settings - opens station settings. o Firewall settings - displays Firewall settings of the currents station. Available only if there is the Firewall component installed. o Synchronize settings - will ask for immediate synchronization of stations' settings with the AVG DataCenter. o Refresh components state - will refresh the state of all components. o Copy settings to...
to be stored. Settings from the configuration file can be applied to any station, application server or a group of stations (via above-mentioned Import settings... item). It is also possible to apply them using the AVG Settings Manager tool. o Station description Simply enter brief description of the selected station into this dialog's text box and press OK. o Ask station for its description - will ask the selected station for its description.
Use the Refresh button to obtain the most current Virus Vault findings. To work with individual threats, use one of the following buttons: Restore - select a threat or threats you wish to restore on the station and click this button. Delete - use this button to delete the selected threat(s).
You can also save the chosen sample to a folder in an encrypted form with the Save button for later processing (e.g. manual sending via e-mail etc.). o Manage scans - in order to view and manage scans using this function, the station in question must be running and connected to the Datacenter. You have the following control options: Refresh - obtains the most recent information about scans from the station. Start - starts the selected scans on the remote station.
o Ask to perform program update - will ask the selected station to start the program update process. o Ask to perform virus database update - will ask the selected station to start the virus database update process. o Ask to rollback last anti-virus database update - will ask the selected station to use previous virus database version and disregard the last one. o Delete temporary update files - sends request to selected station(s) to remove temporary update files.
Use Save button to store the data on your hard drive for later use (i.e. sending by e-mail). Click Send for sending the contents directly: Fill in your e-mail address and briefly describe your problem with the station to the next field. If you need to enclose some additional files (e.g. a screenshot or some logs previously requested by AVG Technical support), use the Attach button to choose them now. To remove an unwanted attachment, select it and use the Remove button.
o Generate new report - starts the Graphic reports generation dialog. Delete station - will delete the station from the AVG DataCenter. Show logs of server plugin - displays logs of the selected server component. You can choose a custom date range. Use the Reload button to display the most current results. Show server plugin statistics - displays statistics of the selected server component.
The filtering options for Servers are as follows: Note: To use a filter, simply tick the check box next to its name and double click the line to insert a value. The results will be displayed immediately. Station name Insert a custom station name, that you want to filter out. Station description Insert a custom station description, that you want to filter out. Station domain Insert a custom station domain name, that you want to filter out.
for individual stations - by right-clicking on a station name in the Stations/group view and selecting the Tasks related to Scan/Ask for scan results item. for all stations in a group - by right-clicking on the group name and selecting the Ask for scan results item. for all stations - by right-clicking on the Stations item in the main tree and choosing the Ask for scan results item. The right-click context menu contains the following options: Delete scan results - will delete the chosen scan results.
Confirm - this button will mark the test result as confirmed and you will not find the number of infections from the accepted test within the other reports. Close - closes the window. Remove selected threats - removes only the selected threats. Remove all threats - removes all threats in the list. Previous - shows the previous scan result in the Scan results view, if available. Next - shows the next scan result in the Scan results view, if available.
Added as exception – the infection was added to the list of exceptions (will no longer be considered as a threat). Potentially dangerous object - the file is potentially dangerous. 6.6.1. Filtering You can apply various listing filters to the current view. The filters are available by default from the bottom left Filter panel. The Filter panel is located by default in the bottom left part of the screen.
and from the context menu select Switch off all filters. Note: All filters are case insensitive! 6.7. Events The Events item allows you to view individual events sent to AVG DataCenter as defined in the Alert Manager (see Configuration/Alert Manager Settings for more information). Each line represents one event and can be sorted by Severity, Event type, Station name etc. by simply clicking a column name. To review an event details, double click its line.
Date Select a custom period that you want to filter out. To disable a filter, simply uncheck the checkbox next to its name or right-click in the filters window and from the context menu select Switch off all filters. Note: All filters are case insensitive! 6.8. Notifications The Notifications item allows you to select from predefined notification actions. These notifications once set can inform an administrator via e-mail about different events within the AVG Admin Console.
6.8.1. Condition Tab On this tab you can customize under which conditions the notification should be sent. Check the Send a notification message when the condition is fulfilled checkbox to receive an email once the above mentioned parameters or the condition generally is met. You can also select a period in which the condition should be checked.
6.8.2. Message Tab On this tab you can customize the notification message itself. If the AVG Admin Server is not configured properly for sending e-mail messages, you should correct the settings by clicking the AVG Admin Server settings button. More information can be found in the Configuration/AVG Admin Server settings/E-mail tab chapter. The available fields are as follows: To - insert a message recipient address (in the form example@somedomain.com).
The variable will be converted to a real value once the message is sent from the AVG DataCenter. The possible variables (macros) are as follows: %AVG_StationName% - name of the station. %AVG_StationDomain% - The domain name in which the station exists (if applicable). %AVG_GroupName% - the group name, in which the station is located. %AVG_IPAddress% - the station IP address. %AVG_MacAddress% - the MAC address of the station. %AVG_LastCall% - last time the station contacted the AVG DataCenter.
The reports are always generated in the language that has been chosen during installation of the AVG Admin Server. You can generate reports in one of two ways: By navigating to Graphic reports/Report schedules and choosing to define a new report schedule. By selecting station(s) or server(s) directly and from the right-click context menu choosing Generate new report item. The same applies to groups.
Non-compliant stations - shows stations in a non-compliant state according to conditions available from the View/Non-compliance conditions menu. Stations by AVG Version - shows all stations sorted by AVG version. Available parameters: - Type of Chart - choose the requested chart type (default selection is pie chart). Stations not communicating longer than N days Available parameters: - Number of days - choose the number of days for which the stations were not communicating.
- Type of Chart - choose the requested chart type (default selection is pie chart). - Grouped by - the result data will be grouped by the selected column. - Severity - choose the minimum scan results severity to be included in the report. - Including rootkits - choose whether to include rootkits to the report or not. Virus scan report - This report shows the status of viruses.
o Note: You can generate reports also from the Stations/Servers/Groups view group simply by selecting a station or stations and choosing Generate new report from the right-click context menu. A new dialog will come up: A V G I nternet Sec urity Bus ines s E dition 2 0 1 2 © 2 0 1 2 C opyright A V G T ec hnologies C Z, s .r.o. A ll rights res erved.
Fill in the Name and Description. Proceed to the next dialog by pressing the Next button. From the rollover menu select which template you want to use for your report. A V G I nternet Sec urity Bus ines s E dition 2 0 1 2 © 2 0 1 2 C opyright A V G T ec hnologies C Z, s .r.o. A ll rights res erved.
On the left choose which groups should be included and on the right choose individual stations for the report. If there are additional parameters available for the selected report, fill in the requested values, or leave the default values. For more information on templates, see the Report templates section above. Once ready, press the Next button. A V G I nternet Sec urity Bus ines s E dition 2 0 1 2 © 2 0 1 2 C opyright A V G T ec hnologies C Z, s .r.o. A ll rights res erved.
In this dialog choose which columns you wish to include in your report. Click the Select all button to include all columns or use the Select default button to keep the default one. To change the order of the columns, first select the desired column you wish to move and choose the appropriate action: Move to top - moves the selected column to the first place. Move up - moves the selected column one step up. Move down - moves the selected column one step down.
In this dialog, choose whether you want to generate the report only once in the selected time, or to generate the report periodically: Generate once at a specific time - choose the exact time and date of generation. Generate periodically - Choose a Period (daily, weekly, monthly) of generation and First generation time and date. Press Next button to proceed to the following part: A V G I nternet Sec urity Bus ines s E dition 2 0 1 2 © 2 0 1 2 C opyright A V G T ec hnologies C Z, s .r.o.
If you want to send the report or notification by e-mail when it is generated, enable the Send e-mail after report generation checkbox. In order to be able to use the e-mail feature, you must first configure the SMTP settings in the AVG Admin Server (E-mail tab). Click on the AVG Admin Server settings to configure the SMTP/E-mail settings now.
value. The results will be displayed immediately. Report template From the roll down menu choose a report template name, that you want to filter out. Schedule name Insert a custom report schedule name, that you want to filter out. Date Insert a custom date and time value, that you want to filter out. To disable a filter, simply uncheck the checkbox next to its name or right-click in the filters window and from the context menu select Switch off all filters. Note: All filters are case insensitive! 6.10.
number. Once changed, the license number will apply for all stations in the given group. Note: The new license number(s) will be deployed to individual stations once the synchronization process tak es place. More information about the synchronization process can be found in the Synchronization process chapter. 6.11. Pending Requests This item allows you view all currently pending requests sent from the AVG Admin Console.
6.12. Network Installer This is the integrated Network installer that allows you to add/remove stations for remote installation and observe the installation status. Note: This option serves only for network installation. If you prefer to create an installation script, you need to use the standalone AVG Network Installer Wizard. To add a new stations for remote installation, simply right-click on the Network installer node name and from the context menu select Add new stations.
simply right-click on the Network installer node name and from the context menu select Add new stations. The Network scanning dialog appears: In the Network scanning method section choose from the drop down list, your preferred method for selecting stations. The possible options are as follows: All stations from the domain - this option will scan all stations available in your local domain. Enter an IP range - this option will allow you to choose a specific range of IP addresses.
This section allows you to create a list of accounts that will be used during remote installation; this way you will avoid entering multiple credentials. You can add accounts to the list by clicking the Add button (or delete them using the Remove button). If you wish to keep your list of accounts for further use, check the Save list of accounts box. However, this is not recommended for safety reasons. Once you select all required parameters, proceed by clicking the Next button.
If you choose to add stations according to an IP range, the following dialog will appear: You need to specify the scanning range by entering the IP addresses here. In the From field enter a starting IP address and in the To field enter an ending address. Click the Add button to add the address range into the list. To delete a range from the right list, simply select the items you wish to remove and click the Remove button. Once you finish selecting the IP ranges, click the Next button to continue.
The dialog displays an overview of the network scanning process. You do not have to wait for it to stop scanning - simply close it by using the Close button and continue working with the Console. To open this dialog again, simply right-click on the Network installer node name and from the context menu select Show network scan progress. The dialog allows you to stop the scanning process by using the Abort button. The Pause button will temporarily stop the process (use Continue button resume the scanning).
The dialog displays an overview of the network scanning process. You do not have to wait for it to stop scanning - simply close it by using the Close button and continue working with the Console. To open this dialog again, simply right-click on the Network installer node name and from the context menu select Show network scan progress. The dialog allows you to stop the scanning process by using the Abort button. The Pause button will temporarily stop the process (use Continue button resume the scanning).
Confirm your choice by clicking the OK button. The Network scanning window will open: The dialog displays an overview of the network scanning process. You do not have to wait for it to stop scanning - simply close it by using the Close button and continue working with the Console. To open this dialog again, simply right-click on the Network installer node name and from the context menu select Show network scan progress. The dialog allows you to stop the scanning process by using the Abort button.
The dialog displays an overview of the network scanning process. You do not have to wait for it to stop scanning - simply close it by using the Close button and continue working with the Console. To open this dialog again, simply right-click on the Network installer node name and from the context menu select Show network scan progress. The dialog allows you to stop the scanning process by using the Abort button. The Pause button will temporarily stop the process (use Continue button resume the scanning).
This dialog is meant to facilitate your work and to accelerate installation process. If your access rights are not sufficient for AVG installation on the remote station, you will be asked to enter a username that has administrator privileges (a username that is member of an administrator's group). If there is no common administrator account for all stations (with the same login name and password) you will be asked separately for every station.
If you have already used the wizard before and saved a customized configuration into a configuration file (available in the final step), you can load the settings now by choosing the Load settings button. To revert to the original settings preset by default, press the Default settings button. During the whole installation process you can decide to save the configuration progress at any time by pressing F2 key or CTRL+S combination. A new dialog will appear allowing you to choose a configuration file name.
For proper remote installation, the wizard will first check whether AVG is already present on the target station, then transfer the AVG installation files and process the installation accordingly. Before you proceed, please review the network requirements and exceptions regarding remote AVG installation. You can find more detailed information on the ports settings in the Network Requirements chapter. A V G I nternet Sec urity Bus ines s E dition 2 0 1 2 © 2 0 1 2 C opyright A V G T ec hnologies C Z, s .r.
During this step it is necessary to define the following installation parameters: License information – type in the license data such as Name, Company, and License number (mandatory value). If you wish to take the Windows username for the Name field, do not select the respective check box, and leave the default system settings to be used.
The following options are available in this step. Note: If you are unsure about these settings, we recommend k eeping the default ones. Remote administration - Enter the AVG DataCenter connection string into the AVG DataCenter connection string field. If applicable, also enter the Username and Password. If you do not want to manage the stations via the AVG Admin Console, simply uncheck this option.
This wizard allows you to remotely install AVG on stations in few easy steps. If you have already used the wizard before and saved a customized configuration into a configuration file (available in the final step), you can load the settings now by choosing the Load settings button. To revert to the original settings preset by default, press the Default settings button.
For proper remote installation, the wizard will first check whether AVG is already present on the target station, then transfer the AVG installation files and process the installation accordingly. Before you proceed, please review the network requirements and exceptions regarding remote AVG installation. You can find more detailed information on the ports settings in the Network Requirements chapter. A V G I nternet Sec urity Bus ines s E dition 2 0 1 2 © 2 0 1 2 C opyright A V G T ec hnologies C Z, s .r.
During this step it is necessary to define the following installation parameters: License information – type in the license data such as Name, Company, and License number (mandatory value). If you wish to take the Windows username for the Name field, do not select the respective check box, and leave the default system settings to be used.
In this step, you can choose if you wish to install AVG with default settings or select custom components. Install AVG with default settings - Choose this option if you prefer the default components to be installed. Select installation components - Select this option to view a tree structure offering a list of AVG components that can be either installed or uninstalled.
In the Setup parameters section you can choose from the following options: Enable Windows Firewall after installation - in case you are not going to install AVG Firewall component, you can choose to enable Windows Firewall as soon as the installation is completed. Quit setup if AVG 2012 is already installed - the remote administration will not proceed if AVG 2012 is already present on the target station.
but the progress will be fully visible on the station. o show installation wizard - the installation will be visible on the station and the currently logged user will need to manually confirm all steps. In the Setup properties section you can choose from the following options: Where to install - if you prefer a customized target location for installation, you can choose it by entering the path here. We recommend keeping the default settings.
use for your stations, check this box and fill in its address now. Once done, click Finish button to begin remote installation. You will be able to observe the status of the installation from the Network installer view. Use Save settings option to save the configuration used. Note: To list recently installed stations that remain in an incorrect state (because of some remote installation failure), navigate to the Stations/Non-compliant stations.
7. AVG Admin Server AVG Admin Server is used to secure communication between the AVG stations and the AVG DataCenter on the server. Through the AVG Admin Server the AVG stations connect to the AVG DataCenter using the TCP protocol (or the HTTP protocol, to be exact) that is a part of each Windows operating system installation. Therefore, the AVG stations do not need any other third party component to be able to connect to the remote administration system.
8. AVG Admin Lite AVG Admin Lite is a simplified version of AVG Remote Installation. It contains only the AVG Admin Server Deployment Wizard Lite and the AVG Network Installer Wizard Lite. No management console is available (such as AVG Admin Console), or any advanced options. AVG Admin Server Deployment Wizard Lite - only allows deployment of the UpdateProxy role. AVG Network Installer Wizard Lite - only allows AVG Installation Script creation.
8.1.1. Configuration Overview This section contains an overview of the configuration, that is going to be deployed on your server. Basically only the UpdateProxy role will be deployed to your server. The UpdateProxy role serves as a proxy server for downloading and distributing updates to your stations. The wizard will also create the update folder on the C: drive (by default) or drive that is indicated in your overview.
8.1.2. Completion If everything went smoothly, you will see a dialog similar to the one above. Click Finish to close the Wizard and continue to the AVG Network Installer Wizard Lite. A V G I nternet Sec urity Bus ines s E dition 2 0 1 2 © 2 0 1 2 C opyright A V G T ec hnologies C Z, s .r.o. A ll rights res erved.
8.2. AVG Network Installer Wizard Lite The AVG Network Installer Wizard Lite will quickly guide you through the AVG script creation process. The script can then be used to install AVG on your stations. A V G I nternet Sec urity Bus ines s E dition 2 0 1 2 © 2 0 1 2 C opyright A V G T ec hnologies C Z, s .r.o. A ll rights res erved.
8.2.1. Installation Settings Fill in the requested values. License number is a mandatory field that must be filled in. Alternatively you may check the Name and/or Company checkboxes and fill in the appropriate values. Use the License number change button to input a new license number for AVG installations. A V G I nternet Sec urity Bus ines s E dition 2 0 1 2 © 2 0 1 2 C opyright A V G T ec hnologies C Z, s .r.o. A ll rights res erved.
8.2.2. Creation of AVG Installation Script In this dialog you need to choose, where the installation script will be saved. If the location does not contain the latest AVG installation package, the wizard will try to download the file from the Internet once you click the Next button. In such a case please make sure your Internet connection is available.
8.2.3. Completion If the script creation proceeded successfully, you will see a dialog similar to this one. Click the Finish button to close the wizard. To use the script saved to a folder: 1. Copy the whole contents of the previously chosen folder to your station. Note: If you used a network folder for storing the script, you can navigate to that folder directly over the network . 2. On the station navigate to this folder and run the AvgSetup.bat file. 3.
5. Once the installation is completed, the window will close automatically. Note: You may also consider creating and distributing an AVG installation clone. For more information please consult the AVG Settings Manager chapter below. A V G I nternet Sec urity Bus ines s E dition 2 0 1 2 © 2 0 1 2 C opyright A V G T ec hnologies C Z, s .r.o. A ll rights res erved.
9. AVG Settings Manager Please note: This tool is not included in the AVG Remote Administration and can be found as a part of the AVG (client) installation. The AVG Settings Manager is a tool suitable mainly for smaller networks that allows you to copy, edit and distribute AVG configuration. The configuration can be saved to a portable device (USB flash drive etc.) and then applied manually to chosen stations.
Load Options o Load a saved settings to AVG - use this link to open an AVG configuration file (. pck) and apply it to the local installation of AVG. Store Options o Store local AVG settings to a file - use this link to save the AVG configuration file (. pck) of the local AVG installation.
Hidden installation - no information will be displayed during the setup process. Show installation progress only - the installation will not require any user attention, but the progress will be fully visible. Show installation wizard - the installation will be visible and user will need to manually confirm all steps.
10. Configuration This chapter contains a description of configuration options for different parts of AVG Internet Security Business Edition. 10.1. Shared Settings for Stations/Groups This dialog allows you to define shared settings for stations. The options are exactly the same as on the station with few exceptions described in the chapters below.
Shared settings defined as mandatory in the Shared settings for stations (available through upper top menu Tools) always have higher priority than the others. Which means, that items set as mandatory in the mentioned settings list cannot be changed at any lower levels.
The sub tree items are as follows: Sending to e-mail This sub tree item enables you to specify which types of events should be sent to the specified e-mail address. Available events are shown in the dialog; mark the respective checkbox to include the event in the list. To specify the address, press the SMTP button. The Outgoing e-mail settings dialog will appear. Type in an e-mail address (To:), a sender (From:), a SMTP server address and a port number to the appropriate text boxes.
Clicking the Insert macro button will open list of macros, that you can apply directly to the message body. If you wish to indent a line, use the control button (ctrl) and Enter as pressing the enter button alone would close the dialog. Use the Default button to restore original dialog values. Record to NT event log This sub tree item enables you to specify which types of events should be written to the NT event log of the specific station.
Threat found Scan started Scan finished Update started Update checked Update finished AVG Startup AVG shutdown AVG component was unexpectedly terminated License number changed Identity Protection - a malware was detected Identity Protection - the allowed list was changed Identity Protection - an object was restored from the quarantine A V G I nternet Sec urity Bus ines s E dition 2 0 1 2 © 2 0 1 2 C opyright A V G T ec hnologies C Z, s .r.o. A ll rights res erved.
10.1.3. Remote Administration The Remote Administration settings available from AVG Admin Console contain some additional settings (in comparison to station settings). The settings include: Synchronize configuration every - choose the automatic interval for synchronization (station will try to synchronize every selected period - i.e. will try to find out if anything new is available and transfer changes only).
10.1.4. Allowed Actions Allowed actions are items, that can be enabled or disabled for usage on a station from the AVG Admin Console. The configuration can be set either in the Shared Settings for groups/stations or individual station settings. The feature is accessible from the Remote Administration item in the main tree as Allowed actions. By unchecking the following checkbox(es), you can forbid use of the feature for user on the station.
Send bug report - if unchecked, it will disallow users on the station to send a bug report. Creating new PUP exceptions - if unchecked, it will disallow users on the station to create a new exception for potentially unwanted programs. Creating new exceptions of Resident Shield - if unchecked, it will disallow users on the station to create a new exception for the Resident Shield component. AVG user interface access - if unchecked, it will disallow users on the station to access AVG user interface.
10.1.5. License The License settings are available only from AVG Admin Console. You can set the following options: Owner name - enter a required name of the owner. Company - enter a required company name. License number - enter a required license number. In the Expiration message section you can choose if expiration dialog should be displayed in case the license has expired: Show expiration dialog - select one of the options.
10.1.6. Configuration copying You can copy predefined Schedules configuration from the Shared settings for stations/Groups (or from settings for a single station) to a group, multiple groups or shared settings. In the left tree right-click on the chosen subitem under Schedules item and from the context menu choose Copy to. A new dialog will appear: A V G I nternet Sec urity Bus ines s E dition 2 0 1 2 © 2 0 1 2 C opyright A V G T ec hnologies C Z, s .r.o. A ll rights res erved.
From the drop-down menu select where do you wish the configuration to be copied. You can choose Shared settings in Groups, Stations, Shared settings for application servers or Application servers. If you select Stations option, the from group drop-down menu will become available, where you can choose a group, from which the stations will be listed. Then select individual stations into which you wish to copy the configuration.
10.1.7. Scheduled Scans During a new scheduled scan definition, you can use either a predefined option to Sca n who le co m pute r, or choose to Sca n s pe cific file s o r fo lde rs . The second option allows you to select custom sections that you wish to scan: Local hard drives: All local (fixed) drives will be scanned. My Documents folder: The following location will be scanned: C:\Documents and Settings\ Where current user represents a user logged during the scanning process.
Program Files: The program files (e.g. C:\Program Files\) location will be scanned. Windows folder: The Windows folder (e.g. C:\Windows) will be scanned. System folder: The Windows system folder (e.g. c:\Windows\System32) will be scanned. System drive: The system drive (e.g. C:\) will be scanned. Temporary Files folder: The following location will be scanned: C:\Documents and Settings\\Local Settings\Temp Where represents an user profile name.
In order to move a predefined value to all other group settings, right-click on the chosen checkbox and from the context menu select Move value to groups. You should see a changed lock icon next to the chosen configuration item: To transfer the chosen setting to other group settings click OK or Apply button. Please note: If you change the value of the setting or amend its status before you click OK or Apply button, the changes will be lost and the configuration will not be copied.
In order to move a configuration from a group to the Shared settings for stations, you can right-click on the chosen checkbox and from the context menu select Move value to Shared settings. You should see a changed lock icon next to the chosen configuration item: By clicking OK or Apply button, the value will be moved to the Shared settings for stations and set as mandatory. In any other group it will be set as monitored. This can be used to easily remove the mandatory flag from all the groups at once.
to the AVG Admin Console, upper menu Tools/Shared settings for stations item. Then select AntiSpam/Expert Settings/Internet connection. In the Proxy server dialog insert your AVG Admin Server address including port number (default value is 4158). If your AVG Admin Server uses username and password, open also the Proxy authentication dialog and input the correct username and password. A V G I nternet Sec urity Bus ines s E dition 2 0 1 2 © 2 0 1 2 C opyright A V G T ec hnologies C Z, s .r.o.
Note: You can analogically update these settings manually for Shared settings for group or for individual stations as well if needed. 10.2. Shared Firewall Settings This dialog allows you to define shared settings for stations. Most of the options are exactly the same as on the station, therefore if you require more detailed information on individual item configuration, we recommend consulting either the context help or the AVG Internet Security User Guide available to download from http://www.avg.
10.2.1. Setting Items as Mandatory You can set the whole configuration as mandatory by checking the Set whole configuration as mandatory checkbox available in the General information dialog. Additionally, you can set certain individual or all settings within profiles as mandatory - to do so simply select the required profile and in the main section click the Set button to mark all items as mandatory. Use the Reset button to set all profile values back to monitored.
10.2.2. Profiles Firewall profiles can be renamed/deleted/duplicated or imported only within the Shared Firewall settings. The chosen set of profiles is then automatically applied to all other Firewall settings sets (i.e. individual stations and groups). Note: The bold highlighted profile name does indicate, that the profile is set as mandatory. The profile settings mandatory/monitored status can be verified (or changed) in the Areas and Adapters profiles section above.
A V G I nternet Sec urity Bus ines s E dition 2 0 1 2 © 2 0 1 2 C opyright A V G T ec hnologies C Z, s .r.o. A ll rights res erved.
10.3. Shared Settings for Application Servers This dialog allows you to define shared settings for application servers. Most of the options are exactly the same as on the station with few exceptions described in the chapters below. If you require more detailed information on configuration of other items, we recommend you to consult the AVG E-mail Server Edition User Guide available to download from http://www.avg.com/ww-en or the context help available via the nice question mark button.
Available for MS Exchange 2007/2010 and can be installed for HUB role only. E-mail Scanner for MS Exchange (SMTP Transport Agent) Checks all e-mail messages coming through the MS Exchange SMTP interface. Available for MS Exchange 2007/2010 only and can be installed for both EDGE and HUB roles. E-mail Scanner for MS Exchange (VSAPI) Checks all e-mail messages stored in user mailboxes. If any viruses are detected, they are moved to the Virus Vault, or completely removed.
10.3.3. E-mail Scanner for MS Exchange (routing TA) This item contains settings of the E-mail Scanner for MS Exchange (routing transport agent). The Basic Settings section contains the following options: Enable component - uncheck to disable the whole component. Language - select preferred component language. Certify messages - check this if you wish to add a certification note to all scanned messages. You can customize the message in the next field.
package of spyware: programs that are perfectly ok and harmless when acquired from the manufacturer directly, but can be misused for malicious purposes later, or programs that always harmless but might be unwanted (various toolbars etc.). This is an additional measure that increases your computer security and comfort even more, however it can possibly block legal programs, and is therefore switched off by default.
10.3.5. E-mail Scanner for MS Exchange (VSAPI) This item contains settings of the E-mail Scanner for MS Exchange (VSAPI). The Basic Settings section contains the following options: Enable component - uncheck to disable the whole component. Language - select preferred component language. The Logging settings section: Log file size - choose a preferred size of the log file. Default value: 100 MB. The Scan settings section: Background Scan – you can enable or disable the background scanning process here.
A specific low priority thread is used for each database, which guarantees other tasks (e.g. email messages storage in the Microsoft Exchange database) are always carried out preferentially. Proactive Scan (incoming messages) You can enable or disable the proactive scanning function of VSAPI 2.0/2.5 here. This scanning occurs when an item is delivered to a folder, but a request has not been made by a client.
Scan inside archives - check this option to let the scanner look also inside archived files (zip, rar, etc.) The E-mail attachments reporting section allows you to choose which items should be reported during scanning. The default configuration can be easily amended in the Detection actions section, part Information (see below).
10.3.6. Document Scanner for MS SharePoint This item contains settings of the Document Scanner for MS SharePoint. The Logging settings section: Log file size - choose a preferred size of the log file. Default value: 100 MB. The Scanning properties section: Use Heuristics - check this box to enable heuristic analysis method during scanning. Report Potentially Unwanted Programs and Spyware threats - check this option to report the presence of potentially unwanted programs and spyware.
(zip, rar, etc.) The Reporting section allows you to choose which items should be reported during scanning. The reports have Information severity. The default action can be easily amended in the Detection actions section, part Information (see below). The following options are available: Report password protected archives Report password protected documents Report files containing macro Report hidden extensions There is also the following sub-item available in the tree structure: Detection actions 10.3.7.
The actions are available for the following items: Infections PUP (Potentially Unwanted Programs) Warnings Information Use the roll-down menu to choose an action for each item: None - no action will be taken. Move to Vault - the given threat will be moved to Virus Vault. Remove - the given threat will be removed. To select a custom subject text for messages that contain the given item/threat, check the Mark subject with... box and fill-in a preferred value.
In the Mail Filtering sub-item you can choose which attachments should be automatically removed, if any. The following options are available: Remove attachments - check this box to enable the feature. Remove all executable files - removes all executables. Remove all documents - removes all document files. Remove files with these comma separated extensions - fill the box with file extensions you wish to automatically remove. Separate the extensions with comma.
Pause server – allows you to pause the AVG Admin Server, and continue its running. Restart server – allows you to restart the AVG Admin Server. Server settings – allows you to set up the AVG Admin Server configuration. If you prefer not to automatically launch the AVG Admin Server Monitor at Windows system startup, you can uncheck the checkbox Run AVG Admin Server Monitor at startup (not recommended). 10.4.1.
Here you can change the port number and local address. o Port - the default port value is 4158. You can reset the default value any time by pressing the Set default port button. o Local address - specify the local address for incoming connections. The default value is empty, meaning any local address. If the specified name resolves to more than one address, then the first available one is used (the server tries all of them).
10.4.2. DataCenter tab This tab offers the following options: Database system settings section contains database options. To change the database system, choose a different one from the drop down list. Firebird This database engine is appropriate for smaller networks with up to 150 stations. The database is a standard part of AVG Internet Security Business Edition installation. To change location of the database file, you can change the path in the Database file field.
This engine can serve over 1000 stations in large networks. It is not a standard part of AVG Internet Security Business Edition and its usage is bound to the Microsoft SQL Server license. To change the database name insert a custom value into the Database name field. Oracle This engine can serve over 1000 stations in large networks. It is not a standard part of AVG Internet Security Business Edition and its usage is bound to a commercial license.
10.4.3. UpdateProxy tab This tab offers the following options: Update files folder - fill in a complete pathname (e.g. c:\AVGUpdate) to the directory, where the downloaded update files will be stored. Download source section (with two separate tabs for stations with AVG 2012 and older AVG 2011) Contains list of available update servers sorted according to priority. The server on the top will be used first. Possible options are as follows: Add - will open a dialog for adding a new update server.
You can also check or uncheck certain entries. The AVG Admin Server will consider only checked entries. Download Anti-Spam updates - If you do not wish to download Anti-Spam updates, uncheck this option. Note: Anti-Spam updates are downloaded directly from the Mailshell servers. Additional information about the Anti-Spam updates can be found in the Configuration/ Shared Settings for Stations/Groups/Anti-Spam chapter.
Note: The crucial fields to be filled are located in the Server for sending e-mails (SMTP) section (see below). You will be allowed to select other fields (To/Subject/Body) also during the Report Schedule Definition Wizard, but all values you will enter here will be considered as default. The Message header section contains these fields: To - specify one or more e-mail addresses that the report(s) will be sent to. Separate individual items by a comma.
Remote Administration component has to be installed on your station(s). During installation of this component, you will be asked for the connection string to the AVG DataCenter. Once the station is connected to the AVG DataCenter, you will be able to manage the station from the AVG Admin Console. The connection string can be changed later on in the AVG User Interface (menu Tools/ Advanced Settings) on the station. To connect to an AVG DataCenter from the AVG Admin Console, follow these steps: 1.
To deploy the UpdateProxy role to your AVG Admin Server, simply select from the Windows Start menu/All programs/AVG 2012 Remote Administration/AVG Admin Server Deployment Wizard item and in the second step of the wizard tick the checkbox UpdateProxy role and complete the rest of the steps.
Delete group - allows you to delete the selected group (does not apply for the New stations group). Access control for group If you are using the Full access control feature (DataCenter upper main menu of the AVG Admin Console, DataCenter settings menu item) and have at least one user account created, you can use this feature to set access rights to the selected group of stations.
You can select objects you want to copy the configuration to by choosing a group from the roll down menu, and/or selecting separate group or station by checking the checkbox near its name. When you're done, click OK button to confirm your choice. o Import settings... - allows you to load settings from the configuration file of your choice and apply them to a selected group of stations. This file (in .
Station settings: o Settings - opens station settings. o Firewall settings - displays Firewall settings of the currents station. Available only if there is the Firewall component installed. o Synchronize settings - will ask for immediate synchronization of stations' settings with the AVG DataCenter. o Refresh components state - will refresh the state of all components. o Copy settings to...
o Station description Simply enter brief description of the selected station into this dialog's text box and press OK. o Ask station for its description - will ask the selected station for its description. If available, the description will be displayed in the Description column. o Station shutdown or restart This dialog lets you shutdown or restart the selected station. Choose the action from the first roll-down menu, then the delay from the second one.
Use the Refresh button to obtain the most current Virus Vault findings. To work with individual threats, use one of the following buttons: Restore - select a threat or threats you wish to restore on the station and click this button. Delete - use this button to delete the selected threat(s).
You can also save the chosen sample to a folder in an encrypted form with the Save button for later processing (e.g. manual sending via e-mail etc.). o Manage scans - in order to view and manage scans using this function, the station in question must be running and connected to the Datacenter. You have the following control options: Refresh - obtains the most recent information about scans from the station. Start - starts the selected scans on the remote station.
o Ask to perform program update - will ask the selected station to start the program update process. o Ask to perform virus database update - will ask the selected station to start the virus database update process. o Ask to rollback last anti-virus database update - will ask the selected station to use previous virus database version and disregard the last one. o Delete temporary update files - sends request to selected station(s) to remove temporary update files.
Use Save button to store the data on your hard drive for later use (i.e. sending by e-mail). Click Send for sending the contents directly: Fill in your e-mail address and briefly describe your problem with the station to the next field. If you need to enclose some additional files (e.g. a screenshot or some logs previously requested by AVG Technical support), use the Attach button to choose them now. To remove an unwanted attachment, select it and use the Remove button.
o Generate new report - starts the Graphic reports generation dialog. Add to group - will add the selected station to a group. Remove from group - will remove the selected station from an user-created group. Delete station - will delete the station from the AVG DataCenter. Check stations availability This dialog allows you to find out, which stations are available (online) and which are not (offline). You will see each station's state in the column to the right of its name.
o Press the Enter button to confirm the creation of the group Immediately after creating the group, a new shared settings object is created in the AVG DataCenter that can be further edited. All members of the new group then automatically share this object’s configuration.
Clicking the Non-Compliant stations link will open a browser window with the list of stations in that state. Clicking the Options icon ( ) opens a login screen for AVG DataCenter: Use the form to quickly connect to a different DataCenter and display adequate results within the gadget. A V G I nternet Sec urity Bus ines s E dition 2 0 1 2 © 2 0 1 2 C opyright A V G T ec hnologies C Z, s .r.o. A ll rights res erved.
11. How to... This chapter describes how to do selected tasks in AVG Internet Security Business Edition.
http://www.avg.com/ww-en). Note: You can also insert the AVG DataCenter connection string directly during AVG installation on the station. To insert the string on the station, open the AVG User Interface and navigate to the Advanced settings (via upper menu Tools/Advanced Settings). Select Remote Administration group. In the right part of the dialog fill in the following entries: Server - enter your AVG DataCenter server name or IP address. Port - enter your AVG DataCenter server port (default is 4158).
Enter all required information and then use the Test connection button to verify the connection. If it fails, consult the Network requirements chapter for a possible solution. As an alternative, you may consider using AVG Settings Manager for applying settings on individual stations manually. 11.2. How to Migrate Stations from/to Different DataCenter This chapter describes migration of stations from a different AVG DataCenter.
3. Fill in the new server address and port number. Close the dialog by clicking the OK button. 4. Wait until all stations get synchronized. (Default synchronization period is 60 minutes.) Alternatively, you can force immediate synchronization of all stations: In the navigation tree rightclick on the Stations node and select Synchronize settings from the context menu. To verify successful migration of the stations, connect to your new AVG DataCenter: 1.
To be completely sure, that the update was successful, synchronize the settings (right-click on the Stations node or a particular station in a stations view and from the context menu select Station settings/Refresh component states) and then open the Versions tab in the stations view. Here you can see, if all databases have been updated. If the update went correctly, but after some time the stations become out-of-date again, check the following settings: 1.
- follow the steps described in the AVG Admin Deployment Wizard chapter. In the Configuration of update servers step, check that the update server is set correctly. Default update servers are as follows: Primary update server address: http://update.avg.com/softw/12/update - for stations with AVG 2012 http://update.avg.com/softw/10/update - for stations with older AVG 2011 Backup update server address: http://backup.avg.cz/softw/12/update - for stations with AVG 2012 http://backup.avg.
PL - Polish user interface JP - Japanese user interface KO - Korean user interface PT - Portuguese user interface RU - Russian user interface TR - Turkish user interface ZT - Traditional Chinese user interface ZH - Simplified Chinese user interface Example usage: From the Windows Start menu choose Run and enter your requested component with path and appropriate parameter. For example: Note: We assume that you have installed AVG to the following destination: C:\Program Files\AVG\AVG2012 Admin\ If not, chang
Deployment Wizard. When installing SQL Server, it is vital to remember that AVG 2012 Remote Administration requires administrator privileges to access Microsoft SQL database. Therefore, in the Database Engine Configuration step of SQL Server installation it is necessary to choose Mixed authentication mode (NOT preselected Windows authentication mode) and to specify the password for the SQL Server system administrator account (or accounts).
Mandatory settings The mandatory/monitored settings can be used for disabling/enabling various actions within the station settings. By marking an item as mandatory, the user on the local station will not be able to customize it. For more information see chapter Configuration/Shared Settings for Stations/Groups/ General control and priority levels. Scheduled scan cancellation You can decide, whether you want to allow the local user to stop a running scheduled scan or not.
Such request is stored in the AVG DataCenter and then distributed by AVG Admin Server to individual stations of the chosen group. Also the result is later displayed individually for each station. Duplicated requests If a same request is sent multiple times to a station, it is not stored in AVG DataCenter and the station will only process the first one. This applies also to offline stations. In other words there is no need to send more than one request, since the duplicated requests are disregarded.
The Account list section contains list of currently available usernames and their states. By default, there is only one account available - administrator with a blank password. If you intend keeping this account for further use, we strongly recommend to choose a proper password first (see below how to do this). The right-mouse button context menu has the following options: Active If you right-click on an existing account name, you will be able to activate or deactivate it by this function.
Enter the account name and password (twice for verification). The Associated Windows system login for SSO field can be used for entering an existing Windows system login name. If you then logon to Windows under this username, you will also be able to login to the AVG DataCenter without entering any password. Note, that the account name or password does not have to be the same, as the Windows system login name. Optionally, you can add some account description.
This tab contains list of actions available for the chosen account name. To forbid an action, uncheck the checkbox next to its name. If you uncheck the checkbox next to the name of category (like Stations, Scans etc.), you will forbid all actions from this category. Group access tab The Group access tab allows you to set access rights to user defined groups of stations. Double-click on one of these groups to trigger a drop down menu (or right-click on it to trigger the context menu with same contents).
Choosing this script will remove all settings, tests, rules and the scheduled tasks belonging to stations that no longer exist in the AVG DataCenter anymore from the AVG DataCenter. Remove unused update servers Choosing this script removes all update servers that have not communicated for more than 7 days from the AVG DataCenter. Remove old Alert Manager events from the AVG DataCenter Choosing this script removes all Alert Manager events older than 7 days from the AVG DataCenter.
There are several types of parameters, the individual usage is marked in brackets with either one of these options: Boolean - requires a numerical value limited to 0 or 1 (true/false). Example: /InstallToolbar=1 will install the feature. Integer - requires a numerical value. Example: /Maintenance=2 String - requires a string value, either specified in the Allowed values or described within the Description. Example: /TemporaryPath="C:\Temporary Folder\MFATemp" No value - some parameters can be used without a
UPDATE - Launches application update. TargetInstallationPath=< Defines the installation path. Default value is C:\Program string> Files\AVG\AVG2012 LicenseKey= Defines a license key used for installation. InstallToolbar= Defines if the toolbar will be installed 1 - will be installed or not. 0 - will not be installed ChangeBrowserSearchPr Defines if the default search engine 1 - provider will be changed ovider= provider should be changed.
Note: Whether a feature can be really installed or not depends mostly on its presence in the installation pack age, also on a license number and in some cases (plug-ins) on other software that must be present on the target PC.
fea_SrvAddI__ExAS AVG Anti-spam for MS Exchange Server fea_SrvAddI__ExSmtp Email scanner for MS Exchange Server (SMTP TA) fea_SrvAddI__ExRte Email scanner for MS Exchange Server (Routing TA) fea_SrvAddI__ExVS Email scanner for MS Exchange Server (VSAPI) fea_SrvAddI__Shrp File scanner for MS Sharepoint Server Below is the list of language codes for the SelectedLanguage parameter.
1033 English (US) 1049 Russian 1042 Korean 1057 Bahasa (Indonesian) 16393 English (Indian) 1086 Malay 1055 Turkish 3076 Chinese (Simplified) 2052 Chinese (Traditional) A V G I nternet Sec urity Bus ines s E dition 2 0 1 2 © 2 0 1 2 C opyright A V G T ec hnologies C Z, s .r.o. A ll rights res erved.
12. AVG DataCenter The AVG DataCenter consists of a database, and AVG Admin Server. The AVG Admin Server performs the role of a mediator between the AVG DataCenter and AVG stations. The AVG Admin Console uses the AVG Admin Server to approach the AVG DataCenter database, and to centrally define settings for stations and system parameters. AVG stations approach the AVG Admin Server to read the setup parameters; and to save their currently defined setting and scan results into the AVG DataCenter.
AVG Network Installer Wizard or manually). If you require more people to access AVG Admin Console and administer stations/settings on a different level, you can also create various user accounts with miscellaneous access rights. To manage access to the AVG DataCenter via AVG Admin Console, navigate to the DataCenter upper menu and select AVG DataCenter settings item. More information on this topic is available in the How to.../How to manage access rights chapter. 12.3.
13. Updates 13.1. General Information AVG offers two update levels to select from: Definitions update contains changes necessary for reliable anti-virus, anti-spam and antimalware protection. Typically, it does not include any changes to the code and updates only the definition database. This update should be applied as soon as it is available. Program update contains various program changes, fixes and improvements.
AVG stations then search for the update files on the computer with the AVG Admin Server running. This option is considered the preferred way of update file distribution within the local network. However, it is possible to use any other web server for this kind of update. The server only has to share one isolated folder accessible by AVG stations. When you are using Microsoft Information Server, for example, the root of all the accessible folders is usually C:\InetPub\wwwroot. Supposing C:\InetPub\wwwroot\av
14. AVG Admin Server 2012 for Linux AVG Admin Server 2012 for Linux is designed for administration of AVG DataCenter using the HTTP communication protocol for connection between the AVG stations and DataCenter. A Firebird server is used for accessing the DataCenter database. AVG Proxy server is also a part of the AVG Admin Server and serves for mirroring update files that can be accessed via the HTTP protocol.
14.1.1. Firebird Installation Note: If you have one of the supported Firebird servers already installed, please sk ip to the AVG Admin Server 2012 for Linux Installation section. Please download and install one of the supported Firebird servers. On some distributions, the Firebird server is already included and can be easily installed. For example on Debian/Ubuntu: # apt-get install firebird2.5-super # dpk g-reconfigure firebird2.
recommended to back up these first. To install AVG Admin Server 2012 for Linux, follow these instructions: 1. Unpack the installation file: $ tar -xvzf avgadmsrv2012-rxxxx.i386.tar.gz 2. Switch to the avgadmsrv directory $ cd avgadmsrv2012-rxxxx.i386 3. Launch the interactive installation script as the root user: # ./install.sh Note: If you are upgrading your installation, you need to stop the avgadmsrvd service first: /etc/init.d/avgadmsrvd stop 4.
Confirm it if you want to enable this roles. If you enable it later on you will be prompted to set all connected stations to update from this server (proxy role) and update URL's for connected stations. Finally, you will be prompted to enter an username, under which the Firebird Server is running (default is firebird) and database owner (default is SYSDBA)with password (default is masterkey, but we strongly recommend to use a custom one). 11.
14.1.6. AVG Admin Server 2012 for Linux Configuration If you require to change some default settings, you can do so in the configuration file. You can open the configuration file avgadmsrv.conf from the following location: /opt/avg/avgadmsrv/etc/avgadmsrv.conf You should restart the AVG Admin Server after each change. To restart the server use the following command: # /etc/init.d/avgadmsrvd restart You can find detailed configuration description in the Configuration chapter below. 14.1.7.
avgadmsrv -v | -h | -l The startup parameters are: -c, --config file Use other then default configuration file. Default configuration file is avgadmsrv.conf stored by default in the following directory: /opt/avg/avgadmsrv/etc -p, --port number Port number where AVG Admin Server 2012 for Linux listens for connection. The default value is 4158. -d, --dbase file Specification of the path to the DataCenter database. The default value is: /var/opt/avg/datacenter/avgdb.
--sqlScriptsPath DIR A path to the directory with SQL scripts to be used with the parameters below. The default path is: /opt/avg/avgadmsrv/var/db/scripts/ --exportDB DIR Export database to the specified directory. --importDB DIR Import database from the specified directory. --createDB Create a new database. --upgradeDB Upgrade the database to the most current version. --executeSQLscript FILE Execute specified SQL script on the database.
is empty, meaning any local address can be used. If the specified name resolves to more than one address then first available address is used (the server tries all of them). EnableDataCenter Specifies whether the Datacenter role is enabled or not. Set this parameter to 1 in order to enable the DataCenter role. Set this parameter to 0 to disable it (default). DatabaseType Specifies the database type. Currently the only option is: Firebird. ConnectionString Full path to the database file.
The URI (address part) used in the update URL to access updates from AVG Admin Server. The default value is /avgupdate - update URL is then http://:4158/avgupdate HttpServerRoot=/avgupdate HttpLogPath By default the server does not log HTTP requests. If this option is used then all HTTP requests are logged in the "Apache Server Combined log file format" into the specified file. UpdateURL List of update URLs which the server should use to download update files.
EmailSmtpPort - port of the SMTP server. The default value is 25. SmtpUsername - if the SMTP server is protected, specify the username here, otherwise leave empty. SmtpPassword - if the SMTP server is protected, specify the password here, otherwise leave empty. UseEncryptedProtocol If set to 1, the communication between stations and AVG Admin Server will be encrypted. The default is 1. Use 0 to disable the feature. ConnectionCount The number of allowed connections to the database.
MaxDatabaseBackupAge For how long should the server store the regular database backup (in days). Set to 0 (zero) in order to keep the backups untouched, i.e. forever (the default value is 14). BackupAlsoScanLogs If set to 1, scan logs in the database will also be backed up during the regular database backup and database export process (not recommended - scan logs may get very big). The default value is 0. AntispamAllowedDomains List of allowed domains to be accessed by the AVG Admin Server.
15. FAQ and Technical Support Should you have any problems with your AVG Internet Security Business Edition, either business or technical, please refer to the FAQ section of the AVG website at http://www.avg.com/ww-en/faq. If you do not succeed in finding help this way, contact the technical support department by email. Please use the contact form accessible from the system menu via Help / Support by e-mail in the AVG application.