AVG 9.0 File Server User Manual Document revision 90.8 (29.4.2010) C opyright AVG Technologies C Z, s.r.o. All rights reserved. All other trademarks are the property of their respective owners. This product uses RSA Data Security, Inc. MD5 Message-Digest Algorithm, C opyright (C ) 1991-2, RSA Data Security, Inc. C reated 1991. This product uses code from C -SaC zech library, C opyright (c) 1996-2001 Jaromir Dolecek (dolecek@ics.muni.cz).
Contents ........................................................................................................................ 6 1. Introduction ........................................................................................................................ 7 2. Installation Requirements 7 2.1 Operation.......................................................................................................... Systems Supported 7 2.2 Hardware..........................................................
23 6.2 Security.......................................................................................................... Status Info .......................................................................................................... 24 6.3 Quick Links .......................................................................................................... 25 6.4 Components Overview .......................................................................................................... 27 6.
52 10.3 Ignore.......................................................................................................... Faulty Conditions .......................................................................................................... 53 10.4 Virus Vault .......................................................................................................... 54 10.5 PUP Exceptions 10.6 Scans .........................................................................................................
103 11.5.2.......................................................................................................... How to Scan 103 11.5.3.......................................................................................................... What to Scan 111 11.6 Scan .......................................................................................................... Results Overview 112 11.7 Scan .....................................................................................................
1. Introduction This user manual provides comprehensive documentation for AVG 9.0 File Server. Congratulations on your purchase of AVG 9.0 File Server! AVG 9.0 File Server is one of a range of award winning AVG products designed to provide you with peace of mind and total security for your PC. As with all AVG products AVG 9.0 File Server has been completely re-designed, from the ground up, to deliver AVG’s renowned and accredited security protection in a new, more user friendly and efficient way.
2. Installation Requirements 2.1. Operation Systems Supported AVG 9.0 File Server is intended to protect workstations with the following operating systems: · Windows 2000 Server · Windows 2003 Server and Windows 2003 Server x64 Edition · Windows 2008 Server and Windows 2008 Server x64 Edition (and possibly higher service packs for specific operating systems) 2.2. Hardware Requirements Minimum hardware requirements for AVG 9.
3. AVG Installation Options AVG can be installed either from the installation file available on your installation CD, or you can download the latest installation file from AVG website (http://www.avg.com). Before you start installing AVG, we strongly recommend that you visit AVG website (http://www.avg.com) to check for a new installation file. This way you can be sure to install the latest available version of AVG 9.0 File Server.
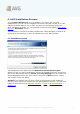
4. AVG Installation Process To install AVG 9.0 File Server on your computer, you need to get the latest installation file. You can use the installation file from the CD that is a part of your box edition but this file might be out-of-date. Therefore we recommended getting the latest installation file online. You can download the file from AVG website (http://www. avg.com), Downloads section. The installation is a sequence of dialog windows with a brief description of what do at each step.
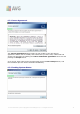
4.2. License Agreement The License Agreement dialog provides the full wording of the AVG license agreement. Please read it carefully and confirm that you have read, understood and accept the agreement by marking the I have read license agreement check box and pressing the Accept button. If you do not agree with the license agreement press the Don't accept button, and the installation process will be terminated immediately. 4.3. Checking System Status A V G 9 .
Having confirmed the license agreement, you will be redirected to the Checking System Status dialog. This dialog does not require any intervention; your system is being checked before the AVG installation can start. Please wait until the process has finished, then continue automatically to the following dialog. 4.4. Select Installation Type The Select Installation Type dialog offers the choice of two installation options: standard and custom installation.
the digital form of the license number is available (in the email), it is recommended to use the copy and paste method to insert it. Press the Next button to continue the installation process. If in the previous step you have selected the standard installation, you will be redirected directly to the Installing AVG dialog. If custom installation was selected you will continue with the Destination Folder dialog. 4.6.
Server should be installed. By default, AVG will be installed to the program files folder located on drive C:. In case the folder does not exist yet, you will be asked in a new dialog to confirm you agree AVG creates this folder now. If you want to change this location, use the Browse button to display the drive structure, and select the respective folder. Press the Next button to confirm. 4.7. Custom Installation - Component Selection The Component Selection dialog displays an overview of all AVG 9.
created using AVG Settings Manager on every computer with AVG application installed. You can then copy these files to any removable device and use them on every computer. Of course, the same goes for the AVG Settings Manager itself. For more information on this application click here. · Document Scanner for MS SharePoint This component scans document files stored in MS SharePoint and protects against possible threats. It is a crucial part of the whole AVG 9.
4.9. Installing AVG The Installing AVG dialog shows the progress of the installation process, and does not require any intervention: After the installation process is finished, you will be redirected to the next dialog automatically. 4.10. Schedule regular scans and updates In the Schedule regular scans and updates dialog set up the interval for new update files accessibility check-up, and define time when the scheduled scan should be A V G 9 .
launched. It is recommended to keep the default values. Press the Next button to continue. 4.11. AVG protection configuration is complete Now your AVG 9.0 File Server has been configured. In this dialog you decide whether you want to activate the option of anonymous reporting of exploits and bad sites to AVG virus lab. If so, please mark the I agree to provide ANONYMOUS information about detected threats to improve my security option. Finally, press the Finish button. A V G 9 .
5. After Installation 5.1. Scan optimization The scanning optimization functionality searches the Windows and Program files folders where it detects appropriate files (at the moment those are the *.exe, *.dll and *.sys files) and saves the information on these files. With the next access these files will not be scanned again and this reduce the the scanning time significantly.
5.4. Scanning of the whole computer There is a potential risk that a computer virus has been transmitted to your computer prior to AVG 9.0 File Server installation. For this reason you should run a Scan of the whole computer to make sure there are no infections on your PC. For instructions on running a Scan of the whole computer please consult the chapter AVG Scanning. 5.5. Eicar Test To confirm that AVG 9.0 File Server has been installed correctly you can perform the EICAR test.
5.6. AVG Default Configuration The default configuration (i.e. how the application is set up right after installation) of AVG 9.0 File Server is set up by the software vendor so that all components and functions are tuned up to achieve optimum performance. Unless you have a real reason to do so, do not change the AVG configuration! Changes to settings should only be performed by an experienced user.
6. AVG User Interface AVG 9.
indicates the AVG current status - details >> 6.1. System Menu The System menu is the standard navigation used in all Windows applications. It is located horizontally in the very top part of the AVG 9.0 File Server main window. Use the system menu to access specific AVG components, feature, and services. The system menu is divided into five main sections: 6.1.1. File · Exit - closes the AVG 9.0 File Server's user interface.
6.1.3. History · Scan results - switches to the AVG testing interface, specifically to the Scan Results Overview dialog · Resident Shield Detection - open a dialog with an overview of threats detected by Resident Shield · Virus Vault - opens the interface of the quarantine space (Virus Vault) to where AVG removes all detected infections that cannot be healed automatically for some reason.
· Your AVG Web - opens AVG website (http://www.avg.com) · About Viruses and Threats - opens the online Virus Encyclopedia where you can look up detailed information on the identified virus · Download AVG Rescue CD - opens your internet browser with AVG website on the Support center/Download page.
component's error status (the "Ignore component state" option is available from the context menu opened by a right-click over the respective component's icon in the component overview of the AVG main window). You may need to use this option in a specific situation but it is strictly recommended to switch off the Ignore component state option as soon as possible. The red icon indicates that AVG is in critical status! One or more components does not work properly and AVG cannot protect your computer.
These links are accessible from the user interface at all times. Once you use a quick link to run a specific process, the GUI will switch to a new dialog but the quick links are still available. 6.4. Components Overview The Components Overview section is located in the central part of the AVG User Interface.
· Remote Administration - connects you AVG to the AVG Remote Administration, allowing your network administrator to trigger some application actions remotely. The Remote Administration component will only appear if you have chosen to install it Components Selection step of the Installation Process).
6.5. Server components The Server components section is located in the central part of the AVG User Interface. The section is divided into two parts: · Overview of all installed components consisting of a panel with the component's icon and the information of whether the respective component is active or inactive · Description of a selected component Within the AVG 9.
Right-click your mouse over a component's icon to expand a context menu: besides opening the component's graphic interface you can also select to Ignore component state. Select this option to express you are aware of the component's error state but for some reason you wish to keep your AVG so and you do not want to be warned by the system tray icon change. 6.6. Statistics The Statistics section is located in the left bottom part of the AVG User Interface.
The System Tray Icon can also be used as a quick link to access the AVG main window at any time - double click on the icon.
7. AVG Components 7.1. Anti-Virus 7.1.1. Anti-Virus Principles The antivirus software's scanning engine scans all files and file activity (opening/ closing files, etc.) for known viruses. Any detected virus will be blocked from taking any action and will then be cleaned or quarantined. Most antivirus software also uses heuristic scanning, where files are scanned for typical virus characteristics, so called viral signatures.
7.1.2. Anti-Virus Interface The Anti-Virus component's interface provides some basic information on the component's functionality, information on the component's current status (Anti-Virus component is active.
7.2. Anti-Spyware 7.2.1. Anti-Spyware Principles Spyware is usually defined as a type of malware, i.e. software, that gathers information from a user's computer without the user's knowledge or consent. Some spyware applications may also be installed on purpose and often contain advertisements, window pop-ups or different types of unpleasant software. Currently, the most common source of infection is websites with potentially dangerous content.
· Spyware definitions - number provides the count of spyware samples defined in the latest spyware database version · Latest database update - specifies when and at what time the spyware database was updated · Database version - defines the number of the latest spyware database version; and this number increases with every virus base update There is just one operating button available within this component's interface (Back) press the button to return to the default AVG user interface (components overview).
7.3.2. Anti-Rootkit Interface The Anti-Rootkit user interface provides a brief description of the component's functionality, informs on the component's current status (Anti-Rootkit component is active.) and also brings information on the last time the Anti-Rootkit test was launched. In the bottom part of the dialog you can find the Anti-Rootkit settings section where you can set up some elementary functions of the rootkit presence scanning.
· Save changes - press this button to save all changes made in this interface and to return to the default AVG user interface (components overview) · Cancel - press this button to return to the default AVG user interface (components overview) without having saved any changes you made 7.4. License In the Licence component interface you will find a brief text describing the component's functionality, information on its current status (License component is active.
Control buttons · Register - connects to the registration page of AVG website (http://www. avg.com). Please fill in your registration data; only customers who register their AVG product can receive free technical support. · Re-activate - opens the Activate AVG dialog with the data you have entered in the Personalize AVG dialog of the installation process.
7.5.2. Resident Shield Interface Besides an overview of the most important statistical data and the information on the component's current status (Resident Shield is active and fully functional), the Resident Shield interface offers some elementary component settings options, too.
o or only after the user's approval (Ask me before removing threats) This choice has no impact on the security level, and it only reflects your preferences. In both cases, you can still select whether you want to Remove cookies automatically. In specific cases you can switch this option on to achieve maximum security levels, however it is switched off by default. (cookies = parcels of text sent by a server to a web browser and then sent back unchanged by the browser each time it accesses that server.
7.5.3. Resident Shield Detection Resident Shield scans files as they are copied, opened or saved.
The Resident Shield detection offers an overview of objects that were detected by the Resident Shield, evaluated as dangerous and either cured or moved to the Virus Vault.
7.6. Update Manager 7.6.1. Update Manager Principles No security software can guarantee true protection from various types of threats unless it is regularly updated! Virus writers are always looking for new flaws that they can exploit in both software and operating systems. New viruses, new malware, new hacking attacks appear daily. For this reason, software vendors are continually issuing updates and security patches, to fix any security holes that are discovered.
· Latest update - specifies when and at what time the database was updated · Virus database version - defines the number of the latest virus database version; and this number increases with every virus base update · Next scheduled update - specifies when and at what time the database is scheduled to be updated again Basic component configuration In the bottom part of the dialog you can find the Update Manager settings section where you can perform some changes to the rules of the update process launch.
8. AVG Server Components 8.1. Documents Scanner for MS SharePoint 8.1.1. Document Scanner Principles The purpose of the Document Scanner for MS SharePoint server component is to scan documents stored in MS SharePoint. If any viruses are detected, they are moved to the Virus Vault, or completely removed.
You can update these statistics at any time by clicking the Refresh statistical values link. New data will appear almost immediately. If you want to set all statistical values to zero, click the Reset statistical values link. Finally, clicking the Scan results link will trigger a new dialog containing a list of scan results. Sort the data in the list using radio buttons and/or tabs.
9. AVG for SharePoint Portal Server This chapter deals with AVG maintenance on MS SharePoint Portal Server that can be considered a special type of a file server. 9.1. Program Maintenance AVG for SharePoint Portal Server uses the Microsoft SP VSAPI 1.4 virus-scanning interface for the protection of your server against possible virus infection. The objects on the server are tested for the presence of malware when they are downloaded and/ or uploaded from or on the server by your users.
9.2. AVG for SPPS Configuration - SharePoint 2007 In the SharePoint 3.0 Central Administration interface you can easily configure the performance parameters and actions of the AVG for SharePoint Portal Server scanner. Choose the Operations option in the Central Administration section. A new dialog will appear. Select Antivirus item in the Security Configuration part.
· Scan documents on upload – enable/disable the scanning of documents being uploaded · Scan documents on download – enable/disable the scanning of documents being downloaded · Allow users to download infected documents – allow/disallow users to download infected documents · Attempt to clean infected documents – enable/disable automatic erasing of infected documents · Time out duration (in seconds) – the maximum number of seconds the virus scanning process will run after single launch (decrease the value whe
You can configure various AVG for SharePoint Portal Server anti-virus scanning actions and performance features here: · Scan documents on upload – enable/disable the scanning of documents being uploaded · Scan documents on download – enable/disable the scanning of documents being downloaded · Allow users to download infected documents – allow/disallow users to download infected documents · Attempt to clean infected documents – enable/disable automatic erasing of infected documents · Time limit of scanning –
10. AVG Advanced Settings The advanced configuration dialog of AVG 9.0 File Server opens in a new window named Advanced AVG Settings. The window is divided into two sections: the left part offers a tree-arranged navigation to the program configuration options. Select the component you want to change the configuration of (or its specific part) to open the editing dialog in the right-hand section of the window. 10.1.
to restart the user interface; follow these steps: · Select the desired language of the application and confirm your selection by pressing the Apply button (right-hand bottom corner) · Press the OK button confirm · New dialog window pops-up informing you the language change of AVG user interface requires the application restart: Balloon tray notifications Within this section you can suppress display of system tray balloon notifications on the status of the application.
information regarding file saving, copying, and opening processes should be displayed or suppressed; o Display tray notifications about scanning - decide whether information upon automatic launch of the scheduled scan, its progress and results should be displayed. Gaming mode This AVG function is designed for full-screen applications where possible AVG information ballons (displayed e.g. when a scheduled scan is started) would be disturbing (they could minimize the application or corrupt its graphics).
Then, select the respective event from the list and browse (Browse) your disk for an appropriate sound you want to assign to this event. To listen to the selected sound, highlight the event in the list and push the Play button. Use the Delete button to remove the sound assigned to a specific event. Note: Only *.wav sounds are supported! 10.3.
There might be a situation that for some reason you need to switch a component off temporarily (this is not recommended, you should try to keep all components permanently on and in default configuration, but it may be happen). In that case the system tray icon automatically reports the component's error status. However, in this very case we cannot talk about an actual error since you have deliberately induced it yourself, and you are aware of the potential risk.
disk. · Automatic file deletion - in this section define the maximum length of time that objects should be stored in the Virus Vault (Delete files older than ... days), and the maximum number of files to be stored in the Virus Vault ( Maximum number of files to be stored) 10.5. PUP Exceptions AVG 9.0 File Server is able to analyze and detect executable applications or DLL libraries that could be potentially unwanted within the system.
· File - provides the name of the respective application · File Path - shows the way to the application's location · Checksum - displays the unique 'signature' of the chosen file. This checksum is an automatically generated string of characters, which allows AVG to unequivocally distinguish the chosen file from other files. The checksum is generated and displayed after successful addition of the file.
10.6. Scans The advanced scan settings is divided into four categories referring to specific scan types as defined by the software vendor: · Scan Whole Computer - standard predefined scan of the entire computer · Shell Extension Scan - specific scanning of a selected object directly from the Windows Explorer environment · Scan Specific Files or Folders - standard predefined scan of selected areas of your computer · Removable Device Scan - specific scanning of removable devices attached to your computer 10.
Scan settings The Scan settings section offers a list of scanning parameters that can be optionally switched on/off: · Automatically heal/remove infection - if a virus is identified during scanning it can be healed automatically if a cure is available. If the infected file cannot be healed automatically, or if you decide to switch off this option, you will be notified upon a virus detection and will have to decide what to do with the detected infection.
the scanning time even more, because these files are often quite large and are not too likely to be infected by a virus). Again, you can specify by extensions which files are those that should always be scanned. · Optionally, you can decide you want to Scan files without extension - this option is on by default, and it is recommended that you keep it so unless you have a real reason to change it. Files with no extension are rather suspicious and should be scanned at all times.
The list of parameters is identical to those available for the Scan of the whole computer. However, the default settings differ: with the Scan of the Whole Computer most parameters are selected while for the Shell extension scan ( Scanning in Windows Explorer) only the relevant parameters are switched on. Note: For a description of specific parameters please consult the chapter AVG Advanced Settings / Scans / Scan Whole Computer.
previous one is checked. If you check it, the Scan Results Details dialog will only appear if there were any threats found during the Shell Extension Scan. 10.6.3. Scan Specific Files or Folders The editing interface for Scan specific files or folders is identical to the Scan Whole Computer editing dialog.
10.6.4. Removable Device Scan The editing interface for Removable device scan is also very similar to the Scan Whole Computer editing dialog: The Removable device scan is launched automatically once you attach any removable device to your computer. By default, this scanning is switched off. However, it is crucial to scan removable devices for potential threats since these are a major source of infection.
· Program update schedule 10.7.1. Scheduled Scan Parameters of the scheduled scan can be edited (or a new schedule set up) on three tabs: On the Schedule settings tab you can first check/uncheck the Enable this task item to simply deactivate the scheduled test temporarily, and switch it on again as the need arises. Next, in the text field called Name (deactivated for all default schedules) there is the name assigned to this very schedule by the program vendor.
hand, an example of a good descriptive name would be "System areas scan" etc. Also it is not necessary to specify in the scan's name whether it is the scan of the whole of the computer or just a scan of selected files or folders - your own scans will always be a specific version of the scan of selected files or folders. In this dialog you can further define the following parameters of the scan: Schedule running Here, you can specify time intervals for the newly scheduled scan launch.
On the How to scan tab you will find a list of scanning parameters that can be optionally switched on/off. By default, most parameters are switched on and the functionality will be applied during scanning. Unless you have a valid reason to change these settings we recommend to keep the predefined configuration: · Automatically heal/remove infection - (switched on, by default): if a virus is identified during scanning it can be healed automatically if a cure is available .
an additional measure that increases your computer security even more, however it can possibly block legal programs - that's why it is switched off by default; · Scan for Tracking Cookies - (switched off, by default): this parameter of the Anti-Spyware component defines that cookies should be detected during scanning; (HTTP cookies are used for authenticating, tracking, and maintaining specific information about users, such as site preferences or the contents of their electronic shopping carts) · Scan insid
medium level of automatic resource usage. If you want the scanning to run faster, it will take less time but the system resources usage will increase significantly during the scan, and will slow down your other activities on the PC (this option can be used when your computer is switched on but nobody is currently working on it). On the other hand, you can decrease the system resources usage by extending the scanning duration. Click the Set additional scan reports ...
On the What to scan tab you can define whether you want to schedule scanning of the whole computer or scanning of specific files or folders. If you select scanning of specific files or folders, in the bottom part of this dialog the displayed tree structure activates and you can specify the folders to be scanned. A V G 9 .0 File Server © 2 0 1 0 C opyright A V G T ec hnologies C Z, s .r.o. A ll rights res erved.
10.7.2. Virus Database Update Schedule On the Schedule settings tab you can first check/uncheck the Enable this task item to simply deactivate the scheduled virus database update temporarily, and switch it on again as the need arises. The basic virus database update scheduling is covered within the Update Manager component.
certain period of time (Run every ...) or by defining an exact date and time (Run at specific time ...), or possibly by defining an event that the update launch should be associated with (Action based on computer startup). Advanced schedule options This section allows you to define under which conditions the virus database update should/should not be launched if the computer is in low power mode or switched off completely.
10.7.3. Program Update Schedule On the Schedule settings tab you can first check/uncheck the Enable this task item to simply deactivate the scheduled program update temporarily, and switch it on again as the need arises. In the text field called Name (deactivated for all default schedules) there is the name assigned to this very schedule by the program vendor.
Advanced schedule options This section allows you to define under which conditions the program update should/ should not be launched if the computer is in low power mode or switched off completely. Other update settings Check the Run the update again after as the internet connection is available option to make sure than if the internet connection gets corrupted and the update process fails, it will be launched again immediately after the internet connection is restored.
10.8. Resident Shield The Resident Shield component performs live protection of files and folders against viruses, spyware and other malware. In the Resident Shield Settings dialog you can activate or deactivate the Resident Shield protection completely by checking/unchecking the Enable Resident Shield item (this option is switched on by default).
increases your computer security even more, however it can possibly block legal programs - that's why it is switched off by default; · Scan files on close - on-close scanning ensures that AVG scans active objects (e.g.
Decide whether you want all files to be scanned or just infectable files - if so, you can further specify a list of extensions defining files that should be excluded from scanning, and also a list of file extensions defining files that must be scanned under all circumstances. 10.8.2. Directory Exludes The Resident Shield - Directory Excludes dialog offers the possibility of defining folders that should be excluded from the Resident Shield scanning.
· Edit list – allows you to edit the list of folders · Remove path – allows you to delete the path to a selected folder from the list 10.8.3. Excluded Files The Resident Shield - Excluded files dialog behaves just like the previously described Resident Shield - Directory Excludes but instead of folders you can now define specific files that should be excluded from the Resident Shield scanning.
· Edit list – allows you to edit the list of files · Remove – allows you to delete the path to a selected file from the list 10.9. Cache Server The Cache Server is a process designed to speed up any scan (on-demand scan, scheduled whole computer scan, Resident Shield scan). It gathers and keeps information of trustworthy files (system files with digital signature etc.): These files are then considered safe, and during scanning are skipped.
of the virus database. 10.10. Anti-Rootkit In this dialog you can edit the Anti-Rootkit component's configuration: Editing of all functions of the Anti-Rootkit component as provided within this dialog is also accessible directly from the Anti-Rootkit component's interface.
· Full rootkit scan - scans all accessible disks except for A: and B: 10.11. Update The Update navigation item opens a new dialog where you can specify general parameters regarding the AVG update: When to update files In this section you can select between two alternative options: update can be scheduled for the next PC restart or you can launch the update immediately. By default, the immediate update option is selected since this way AVG can secure the maximum safety level.
restart needed to finalize the update process · Restart immediately - the computer will be restarted automatically immediately after the update process has finished, and your approval will not be required · Complete at next computer restart - the update process finalization will be postponed until the next computer restart - again, please keep in mind that this option is only recommended if you can be sure the computer gets restarted regularly, at least daily Post update memory scan Mark this check box to
10.11.1. Proxy The proxy server is a stand-alone server or a service running on a PC that guarantees safer connection to the Internet. According to the specified network rules you can then access the Internet either directly or via the proxy server; both possibilities can also be allowed at the same time.
· Server – specify the server’s IP address or the name of the server · Port – specify the number of the port that enables Internet access (by default, this number is set to 3128 but can be set differently – if you are not sure, contact your network administrator) The proxy server can also have configured specific rules for each user.
10.11.2. Dial-up All parameters optionally defined in the Update settings - Dial-Up connection dialog refer to the dial-up connection to the Internet. The dialog's fields are inactive until you check the Use dial-up connections option that activates the fields. Specify whether you want to connect to the Internet automatically (Automatically open this connection) or you wish to confirm the connection manually every time ( Ask before connection).
10.11.3. URL The URL dialog offers a list of Internet addresses from which the update files can be downloaded. The list and its items can be modified using the following control buttons: · Add – opens a dialog where you can specify a new URL to be added to the list · Edit - opens a dialog where you can edit the selected URL parameters · Delete – deletes the selected URL from the list · Move Up/Move Down – these two buttons are quite important.
10.11.4. Manage The Manage dialog offers two options accessible via two buttons: · Delete temporary update files - press this button to delete all redundant update files from your hard disk (by default, these files are being saved for 30 days) · Revert virus database to previous version – press this button to delete the latest virus base version from your hard disk, and to return to the previously saved version (new virus base version will be a part of the following update) 10.12.
The Remote Administration settings refer to connecting the AVG client station to the remote administration system.
Note: For a detailed description on remote administration please consult the AVG Business Edition documentation. 10.13. Server components 10.13.1. Document Scanner for MS SharePoint In this dialog you will find several preset options related to the Document Scanner for MS SharePoint document virus scanning performance.
Scanning properties · Use Heuristics – check to use Heuristics detection method when scanning documents. When this option is on, you can filter documents not only by extension but also the actual contents of the document will be considered. · Report Potentially Unwanted Programs and Spyware threats – check to use the Anti-Spyware engine, i.e. detect and report suspicious and potentially unwanted programs when scanning documents. · Scan inside archives – check to scan contents of archives.
In this dialog you can configure how the Document Scanner for MS SharePoint component should behave, when it detects a threat. The threats are divided into several categories: · Infections – malicious codes that copy and spread themselves, often unnoticed until the damage is done. · PUP (Potentially Unwanted Programs) – such programs, in general, vary from positively serious to only potential threats to your privacy. · Warnings – detected objects unable to be scanned.
· Move to Vault – every infected document will be moved into Virus Vault quarantine environment. · Remove – a document where a virus is detected will be deleted. A V G 9 .0 File Server © 2 0 1 0 C opyright A V G T ec hnologies C Z, s .r.o. A ll rights res erved.
11. AVG Scanning Scanning is a crucial part of AVG 9.0 File Server functionality. You can run ondemand tests or schedule them to run periodically at convenient times. 11.1. Scanning Interface The AVG scanning interface is accessible via the Computer Scanner quick link. Click this link to switch to the Scan for threats dialog.
· Scan history - displays the Scan results overview dialog with the entire history of scanning · View Virus Vault - opens a new window with the Virus Vault - a space where detected infections are quarantined 11.2. Predefined Scans One of the main features of AVG 9.0 File Server is on-demand scanning. On-demand tests are designed to scan various parts of your computer whenever suspicion of possible virus infection arises.
Scan configuration editing You have the option of editing the predefined default settings of the Scan of the whole computer. Press the Change scan settings link to get to the Change scan settings for Scan whole computer dialog. It is recommended to keep to the default settings unless you have a valid reason to change them! A V G 9 .0 File Server © 2 0 1 0 C opyright A V G T ec hnologies C Z, s .r.o. A ll rights res erved.
· Scanning parameters - in the list of scanning parameters you can switch on/ off specific parameters as needed. By default, most of the parameters are switched on and these will be used automatically during scanning. · Additional scan settings - the link opens a new Additional scan settings dialog where you can specify the following parameters: o Computer shutdown options - decide whether the computer should be shut down automatically once the running scanning process is over.
locked).
11.2.2. Scan Specific Files or Folders Scan specific files or folders - scans only those areas of your computer that you have selected to be scanned (selected folders, hard disks, floppy discs, CDs, etc.). The scanning progress in case of virus detection and its treatment is the same as with the scan of the whole computer: any virus found is healed or removed to the Virus Vault. Specific files or folders scanning can be used to set up your own tests and their scheduling based on your needs.
Scan configuration editing You have the option of editing the predefined default settings of the Scan of specific files or folders. Press the Change scan settings link to get to the Change scan settings for Scan of specific files or folders dialog.
o Computer shutdown options - decide whether the computer should be shut down automatically once the running scanning process is over. Having confirmed this option (Shutdown computer upon scan completion), a new option activates that allows the computer to shut down even if it is currently locked (Force shutdown is computer is locked).
computer but you do not care so much how long the scanning takes), or faster with increased system resources requirements (e.g. when the computer is temporarily unattended). · Set additional scan reports - the link opens a new Scan Reports dialog where you can select what types of possible findings should be reported: Warning: These scan settings are identical to the parameters of a newly defined scan - as described in the chapter AVG Scanning / Scan scheduling/ How to Scan.
Scan configuration editing Anti-Rootkit scan is always launched in the default settings, and editing of the scan parameters is only accessible within the AVG Advanced Settings / Anti-Rootkit dialog. In the scanning interface, only the following configuration is available: · Automatic scan - you can use the slider to change the scanning process priority. By default, the priority is set to medium level (Automatic scan) that optimizes the scanning process speed and the use of system resources.
11.3. Scanning in Windows Explorer Besides the pre-defined scans launched for the entire computer or its selected areas, AVG 9.0 File Server also offers the option of quick scanning of a specific object directly in the Windows Explorer environment. If you want to open an unknown file and you cannot be sure of its content, you may want to have it checked on demand.
Syntax of the command The syntax of the command follows: · avgscanx /parameter ... e.g. avgscanx /comp for scanning the whole computer · avgscanx /parameter /parameter .. with multiple parameters these should be lined in a row and separated by a space and a slash character · if a parameters requires specific value to be provided (e.g.
· /EXCLUDE Exclude path or files from scan · /@ Command file /file name/ · /EXT Scan these extensions /for example EXT=EXE,DLL/ · /NOEXT Do not scan these extensions /for example NOEXT=JPG/ · /ARC Scan archives · /CLEAN Clean automatically · /TRASH Move infected files to the Virus Vault · /QT Quick test · /MACROW Report macros · /PWDW Report password-protected files · /IGNLOCKED Ignore locked files · /REPORT Report to file /file name/ · /REPAPPEND Append to the report file · /REPOK
· /ADS Scan Alternate Data Streams (NTFS only) · /ARCBOMBSW Report "archive bombs" (repeatedly compressed archives) 11.5. Scan Scheduling With AVG 9.0 File Server you can run scanning on demand (for instance when you suspect an infection has been dragged to your computer) or based on a scheduled plan.
You can edit / add scans using the following control buttons: · Add scan schedule - the button opens the Settings for scheduled scan dialog, Schedule settings tab. In this dialog you can specify the parameters of the newly defined test. · Edit scan schedule - this button can only be used if you have already previously selected an existing test from the list of scheduled tests.
On the Schedule settings tab you can first check/uncheck the Enable this task item to simply deactivate the scheduled test temporarily, and switch it on again as the need arises. Next, give a name to the scan you are about to create and schedule. Type the name into the text field by the Name item. Try to use brief, descriptive and apt names for scans to make it easier to later recognize the scan from others.
Control buttons of the Settings for scheduled scan dialog There are two control buttons available on all three tabs of the Settings for scheduled scan dialog (Schedule settings, How to scan and What to scan) and these have the same functionality no matter on which tab you currently are: · Save - saves all changes you have performed on this tab or on any other tab of this dialog and switches back to the AVG scanning interface default dialog.
the detected infection. The recommended action is to remove the infected file to the Virus Vault.
o Computer shutdown options - decide whether the computer should be shut down automatically once the running scanning process is over. Having confirmed this option (Shutdown computer upon scan completion), a new option activates that allows the computer to shut down even if it is currently locked (Force shutdown if computer is locked).
computer but you do not care so much how long the scanning takes), or faster with increased system resources requirements (e.g. when the computer is temporarily unattended). · Set additional scan reports - the link opens a new Scan reports dialog where you can select what types of possible findings should be reported: Note: By default, the scanning configuration is set up for optimum performance.
11.5.3. What to Scan On the What to scan tab you can define whether you want to schedule scanning of the whole computer or scanning of specific files or folders. In case you select scanning of specific files or folders, in the bottom part of this dialog the displayed tree structure activates and you can specify folders to be scanned.
11.6. Scan Results Overview The Scan results overview dialog is accessible from the AVG scanning interface via the Scan history button. The dialog provides a list of of all previously launched scans and information of their results: · Name - scan designation; it can either be the name of one of the predefined scans, or a name you have given to your own scheduled scan.
· Start time - date and time when the scan was launched · End time - date and time when the scan ended · Tested objects - number of objects that were checked during scanning · Infections - number of virus infections detected / removed · Spyware - number of spyware detected / removed · Scan log information - information relating to the scanning course and result (typically on its finalization or interruption) Control buttons The control buttons for the Scan results overview dialog are: · View details - this
were detected during scanning · Rootkits - this tab is displayed only if rootkits were detected during scanning · Information - this tab is displayed only if some potential threats were detected but these cannot be classified as any of the above categories; then the tab provides a warning message on the finding 11.7.1.
returns to the Scan results overview dialog. The Remove all unhealed infections button only appears if the scan has detected some threats that were not removed automatically. Clicking it moves such threats to the Virus Vault. 11.7.2. Infections Tab The Infections tab is only displayed in the Scan results dialog if a virus infection was detected during scanning.
o Deleted - the infected object was deleted o Added to PUP exceptions - the finding was evaluated as an exception and added to the list of PUP exceptions (configured in the PUP Exceptions dialog of the advanced settings) o Locked file - not tested - the respective object is locked and AVG is therefore unable to scan it o Potentially dangerous object - the object was detected as potentially dangerous but not infected (it can contain macros, for instance); the information should be taken as a warning only o R
· Close results - terminates the detailed information overview and returns to the Scan results overview dialog 11.7.3. Spyware Tab The Spyware tab is only displayed in the Scan results dialog in if spyware was detected during scanning.
o Added to PUP exceptions - the finding was evaluated as an exception and added to the list of PUP exceptions (configured in the PUP Exceptions dialog of the advanced settings) o Locked file - not tested - the respective object is locked and AVG is therefore unable to scan it o Potentially dangerous object - the object was detected as potentially dangerous but not infected (it can contain macros, for instance); the information is a warning only o Reboot is required to finish the action - the infected object
the Scan results overview dialog 11.7.4. Warnings Tab The Warnings tab displays information on "suspected" objects (typically files) detected during scanning. When detected by the Resident Shield, these files are blocked from being accessed. Typical examples of this kind of findings are: hidden files, cookies, suspicious registry keys, password protected documents or archives, etc. Such files do not present any direct threat to your computer or security.
11.7.6. Information Tab The Information tab contains data on such "findings" that cannot be categorized as infections, spyware, etc. They can neither be positively labeled as dangerous but they are still worth your attention. AVG scan is able to detect files which may not be infected, but are suspicious. These files are reported either as Warning, or as Information.
11.8. Virus Vault Virus Vault is a safe environment for the management of suspect/infected objects detected during AVG tests. Once an infected object is detected during scanning, and AVG is not able to heal it automatically, you are asked to decide what is to be done with the suspect object. The recommended solution is to move the object to the Virus Vault for further treatment.
e-mail attachment that does not respond to the actual content of the attachment), it will be provided in this column.
12. AVG Updates Keeping your AVG up-to-date is crucial to ensure that all newly discovered viruses will be detected as soon as possible. Since AVG updates are not released according to any fixed schedule but rather in reaction to amount and severity of new threats, it is recommended to check for new updates at least once a day. Checking every 4 hours will guarantee that your AVG Virus base is kept up-to-date also during the day. 12.1.
Note: Before the AVG program update launch a system restore point is created. In case the update process fails and your operating system crashes you can always restore your OS in its original configuration from this point. This option is accessible via Start / All Programs / Accessories / System tools / System Restore. Recommended to experienced users only! A V G 9 .0 File Server © 2 0 1 0 C opyright A V G T ec hnologies C Z, s .r.o. A ll rights res erved.
13. Event History The Event History dialog is accessible from the system menu via the History/Event History Log item. Within this dialog you can find a summary of important events that occurred during AVG 9.0 File Server operation.
14. AVG Settings Manager The AVG Settings Manager is a tool suitable mainly for smaller networks that allows you to copy, edit and distribute AVG configuration. The configuration can be saved to a portable device (USB flash drive etc.) and then applied manually to chosen stations. The tool is included in the installation of AVG and available via Windows Start menu: All Programs/AVG 9.
Use this button to save the AVG configuration file (.pck) of the local AVG installation. If you did not set a password for the Allowed actions, you may experience the following dialog: Answer Yes if you wish to set the password for access to Allowed items now and then fill-in the required information and confirm your choice. Answer No to skip the password creation and continue to save the local AVG configuration to a file.
You can use the Proxy button to define a proxy server settings if your network requires this for a successful connection. By clicking OK the cloning process begins and should shortly finish. You may also experience a dialog asking about setting password to Allowed items (see above). Once finished, there should be AvgSetup.bat available in the chosen folder along with other files. If you run the AvgSetup.bat file, it will install AVG according to the parameters chosen above. A V G 9 .
15. FAQ and Technical Support Should you have any problems with your AVG, either business or technical, please refer to the FAQ section of AVG website (http://www.avg.com). If you do not succeed in finding help this way, contact the technical support department by email. Please use the contact form accessible from the system menu via Help / Get help online. A V G 9 .0 File Server © 2 0 1 0 C opyright A V G T ec hnologies C Z, s .r.o. A ll rights res erved.