
Specifications


Lotus Redbooks Wiki – IBM Lotus Notes and Domino V8.5 Deployment Guide
124
Integrate Dictionary Files
This chapter describes how to add spell checking dictionary files to your installation package.
Prerequisites:
• Spell Checking Dictionaries - File name : Dictionaries.exe
This file can be found on the Lotus Notes product CD/DVD in the folder Apps\Dictionaries\XTAF\
or can be downloaded from IBM Passport Advantage by searching for Part Number
C1435EN, which
contains the required file in zipped form.
1.
Run dictionaries.exe to extract all dictionary files to a new folder.
C:\makeinstall\Dictionaries
2. Launch InstallShield Tuner, to create a new .MST file (or use an existing one)
3. Go to "System Configration\Files and Folders"
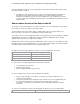
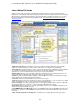
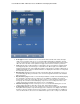
4. Drag and drop the dictionary files to the folder shown below:
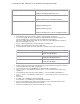
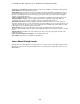
5. Go to "Additional Toos \ Direct Editor" Section and open the component table.
6. Within the table "Component" search for "CST_COMPONENT" and change the vaule in the
Directory column to "VDIR_SHARED" as shown in the picture below.
7. Save and close the .MST file
For detail steps how to use these dictionaries at the client side, please refer to Setting spell check
preferences in Notes Help.
Note: Lotus Notes 8.5.1 is using a new dictionary engine (XTAF) which does not suppor certain languages.
In case of any issues, Lotus Notes clients can be forced to use the legacy mode by adding
„SPELL_FORCE_LEGACY=1" to the clients Notes.ini.
Further reading:
Technote # 1199055
- How to obtain Notes client dictionary files
Technote # 1154399
- How Can You Switch Spell Checker Languages
Finalizing a custom package
If everything has been specified and all information has been entered via InstallShield Tuner so as to
provide a correct and appropriate configuration of the custom installation package for the package. It is now
time to save the Transform file (it should have been done a number of times during the various steps of
entering data for and configuring the custom installation package) and to generate the custom installation
package. To do so, the steps below need to be performed.
• Click on Save on the toolbar.
• Select "Package" from the menu "Project".
Now all required files (as defined earlier on in InstallShield Tuner) will be copied into a new
package at the defined location also defined earlier.
• Click on Save one last time on the button bar and close Tuner.
The installation kit is now ready to be distributed to users.