
User manual

15
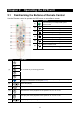
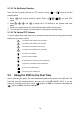
TIME SETUP
TIME
AUTO SYNC TIME
TIME ZONE
LAST SYNC TIME
DAYLIGHT SAVING
DELETE RECORDED FILES OLDER THAN
10 DAYS
2007 / 03 / 12
15 : 45 : 57
OFF
GMT
2007 / 03 / 12
12 : 00 : 00
DATE
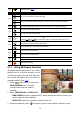
HARD DISKS INFORMATION
VERSION S3 . 01. 01. 00. 03
MASTER HDD
HDD FORMAT YES (SELECT) / NO (MENU)
HDD CHECKING . . .
SIZE 76GB 509MB
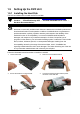
2.2.1 Set up the System Date and Time
Before starting record video, adjust the date and time first.
1. Press to call up the OSD menu and then use
▲
and
▼
to go up and down
and select
Submenu
. And then, press or
▲
to confirm the selection.
2. In Submenu, use
▲
and
▼
to go up and down and select the
Time Setup
and
press again to make a selection. And then, use
▲
and
▼
to select the Date
and press or
▲
to confirm the selection.
3. To adjust the date, use
▼
and
▼
or
▼
▼
and
▼
▼
buttons to move the selection to the left and right.
4. To adjust Time, follow the above step 2 and 3.
5. Press to go back to main menu after adjustment.
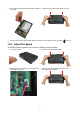
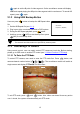
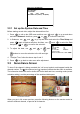
2.3 Surveillance Screen
To know if the channel is being recorded, the “ ” record symbol would appear beside the
channel number. The (microphone) and (speaker) indicate that the audio is available.
The information below the screen shows the current date and time, recording mode (record
schedule setting), and the percentage of the used hard disk space.
Full Screen Preview
Quad mode Preview
When you are in full screen preview, press the following buttons on the remote control to
switch to different channel, or preview all 4 channels: