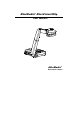
AVerMedia® AVerVision300p User Manual AVerMedia® Document Camera
FCC NOTICE (Class A) This device complies with Part 15 of the FCC Rules. Operation is subject to the following two conditions: (1) this device may not cause harmful interference, and (2) this device must accept any interference received, including interference that may cause undesired operation. NOTE- This equipment has been tested and found to comply with the limits for a Class A digital device, pursuant to Part 15 of the FCC Rules.
COPYRIGHT © 2006 by AVerMedia TECHNOLOGIES, Inc. All rights reserved. No part of this publication may be reproduced, transmitted, transcribed, stored in a retrieval system, or translated into any language in any form by any means without the written permission of AVerMedia TECHNOLOGIES, Inc. THE MARK OF CROSSED-OUT WHEELED BIN INDICATES THAT THIS PRODUCT MUST NOT BE DISPOSED OF WITH YOUR OTHER HOUSEHOLD WASTE.
Table of Contents Introduction ..........................................................................................1 Package Contents ................................................................................2 Optional Accessories ............................................................................................ 3 Technical Specifications......................................................................4 Installing and Setting Up the Hardware ......................................
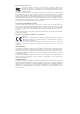
Introduction Thank you for purchasing the AVerMedia® AVerVision300p. This document camera displays any documents, negatives, transparencies and 3D objects onto a TV, LCD or DLP projector making presentations a snap. The advanced features of the AVerVision300p make it a versatile and multifunctional product, making presentations easy. You can save still images with built-in flash memory and download to a PC.
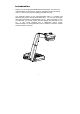
Pa ck a g e C o n t e n t s ® AVerMedia AVerVision300p User Manual Remote Control (batteries included) Driver CD Anti-glare Sheet RCA Cable Power Adapter S-Video Cable Computer Extension Cable (VGA Cable) Power Cord * The power cord will vary depending on the standard power outlet of the country where it is sold.
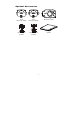
Optional Accessories 34mm 28mm Microscopic Adapter Microscopic Adapter Monitor Adapter Computer Adapter (for MAC) (for MAC) Microscopic Coupler Light Box 3
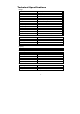
Te c h n i c a l S p e c i f i c a t i o n s Image Sensor 1/2” progress scan CMOS VGA Effective Pixels 790K 1024 (H) x 768 (V) Frame Rate 24 fps (Max.) White Balance Auto / Manual Exposure Auto / Manual / Flicker / Night View Image mode Text / Graphics / High Frame Effect Analog RGB output Color / B/W / Negative; Reverse; Mirror XGA: 75 Hz, SVGA: 60 Hz, VGA: 60 Hz H Sync. Signal 60K / 37.879K / 31.469 KHz, TTL level V Sync. Signal 75Hz / 60Hz / 60 Hz, TTL level Image Signal Level 0.
Installing and Setting Up the Har d war e The ports on the back and side panel of the AVerVision300p enable you to connect the unit to a computer, graphics display monitor or LCD/ DLP projector, TV or other devices. Illustrated below are the ports that are located at the back and side panel of the AVerVision300p with their corresponding labels. Port (1) Security Slot (2) DC 12V (input) (3) DC 6V (output) (4) USB1.
C o n n e c t i n g t h e Powe r A d a p t e r You can connect the power adapter to a standard 100V~240V AC power source. C o n n e c t i n g a VG A , M a c D i s p l a y M o n i t o r o r LC D / D L P P r o j e c t o r AVerVision300p enables you to display a presentation on a VGA / MAC display monitor, or LCD/DLP projector with an outstanding video quality.
Connecting a TV To display a presentation on TV, connect AVerVision300p to your TV by using the Video Cable or S-Video cable, switch the output mode to TV system by pressing the VGA / TV button on the remote control or control panel. If you are using a SCART RGB monitor, connect it by using the RCA to SCART cable. (The SCART RGB cable is provided as an optional accessory cable with the AVerVision300p.
Connecting a Computer via USB connection Download the saved images from AVerVision300p’s built-in memory to your computer or access the software application as a PC cam via the USB cable. Select the function through OSD, then connect it. (Refer to the section, Using the AVerVision Application, for more details.) I n s t a l l i n g t h e O p t i o n a l L i g h t B ox Connecting an optional light box enables you to view x-rays, transparencies and negative slides.
Connecting to a Microscope Connecting the AVerVision300p to a microscope enables you to examine microscopic objects on a larger screen without straining your eyes.
A d j u s t i n g t h e AVe r V i s i o n 3 0 0 p This section provides illustrated useful tips on how to adjust the AVerVision300p to meet your needs. Camera Head The camera head can be rotated 135 degrees from left to right. You can also manually adjust the focus from here to improve the quality of the pictures.
L i g h t a n d D o c u m e n t Po s i t i o n i n g Po i n t e r A unique feature of the AVerVision300p is the four (4) laser positioning pointers that define the viewing area, enabling you to correctly position the object at the center under the camera’s viewing area. 3 various light and laser position pointer settings are provided as follows.
U s i n g t h e I n f r a r e d Re m o t e C o n t r o l Use the AVerVision300p Remote Control to enhance your presentation, switch between (3) three presentation modes and access various features. To use the remote control, first insert the batteries (2 size “AAA” batteries are provided) into the battery compartment at the back of the remote. Use the figure and descriptions below to help you use the remote control.
(6) MIRROR Flip the image in Camera mode. (7) TIMER Display, start and hide the on-screen display timer. You can toggle to display or hide the remaining time when the timer countdown has started. (See Timer Function for more details) (8) REVERSE REVERSE (9) NIGHT VIEW (10) VGA/TV Rotate the image by 180°. (camera mode only) Turn on/off Night View. Use Night View when you are presenting in a low-light condition. The captured image however, appears in slow motion.
To u c h B u t t o n C o n t r o l P a n e l The touch button control panel located on the top side of the AVerVision300p provides quick access to commonly used functions. PC CAMERA P LAYBA CK V G A/ TV ZO O M ME NU EFFECT FRE EZE A V e r V isio n 3 0 0 P CAP/ DEL Function Description (1) CAMERA MODE Switch to Camera mode and display the image from the AVerVision300p’s built-in CMOS camera. (2) PC MODE Switch to PC mode and display the video signal from the RGB input port.
(9) ZOOM +/ - - Zoom in and zoom out the picture digitally in Playback mode. - Zoom in and zoom out the image optically and digitally in Camera mode. When it reaches the maximum AVERZOOM level of about 2 times, you can still continue to digitally zoom in the image up to 1600%. (10) ▲ ▼ ◄ ► - Use ▲, ▼, ◄ and ► to make a selection and adjustment. And use ► to enter sub-menu. (See Menu Functions, for more details) - Use ▲, ▼, ◄ and ► to make a selection in 80-thumbnail to view the selected image.
Timer Function The AVerVision300p enables you to control the pace of your presentation by displaying the remaining time on the countdown screen. This merely serves as a reminder. When the time is up, the timer blanks at the top right corner only and the presentation screen will not be affected in any way. To Set the Timer: 1. Press MENU to view on screen function selections. 2. Press ▲or▼ buttons to select TIMER. 3. Press ►or◄ buttons to set a time value. You can set the time value up to 120 minutes. 4.
U s i n g t h e AV e r V i s i o n A p p l i c a t i o n Use the AVerVision PC Camera applications provided to control the AVerVision300p to save any captured images or video clips to your PC, or send them via emails. Note: 1. When a USB cable is connected between the document camera and the PC, the document camera features are controlled by the application software directly instead on the remote control. 2. If AVerVision300p is used in PC Camera mode, the frame rate is below 12 fps.
Application User Interface C B 4 A 5 1 6 7 8 2 9 10 3 11 12 16 13 17 14 15 20 18 21 22 19 23 18
A. Basic Setting Function Description 1 Digital Zoom and Pan Control 2 Return to normal view (1X ) 3 Linear/Fast zoom-in selection. 4 Brightness adjustment 5 Contrast adjustment 6 Normal view without image rotate or mirror 7 Rotate the image by 180°. 8 Image mirroring 9 Convert the image to Negative 10 Convert the image to Black and White 11 Back to the original image B.
I m a g e D o w n l o a d f r o m AVe r V i s i o n 3 0 0 p t o PC To download captured still images from the AVerVision300p to PC, DO NOT connect the USB cable first. Go to Menu, click on the "Advance" option, then click on the "USB Select" option, and choose "IMG Download". Next, connect the USB cable between the AVerVision300p and PC. When a dialog box appears, you are ready to download the images to your PC.
O S D N a v i g a t i o n Tr e e 21
Menu Functions The MENU functions of the AVerVision300p enable you to fine-tune your screen display, set the timer, select OSD language and more. Press the MENU button to call up and exit from the main menu or sub-menu display. Use the ▲or▼ buttons to select the items in the menu list. Use the ► button to enter sub-menu. To adjust the setting, press ◄or► buttons.
Main Menu Sub-Menu OSD Description mode is better to be used in good light.) EFFECT Use ▲or▼ buttons to display the image captured by the camera into negative, positive (true color), monochrome (black and white), mirrored image, or as a rotated image by 180º. DEFAULT Use ▲or▼ buttons to select YES to restore to original factory default setting or NO to exit. Press ► to make the selection. EXPOSURE Use ▲or▼ buttons to select between Auto and Manual.
Main Menu Sub-Menu OSD Description WHITE BALANCE To obtain a more accurate color balance, place a sheet of white paper under the camera. Select MEASURE then press ► button to calibrate the color temperature. Wait until a "MEASURE OK" appears at the lower left corner of the presentation screen. RESOLUTION Use ▲or▼ buttons to choose from 1024x768, 800x600 or 640x480 display resolution then press ► to make the selection.
Tr o u b l e s h o o t i n g This section provides many useful tips on how to solve common problems while using the AVerVision300p. There is no picture on the presentation screen. 1. Check all the connectors again as shown in this manual. 2. Check the on/off switch of the display output device. 3. Verify the setting of the display output device. 4. If you are presenting from a notebook or computer through the display output device, please check and switch the document camera source to PC Mode.
the box “Extend my Windows desktop onto this monitor”. Then go back one more time to your PC or Notebook and place the mouse on the desktop and right click again. This time choose “Graphics Options”, then “Output To”, then “Intel® Dual Display Clone”, and then choose “Monitor + Notebook”. After you follow these steps, you should be able to see the same desktop image on your PC or Notebook as well as on the presentation screen.
Li m i ted War r anty For a period of time beginning on the date of purchase of the applicable product and extending as set forth in Section 6 of this Limited Warranty (the “Warranty Period”), AVerMedia Technologies, Inc. (“AVerMedia”) warrants that the applicable product (“Product”) substantially conforms to AVerMedia’s documentation for the product and that its manufacture and components are free of defects in material and workmanship under normal use.
PERMITTED BY APPLICABLE LAW, AVERMEDIA DISCLAIMS ALL OTHER WARRANTIES WITH RESPECT TO THE PRODUCT, WHETHER EXPRESS, IMPLIED, STATUTORY OR OTHERWISE, INCLUDING WITHOUT LIMITATION, SATISFACTORY QUALITY, COURSE OF DEALING, TRADE USAGE OR PRACTICE OR THE IMPLIED WARRANTIES OF MERCHANTABILITY, FITNESS FOR A PARTICULAR PURPOSE OR NONINFRINGEMENT OF THIRD PARTY RIGHTS.
P/N 300AAB6S MADE IN TAIWAN