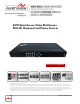
KVM Quad Screen Video Multiviewer With IR, Keyboard and Mouse Control Model #: DVI-SPLITPRO-4X © 2013 Avenview Inc. All rights reserved. The contents of this document are provided in connection with Avenview Inc. (“Avenview”) products. Avenview makes no representations or warranties with respect to the accuracy or completeness of the contents of this publication and reserves the right to make changes to specifications and product descriptions at any time without notice.
Table of Contents Section 1: Getting Started ...................................................................................................................... 4 1.1 Important Safeguards ............................................................................................................ 4 1.2 Safety Instructions ................................................................................................................. 4 1.3 Regulatory Notices Federal Communications Commission (FCC) ..
4.1.2 4.2 DVI-OUT........................................................................................................................ 33 General Troubleshooting ..................................................................................................... 34 www.avenview.
Section 1: Getting Started 1.1 Important Safeguards Please read all of these instructions carefully before you use the device. Save this manual for future reference. What the warranty does not cover Any product, on which the serial number has been defaced, modified or removed. Damage, deterioration or malfunction resulting from: Accident, misuse, neglect, fire, water, lightning, or other acts of nature, unauthorized product modification, or failure to follow instructions supplied with the product.
1.3 Regulatory Notices Federal Communications Commission (FCC) This equipment has been tested and found to comply with Part 15 of the FCC rules. These limits are designed to provide reasonable protection against harmful interference in a residential installation. Any changes or modifications made to this equipment may void the user’s authority to operate this equipment. 1.
1.5 Package Contents Before you start the installation of the converter, please check the package contents. - DVI-SPLITPRO-4K DVI – DVI & VGA breakout Cable VGA to Component breakout Cable DVI to VGA Adapter Rack Mounting Kit RS232 to USB Adapter IR Remote Control Software CD AC Power Supply User’s Manual x1 x4 x4 x4 x1 x1 x1 x1 x1 x1 www.avenview.
1.6 Before Installation Put the product in an even and stable location. If the product falls down or drops, it may cause an injury or malfunction. Don’t place the product in too high temperature (over 50°C), too low temperature (under 0°C) or high humidity. Use the DC power adapter with correct specifications. If inappropriate power supply is used then it may cause a fire. Do not twist or pull by force ends of the optical cable. It can cause malfunction.
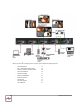
1.7 Panel Description Avenview Advanced Quad Screen Video Processor (DVI-SPLITPRO-4K) has 16 inputs and accepts both graphics and video signals, which come from computers (DVI or VGA), composite, and component video sources respectively. You can pick up four of the ten inputs and then display four of them simultaneously on the same screen. 1.7.
1.8 Installation To setup Avenview DVI-SPLITPRO-4K follow these steps for connecting to a device: 1. 2. 3. 4. 5. 6. 7. 8. 9. 10. 11. 12. 13. Mount or fix the DVI-SPLITPRO-4K safely Switch off DVI-SPLITPRO-4K and all source devices and displays that will be connected Connect a monitor, projector, other displays that come with DVI / VGA inputs by using 1 male – male DVI cable to DVI-SPLITPRO-4K DVI output.
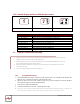
1.8.2 Default display modes for KVM hot key control Full Quad1 Quad2 * Red Icon implies the main display area. Key Combination1 Ctrl + Alt + Shift + 1 Ctrl + Alt + Shift + 2 Ctrl + Alt + Shift + 3 Ctrl + Alt + Shift + 4 Ctrl + Alt + Shift + 5 Ctrl + Alt + Shift + 6 Ctrl + Alt + Shift + 7 Ctrl + Alt + Shift + 8 Ctrl + Alt + Shift + 0 1.
1.9.2 Software Connection 1. 2. Power up the DVI-SPLITPRO-4K and you can see VFD on the front panel blink. . Launch Avenview Control Software. It will open following “Serial Port” setting page. 3. Click on Scan button and it will automatically detect Avenview Video Processor and display the following screen: 4. Note the “Device – ID” and Select Correct “Com Port” and Device ID” from bottom of screen.
5. Once Device is Ready, click “OK” and Avenview Control Software will launch . www.avenview.
1.9.
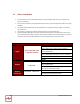
Background Setting DVI-SPLITPRO-4K offers the video background to make this advanced unit actually working like 5 channel video mixer! The default background video must work as full screen! Users can choose between color and video background through the following control window. Click on this button will show the dialog for output resolution, background color and background channel setting.
Set signal channel full screen or all channel Notice that the input sources will not be changed in Software. www.avenview.
Default Layouts There are 5 pre-configured layouts available from Control Software, IR Remote Control or Front Panel Buttons. - Panel Cross Panel Right – Type Panel Left – Type Panel Top – Type Panel Bottom - Type Panel Cross Panel Right – Type www.avenview.
Panel Left – Type Panel Top – Type www.avenview.
Panel Bottom – Type Input Singal which is selected at “Focus Input” will be displayed as Main Video Sources. Focus Input Select which Input Source should stay in focus when “Layouts” are selected Save and Set Custom Layouts Save up to 8 Custom Layouts and Set them using Control Software, Front Panel or IR Remote Control. www.avenview.
7 Layout Control Size Set layout control size in Software by percent. If you enable Fixed Stretch, Aspect Ratios are kept with each Input layout is changed. 8 Layout Control Create different Layouts by Drag and Drop. You can use “Fixed Aspect Ratio” as described above to retain Aspect Ratio of source image.
Input Selection: - Select “Focus Input” from drop down menu or by Clicking on Main Layout Window. Click on “Input Signal”. Select Correct “Input Signal” from drop down menu. Once right Input Signal is selected, click on UP ARROW (Input Update) beside Focus Input to update it on system memory. www.avenview.
Size and Position: Select on “Size / Pos” Channel Windows Visible: You may uncheck “Channel Window Visible” if you decide to not show this Windows on screen Blend: Change the value of Blending from 100% to 0%. This will allow you to overlay an Input Source on other. Custom Height and Width: If you have specific requirement for Input Layout, you may adjust them here. www.avenview.
Color Setting: Various options to change Brightness, Contrast, Saturation, Hue, Red, Green and Blue are available on each “Input Source” www.avenview.
Color Balance and Auto Configure: You may adjust Color Balance and Auto Configure them by selecting these options 1.9.4 Software Configuration Follow these steps to select right Output Resolution and Input Signal - Once RS232 communication is setup properly, you should select Optimal “OUTPUT Resolution” supported by your Display (TV or Monitor) Select correct “Input Signal” for each Input.
Section 2: Cascade Installation 2.1 The Control Serial The Device ID number will show on the VFD, like below picture. The “Device ID” number can adjust by button menu. Please push the “Down, Up, Left, Right” button, enter Menu “(05/05) System Setting” Menu “(03/03) Device ID” Menu. Push the “Right” button. When the “Up” and “Down” arrow are display, you can adjust number by “Up” and “Down” button. www.avenview.
2.2 Converter Serial (1) C5-RS232-S (Transmitter) Model Name C5-RS232-S Role of usage Transmitter [TX] Transmission length Up to 1,000m (1,100yd) [CAT5e] Baud rate Up to 57.
(2) Set DVI-SPLITPRO-4K to RS485 Mode by “DIP Switch”. Please check the VFD will display “Square” Icon. *Using C5-RS232-S to control all the cascaded DVI-SPLITPRO-4K C5-RS232-S DVI-SPLITPRO-4K Device ID: 0 Device ID: 1 Device ID: 2….. www.avenview.
www.avenview.
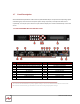
Section 3: Front Panel Controls 3.1 Front Panel Push Buttons Description PAP Full Screen 11 Function key: Layout 2 Input Select 12 N/A 8 Function key: Input Signal 13 Infrared Sensor 9 Function key: Setting 10 Function key: Layout 1 1 2 3 4 5 6 7 14 15 Navigation www.avenview.
3.2 Front Panel Push Buttons Functions 3.2.1 Selecting PIP Window Arrangement Main Window with 3 triple sub-windows aside You may choose one of the following layouts from 4 presets: 1. To cancel the operation, press [ LAYOUT 1] again Select a type by pressing according button while VFD 2. B_top: press UP B_btm: press DOWN B_left: press LEFT B_right: press RIGHT Quad Windows in crisscross + 3 user-defined custom Layout 1. To cancel the operation, press [ LAYOUT 2] 2.
3.3 On Screen Display Menu www.avenview.
3.4 IR Remote Control Avenview DVI-SPLITPRO-4K, Advanced Quad Screen Processor ships with a compact IR Remote Control that allows for direct access to most commands used to control the video processor. IR Remote Button Define 1. 2. 3. 4. Power Button Cross-Layout Side-Bar Layout IN 2 (Input Channel 2) 5. Right Button 6. IN 4 (Input Channel 4) 7. 8. 9. 10. Up Button PAP Full Screen Down Button IN 1 (Input Channel 1) 25. D Button 26.
Section 4: Specifications Model Description Dual Output Support Background Video Input HDCP Compliance Video Bandwidth Supported Resolutions Audio Support Control Embedded Video Mixer Ability to Cascade Input TMDS Signal ESD Protection Input Output DVI Connector Type VGA Connector Type S-Video Connector RS232 Connector RCA Connector RJ45 Connector Dimensions Size Power Supply Power Consumption Operating Temperature Storage Temperature Relative Humidity DVI-SPLITPRO-4K Advanced Quad Screen Video Process
4.1 Supported Resolutions 4.1.
4.2 General Troubleshooting Problem No Power Possible Solution No or Distorted Image Poor Quality Wrong Color No Video after Factory Hardware and Software Reset Ensure that DVI-SPLITPRO-4K is plugged in If you are recovering from power outage, accidentally unplug the adapter or other power surge conditions, leave the device off for a at least a minute and then power it on again.
Disclaimer While every precaution has been taken in the preparation of this document, Avenview Inc.