
User's Manual


Chapter 8: Install the IP Deskphone
Complete instructions to install the IP Deskphone, including detailed figures and applicable warnings, are
given in the IP Deskphones User Guides.
The steps for installing the IP Deskphone are summarized in the following procedure.
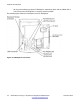
Installing the IP Deskphone
1. Remove the stand cover. Pull upward on the center catch and remove the stand cover. The
cable routing tracks are now accessible.
2. Connect the AC power adapter (optional). Connect the adapter to the AC adapter jack in the
bottom of the IP Deskphone. Form a small bend in the cable, and then thread the adapter cord
through the channels in the stand.
3. Install the handset. Connect the end of the handset cable with the short straight section into
the handset. Connect the end of the handset cable with the long straight section to the back of
the IP Deskphone, using the RJ-9 handset jack. Form a small bend in the cable, and then
thread the handset cord through the channels in the stand so that it exits behind the handset
on the right side, in the handset cord exit in the stand base.
4. Install the headset (optional). If installing a headset, plug the connector into the RJ-9 headset
jack on the back of the IP Deskphone, and thread the headset cord along with the handset cord
through the channels in the stand, so that the headset cord exits the channel.
5. Install the Ethernet cable. Connect one end of the supplied Ethernet cable to the back of the
IP Deskphone using the RJ-45 connector and thread the network cable through the
channel.
6. Install the Ethernet cable connecting the PC to the IP Deskphone (optional). If connecting PC
Ethernet through the IP Deskphone, connect one end of the PC Ethernet cable to the
IP Deskphone using the RJ-45 connector and thread it through the channel. Connect the other
end to the LAN connector on the back of the PC.
7. Install additional cables. If applicable, plug in optional USB devices. Connect the Ethernet cable
to the LAN Ethernet connection. If using an AC power adapter, plug the adapter into an AC
outlet.
8. Wall-mount the IP Deskphone (optional). The IP Deskphone can be mounted either by: (method
A) using the mounting holes on the bottom of the IP Deskphone stand, or (method B) using a
traditional-style wall-mount box with RJ-45 connector and 15-cm (6-inch) RJ-45 cord (not
provided).
9. Replace the stand cover. Ensure that all cables are neatly routed and press the stand cover
into place until a click is heard.
10. Put the IP Deskphone in the wall-mount position (optional). If the IP Deskphone is to be
mounted on the wall, put it in the wall-mount position by holding the tilt lever and pressing the
IP Deskphone towards the base until the IP Deskphone is parallel with the base. Release the
SIP Software for Avaya 1100 Series IP Deskphones-Administration November 2012 113