
User's Manual


Configuration using IP DECT Configurator
Use the IP
DECT Configurator tool to create configuration files for the DAP controller and
DAPs. The IP DECT Configurator is installed and starts automatically when you install the DAP
controller software. You can also start the IP DECT Configurator by using the shortcut to the
IP DECT Configurator tool under the Start menu at Programs > DAP controller > DAP
Applications.
For information about IP DECT Configurator installation, see
Installing the DAP Controller on
page 90.
Perform the following procedures to configure the settings in the IP
DECT Configurator.
•
Starting the IP DECT Configurator on page 94
• Adding a new system using the IP DECT Configurator on page 94
• Configuring IP Settings on page 95
• Configuring Network Settings on page 95
• Configuring other settings—Performance/Email Settings on page 100
• Configuring other settings—Customer Information settings on page 102
• Saving the system on page 102
• Enabling or re-enabling the DAPs on page 103
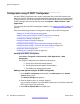
Starting the IP DECT Configurator
Select Start > Programs > DAP controller > DAP Applications > DAP
Configurator.
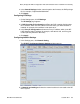
The IP DECT Configurator main window has three panes.
a. The top pane shows the Settings buttons.
b. The left pane shows the System Control buttons.
c. The middle pane shows the information.
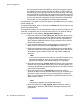
Adding a new system using the IP DECT Configurator
1. In the IP DECT Configurator main window, click New System in the System
Control settings pane.
The General settings page appears.
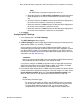
2. Enter the System name; for example, System_1.
Use no special characters in your SIP DECT system name. The folder and the SIP
DECT system share the same name.
3. Select SIP on CS1000 SIPL in the PBX menu.
System configuration
94 SIP DECT Fundamentals October 2012
Comments? infodev@avaya.com