
User's Manual


You can configure built-in DHCP server using the Network Settings window of IP DECT
Configurator
.
Prerequisites
If you are configuring a new system, perform the following procedures before you configure
the built-in DHCP server.
•
Starting the IP DECT Configurator on page 94
• Adding a new system using the IP DECT Configurator on page 94
Configuring the built-in DHCP
server using the IP DECT Configurator Network
Settings Window
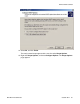
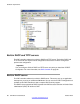
1. Start the IP DECT Configurator, and select Modify the system.
2. Choose the system to modify. Select the Network settings pane and the DHCP
Settings tab,
3. Select the Run DHCP server on this PC check box.
4. Enter the DAP IP range; for example, 192.168.100.200-210.
5. Select the DAP IP Range exclusive for DAPs only.
6. Enter the Subnet Mask; for example, 255.255.255.0.
7. Enter the Default gateway; for example, 192.168.100.1.
8. Enter theTFTP IP address on the PC where the DAP controller software is installed,
for example, 192.168.100.10.
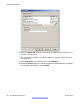
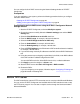
9. If you need to assign manually IP addresses to the DAP, click the DAP IP Addresses
tab.
10. Using the context menu and typing required data in the fields, enter MAC address
of the DAP and the IP address assigned to the DAP.
You can add DAPs to the list, delete DAPs from the list, or edit the addresses.
11. Click Apply to save the changes, or Close to exit.
12. Start the DHCP server with Start > All Programs > DAP controller.
13. Restart the DAPs.
If you are configuring a new system, follow the steps in
Configuring IP Settings on
page 95
instead of restarting DAP.
Built-in TFTP server
The DAP
controller has a built-in TFTP server that runs as a service under Microsoft Windows.
You can use the IP DECT Configurator tool available with the DAP controller to start or stop
the TFTP server program. You can start or stop the service through the Services window in
Microsoft Windows.
DAP controller software
SIP DECT Fundamentals October 2012 87