
User's Manual


each isolated site (branch office), but not between sites. Support is unavailable for roaming
between branch offices.
Follow this procedure to configure Routed Head Quarter with Branch Office(s)
Choosing system configuration
1. Perform one of the following steps:
If you were referred to this procedure from Configuring System Settings on
page 96, go to step 3.
OR
Open the IP DECT Configurator, and click Modify.
2. Select the SIP DECT system that you are running, and click System
Configuration.
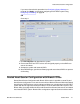
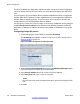
3. Choose Routed Head Quarter with Branch Office(s) for System configuration, as
shown in the following figure.
4. Enter a Aggregated Subnet mask greater than 1 to have the Router forward
multicast packages, calculate and enter the corresponding to the subnets of Routed
Head Quarter (see Routed Head Quarter configuration on page 109).
Ensure that the aggregated subnet mask for RHQ doesn’t cover the subnets used
in the branch offices
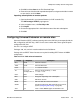
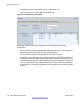
5. Configure each branch office by entering the following parameters:
• Subnet - the first address in the subnet range, for instance 192.168.31.0.
• Subnet mask - mask to specify the subnet boundaries
• RPN range - lowest RPN and highest RPN in this Branch Office.
• Subnet name - any name used to identify the Branch Office.
• Time Offset - time zone for the current subnet (branch office).
6. Perform one of the following steps:
If you were referred to this procedure in Configuring System Settings on page
96,
click Apply and continue configuring the SIP DECT system with
Configuring SIP
Settings on page 96.
OR
Go to step 7.
7.
Click Save System and deactivate the system.
8. Ensure DHCP and TFTP servers are configured properly, so that DAPs can start in
all Branch Offices.
9. Activate the system and restart all DAPs.
10. Start DAP Manager, open the Access Points page and ensure all DAPs are present
and working.
System configuration
112 SIP DECT Fundamentals October 2012
Comments? infodev@avaya.com