
User's Manual


Backup and Restore of administered data of Network Management applications
96 Network Management Configuration
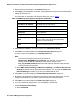
l Backup Name – This displays the name of the Backup you entered in the Configure
Backup Items dialog box.
l Application Types – This displays the application you choose to backup in the
Configure Backup Items dialog box.
l Backup Destination – This displays the backup destination you choose in the Select
Backup Destination dialog box.
l Schedule Information - This displays the schedule information you choose in the
Schedule Backup Job dialog box.
13. Click Submit. The wizard is closed and a row is added for this backup job in the jobs list
appearing on the left of the screen.
The job will run at scheduled intervals and the progress percentage will be updated in the
status column. When the job is complete, the status column will be updated with message
’Job Succeeded. Stored in archive: test_July.28.2008.123244.zip’.
If the job fails the status message will say ‘Job Failed: reason for failure’
When the job succeeds, the archive is created at the backup location you entered while
setting up the backup job. There is also a text file present at the location with the same
name of archive (for example, test_July.28.2008.123244.txt), which lists the applications
which are backed up in the archive, the NM version and other useful information for future
reference.
This text file is not required during restore. You can safely delete it if you wish. The archive
need not be at the same location for restore to succeed and it is safe to move archive to
different locations, if required.
!
WARNING:
WARNING: Please do not modify the contents of the archive. Even if you just unzip and
recompress the archive without any modifications, the restore may fail.
Restoring the data using NM Easy Restore Utility
Do the following to restore your backup.
Note:
Note: The restore can only be done on the same NM Server from where backup was
taken.
Only Windows Administrators can restore the data.
1. Select Start > All Programs > Avaya > Tools > NM Easy Restore Utility from the NM
server. The system displays the NM Easy Restore Utility window.