
User's Manual
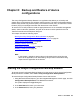


Backup and Restore of device configurations
84 Network Management Configuration
4. Click Login.
The system displays the Avaya Configuration Backup Restore window.
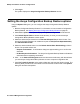
Setting the Avaya Configuration Backup Restore options
Using the Options dialog box, you can configure the Avaya Configuration Backup Restore
options.
1. Start the Configuration Backup Restore. For information on how to start the Configuration
Backup Restore, see Starting the Avaya Configuration Backup Restore
on page 83.
2. Select File > Options. The system displays the Options dialog box to the General tab.
3. Click Default Report Path and browse to the directory in which you want the Avaya
Configuration Backup Restore to save reports.
4. Select the desired report format from the Format Of Report File pull-down list box. The
Avaya Configuration Manager can create text reports in CSV (Comma Separated Value)
and Tab Delimited Format.
5. Select the desired default action from the Default Action When Downloading pull-down
list box. The possible actions are:
l Request Confirmation - A confirmation dialog box appears asking you to confirm the
download.
l Do Not Request Confirmation - The Avaya Configuration Backup Restore will start the
download without requesting confirmation.
6. Click ... in the Path to Diff Program section and browse to the directory with the software
you want Avaya Configuration Backup Restore to use to compare configuration files.
7. Click File Transfer Protocols on the options dialog box and enter the fields in the tab. The
following table provides a list of the fields in the File Transfer Protocols tab of the Options
dialog box and their descriptions.