
User's Manual


Step 2: Add IP Office devices to Avaya Network Management Console
Issue 1 June 2010 57
9. Select Actions > Start Network Discovery.
The system displays a progress bar displaying the progress of the discovery process. When
the process is complete, the devices appear in the left panel.
Adding devices manually
If your IP Office devices answer to SNMP and you want to discover them manually, perform the
following steps:
1. Log into Network Management Console. For more information on how to start the Avaya
Network Management Server and launch the Network Management Console, see Starting
the Network Management Console on page 35.
2. Select File > New > Device.
The system displays the Add Device dialog box. The Basic Information tab is selected.
3. Enter the parameters for the IP Office device.
4. Click the SNMP Access tab.
5. Enter the SNMP parameters for the IP Office device.
6. When finished, click Apply to add the device to the Network Map.
7. Click Close.
8. Repeat Steps 2 through 7 for each IP Office device you want to add.
Importing a CSV file
If your IP Office devices are accessible through the web, but do not answer to SNMP, you must
import a CSV file into Avaya Network Management Console. This CSV file must contain the
following information for each IP Office device in your network:
l type
l IP address
l subnet mask
l MAC address
l name
l read community string
l write community string
l timeout interval
l retry interval
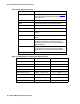
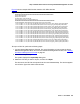
Table 2
describes the fields in each record of the CSV file.