Avaya Integrated Management Release 6.
© 2010 Avaya Inc. All Rights Reserved. Notice While reasonable efforts were made to ensure that the information in this document was complete and accurate at the time of printing, Avaya Inc. can assume no liability for any errors. Changes and corrections to the information in this document may be incorporated in future releases. For full legal page information, please see the complete document, Avaya Legal Page for Software Documentation, Document number 03-600758.
Contents Preface . . . . . . . . . . . . . . . . . . . . . . . . . . . . . . . . . . 7 Purpose. . . . . . . . . . . . . . . . . . . . . . . . . . . . . . . . . . . . . . . . . 7 Prerequisites . . . . . . . . . . . . . . . . . . . . . . . . . . . . . . . . . . . . . . 8 Intended audience . . . . . . . . . . . . . . . . . . . . . . . . . . . . . . . . . . . 8 Conventions used in this book . . . . . . . . . . . . . . . . . . . . . . . . . . . . 8 Support resources . . . . . . . . . . . . . . . . .
Contents Configuring FTP (Optional) . . . . . . . . . . . . . . . . . . . . . . . . . . . . . . 31 Changing the Port Numbers used by the Network Management applications . . 32 Configuring the Software Update Manager for domain users . . . . . . . . . . . Configuring the COPSSH Server . . . . . . . . . . . . . . . . . . . . . . . . . Configuring the Software Update Manager . . . . . . . . . . . . . . . . . . . 33 33 34 Chapter 3: Discovering the Voice Network . . . . . . . . . . . . . . . .
Contents Chapter 7: Managing IP Office devices in your network . . . . . . . . . 67 Overview . . . . . . . . . . . . . . . . . . . . . . . . . . . . . . . . . . . . . . . . 67 Accessing IP Office Systems . . . . . . . . . . . . . . . . . . . . . . . . . . . . . 67 Backing Up the configurations of all the IP Office devices . . . . . . . . . . . . . 68 Working with templates . . . . . . . . . . Creating a General template . . . . . Creating a Hardware template . . . .
Contents 6 Network Management Configuration
Preface This section includes the following topics: Purpose - A description of the goals of this manual. Prerequisites - A description of the prerequisite knowledge required to use the Avaya Network Management applications. Intended audience - The intended audience of this manual. Conventions used in this book - The typographical conventions used in this manual. Support resources - A description of the support resources available.
Preface Prerequisites Network managers should be knowledgeable about network-wide tasks, such as monitoring switching, configuring VLANs, and setting up rules to enhance quality of service. The Network managers should also be knowledgeable about managing specific network devices. Intended audience This book is written for network managers familiar with network management and its fundamental concepts.
Support resources Avaya Professional Services The Avaya Professional Services (APS) team of Avaya Integrated Management (AIM) consultants offers customers the following services: - Platform-readiness verification - AIM architectural planning, design, and overview - Remote turnkey implementation and installation - AIM server configuration - Customer acceptance verification - Custom on-site services - Onsite and remote knowledge transfer The APS Data Group consists of the following teams: - Avaya Integrated
Preface Avaya Global Services Delivery Avaya Global Services Delivery (GSD) provides support to the Avaya Integrated Management client teams, field technicians, and customers. The GSD will bill customers for support on a time and materials basis if the following conditions exist: - Customers do not provide remote access. - Customers do not have a current maintenance agreement.
Product documentation Avaya contact information Table 1 provides contact information that you may use if you need assistance during the process of installing, configuration and setting up Avaya Integrated Management. Table 1: Customer-Accessible Resources Resource Contact Information Avaya Support Center http://www.avaya.
Preface How to access books on the web To view or download books from the Avaya Support Web site, follow these steps: 1. Go to http://www.avaya.com/support. 2. Click Documentation, and then select the document category you want to view. 3. Click the letter I in the alphabet listing. 4. Locate Integrated Management(All Offers) and click the corresponding link. 5. Select the document you want to view from the available list.
Chapter 1: Overview Avaya Network Management The Avaya Network Management is part of the Avaya Integrated Management, which provides a complete set of tools and an applications platform. All of the tools in the Avaya Integrated Management are accessible through a common Web-based user interface to facilitate system and network management. The Avaya Network Management applications and device managers are SNMP-based network management applications.
Overview Note: Note: Note: The Avaya Network Management applications do not support devices that use Network Address Translation (NAT) addresses. Network Management Console client and server connections, with NAT in between is not supported too. Although the Avaya Network Management Console may detect devices that are configured using NAT, some Network Management framework features are not available.
Avaya Network Management applications intuitive, hierarchical navigation tree. Different views of the tree allow the administrator to view the network by IP subnet, by device type, or logically by voice systems. Elements in the navigation tree are color coded to indicate fault status. Network Management Console also serves as a focal point for viewing fault event notifications, which are collected and displayed in the Event Browser.
Overview Avaya Provisioning and Installation Manager for IP Office Avaya Provisioning and Installation Manager for IP Office provides the capability to remotely configure IP Office systems on a network-wide basis. It provides integrated network system views that ease centralized configuration tasks, especially provisioning and installing large numbers of IP Office system devices simultaneously.
Avaya Network Management applications console application on a workstation and remote monitoring probes in network devices that support SMON. The Avaya SMON Manager console constantly communicates with the SMON devices on your network. The console uses SNMP to gather information from the devices. The Avaya SMON Manager provides a suite of powerful graphic display tools to view this information.
Overview - Store notes about templates and device profiles.
Device Managers The Provisioning and Installation Manager supports the following media gateways: - Avaya G250 - Avaya G250–BRI - Avaya G250-DS1 - Avaya G250-DCP - Avaya G350 - Avaya G430 - Avaya G450 - TMG550 You can perform initial gateway configuration in the following ways: - In a staging environment using a Local Area Network (LAN) to simulate the customer LAN - On the customer premises with the assumption that either LAN connectivity exists to Provisioning and Installation Manager or Wide Area Network
Overview Figure 1: Avaya Device Manager In addition, each device can be monitored using Avaya’s Device SMON applications. Device SMON provides switch monitoring capabilities, as well as graphs and pie charts displaying traffic types on ports, VLANs, and switches.
NM Easy Restore Utility The utility backs up various configuration files and application data which are essential to restore the NM server in case of an unrecoverable error. You need not recreate all the administered settings when you bring up the NM server. Instead you can restore the information from the backup archive stored on the NM or remote FTP server. Also, if you are installing a Service Pack, it is recommended that you take a backup before installing the Service Pack.
Overview 22 Network Management Configuration
Chapter 2: Post installation tasks for Avaya Aura™ Communication Manager Overview This chapter provides information on the tasks you should perform after installing the Avaya Network Management applications. - Configuring the Avaya Aura™ Communication Manager Servers – Information on configuring the Avaya Aura™ Communication Manager servers to view them properly on Network Management Console.
Post installation tasks for Avaya Aura™ Communication Manager Configuring the Avaya Aura™ Communication Manager Servers You must configure each Communication Manager in order to see the Communication Manager servers properly within the Avaya Network Management Console. The Avaya Network Management Console provides a simplified, wizard-driven process to automate this setup.
Configuring the Avaya Aura™ Communication Manager Servers b. Under the SNMP Users/Communities section, do one of the following: - Check Enable SNMP Version 1, and enter the community names. - Check Enable SNMP Version 2c, and enter the community names. - Check Enable SNMP Version 3, and enter the user name and password for the read-only user and read-write user. c. Click Submit. 8. Click SNMP Traps in the left panel. The system displays the SNMP Traps page. 9. Click Add.
Post installation tasks for Avaya Aura™ Communication Manager 22. Set up the SNMP rule for the Avaya Aura™ Communication Manager server IP addresses. Note: Note: The SNMP time-out value must be set to 60 seconds (60000), and the retries value must be set to 1. 23. Ensure that the test trap generated in Step 14 was received by the Network Management Console. 24. Run Network Discovery. For information, see Discovering the Voice Network on page 35. Communication Manager 3.
Configuring SNMP options in Network Management 7. Click Add. The system displays the Add Trap Destination page. 8. On the Add Trap Destination page, do the following: a. Ensure the check box for Check to enable this destination is selected. b. Enter the IP address of the management station, and then do one of the following: - Check the SNMP version 1 option, and enter the community name. - Check the SNMP version 2c option, ensure notification type is trap, and enter the community name.
Post installation tasks for Avaya Aura™ Communication Manager community strings to authorize read-only or read-write access to a device. SNMPv3 is more secure and validates users with a user name and password. In addition, SNMPv3 offers the option of encrypting all data transferred between the applications and the network devices. For details on configuring SNMPv1 and SNMPv3 credentials for use with your network devices, see the Avaya Network Management Console User Guide.
Configuring Proxy settings (Optional) Configuring Proxy settings (Optional) If your network has a non-permissive firewall, you must configure Avaya Network Management to work with your proxy server. This enables the Avaya Software Update Manager’s Analyze and Retrieve capability from the Web functions. The process to configure Avaya Network Management to work with your proxy server was simplified beginning in Avaya Network Management Release 4.0. It is no longer necessary to edit property files.
Post installation tasks for Avaya Aura™ Communication Manager PassEnv AIM_FPM PassEnv AIM_MSA PassEnv CV_PATH #Aliases: Alias /launch "C:/Program Files/Avaya/Network Management/CVS/Launch" AddHandler cgi-script .
Configuring the Web Server for Polycom GMS support (Optional) Configuring the Web Server for Polycom GMS support (Optional) Polycom GMS runs under the Microsoft IIS Web Server on the same server as the Network Management server. To support Polycom GMS: 1. Open the Apache configuration file. This file is usually called httpd.conf and it resides under the Apache bin directory. 2. Add the following lines: #Polycom Support LoadModule proxy_module modules/mod_proxy.
Post installation tasks for Avaya Aura™ Communication Manager 6. Click Apply to save changes. 7. Close the Control Panel. 8. Open Avaya Software Update Manager. 9. Select File > Options. The system displays the Options dialog box. 10. In the FTP Global Use field, select Enabled. 11. In the FTP User Name and Password field, enter the user name and password you created. 12. In the FTP Server Page field, enter the path of the FTP Site Directory on your server. 13. Click Apply to save the changes.
Configuring the Software Update Manager for domain users Configuring the Software Update Manager for domain users The Avaya Software Update Manager automatically upgrades TN board versions. The upgrade is done when the SCP client on the TN board downloads the image file from the Network Management Console/Software Update Manager SCP server. During the upgrade process, the Software Update Manager sets the user name and password on the TN board for the download process.
Post installation tasks for Avaya Aura™ Communication Manager 6. In the command prompt window run the following command: C:\Program Files\copSSH\bin>mkgroup -d >> domain.txt The command looks for the domain groups. The run time of the command can take some time depending on the number of groups in the domain. The output of the command is printed in the file domain.txt. When the command is finished running, open the file domain.txt and locate the line for the group Domain Users.
Chapter 3: Discovering the Voice Network This chapter provides the procedure to run the Network Discovery Wizard to discover your voice network. The Network Discovery Wizard is provided during the Network Management installation. If you did not run the Network Discovery Wizard during installation, the first time you open the Avaya Network Management Console, you must discover your voice network.
Discovering the Voice Network b. Enter the IP address of the server where the Avaya Integrated Management applications are installed, and then press Enter. The system displays the Avaya Integrated Management Launch Products page. c. Click the link Avaya Network Management Console. The system displays the Login dialog box. It prompts you for the User Name and Password you specified during installation. d. Enter your User Name, and press Enter. e. Enter your Password, and click Login.
Using the Network Discovery Wizard to discover your voice network 5. From the Actions menu, select Network Discovery Wizard. The system displays the Welcome dialog box for the Avaya Network Management Configuration Wizard. This wizard will help you configure your VoIP media servers and gather information required to properly discover and manage your voice network with this network management station. 6. Click Next. The system displays the Configure CM Servers dialog box. 7.
Discovering the Voice Network h. Validate the server certificate, and then click Yes. The new Avaya Aura™ Communication Manager server appears in the Configure CM Servers dialog box. i. Repeat Steps a through h for each Communication Manager server you want to add. When you are finished adding Communication Manager servers, click Next. The system displays the Configure Global SNMP Parameters dialog box.
Using the Network Discovery Wizard to discover your voice network b. In the Subnet IP field, enter the subnet IP Address. c. Perform one of the following steps: l Click Subnet Mask, and then enter the subnet mask. l Click Router, and then enter the router for this subnet. d. Click Next. The system displays the new IP network in the Configure Network Subnet to Discover dialog box. e. Repeat Steps a through d for each IP network you want to discover. When you are finished adding IP networks, click Next.
Discovering the Voice Network 40 Network Management Configuration
Chapter 4: Provisioning Media Gateways in the network Overview To perform initial provisioning of the Avaya media gateways in your network, complete the following tasks: - Starting the Avaya Provisioning and Installation Manager on page 41 - Creating a Template on page 43 - Creating a Device Profile on page 43 - Creating a Group on page 45 - Scheduling a job on page 45 - Performing a backup on page 46 Starting the Avaya Provisioning and Installation Manager You can start the Provisioning and Installation
Provisioning Media Gateways in the network From the Server To start the Avaya Provisioning and Installation Manager from the Windows server where the application is installed, do the following: 1. Double-click the Windows desktop shortcut to the Avaya Integrated Management Launch Products page. The system displays the Avaya Integrated Management Launch Products page. 2. Click the link Avaya Provisioning and Installation Manager. The system displays the Login dialog box.
Creating a Template Creating a Template When you create a template, you can specify configuration parameters manually or by importing template data from an XML file. To create a template, do the following: 1. From the Provisioning and Installation Manager main window, click Templates in the left panel. The system displays the Templates page. 2. Click New. The system displays the Templates wizard. 3.
Provisioning Media Gateways in the network To create a device profile, do the following: 1. From the Provisioning and Installation Manager main window, click Device Profiles in the left panel. The system displays the Device Profiles page. 2. Click New. The system displays the Device Profile wizard. 3. Enter the IP address of the device in one of the following ways: - Enter manually. - Select a device from the Network Management Console. - Import from the electronic pre-installation worksheet.
Creating a Group Creating a Group A Group is a collection of devices and is used in conjunction with templates to make it easy to apply a template to multiple devices at a time. To create a group, perform the following steps: 1. From the Provisioning and Installation Manager main window, click Groups in the left panel. The system displays the Groups page. 2. Click New. The system displays the Groups wizard. 3. Enter the Group Name for this group. 4. Continue through each page of the Groups wizard.
Provisioning Media Gateways in the network 3. Click Job at the top of the Device Profile page. The system displays the Jobs wizard page. 4. Continue through each page of the Jobs wizard. Click Help for help with each wizard page. Scheduling a Template job To schedule a Template Job, perform the following steps: 1. From the Provisioning and Installation Manager main window, click Template in the left panel. The system displays the Template page.
Performing a backup To restore PIM data and settings, use the Network Management Easy Restore utility.
Provisioning Media Gateways in the network 48 Network Management Configuration
Chapter 5: Upgrading Avaya Aura™ Communication Manager devices Use this procedure to update the Communication Manager devices using the Avaya Software Update Manager. Follow these steps to upgrade the Communication Manager devices: 1. From the Avaya Network Management Console window, select Tools > Avaya Software Update Manager. 2. Select File > Options. The system displays the Options dialog box. Perform the following one-time setup instructions: a.
Upgrading Avaya Aura™ Communication Manager devices 7. Click Continue. The system displays a message box stating that the Avaya Software Update Manager will update the Download View table. 8. Click OK. All of the current information (software version and firmware version) for the discovered devices in the Avaya Network Management Console is displayed.
Upgrading using the CM Software Management dialog box Upgrading using the CM Software Management dialog box The CM Software Management Dialog box in the Avaya Software Update Manager is used to install and upgrade the CM Server (Media Server) software and install license or authentication files to the software repository on the CM Server. You can perform upgrades on multiple servers at the same time.
Upgrading Avaya Aura™ Communication Manager devices i. Click Retrieve Sold To’s to specify the information you want to download. j. When finished, click Apply. k. Click the OK. 2. Select the CM Software Management tab. 3. Select Actions > Target Details. The CM Software Management dialog box appears. 4. Click the CM Software Upgrade/Update tab in the CM Software Management dialog box. Choose one of the following options: l To install a release on one or more Media Servers: a.
Upgrading using the CM Software Management dialog box d. Click Download. The system displays the Job Summary window in the CM Software Management dialog box, displaying a summary of the download currently being performed. e. Click Close to close the dialog box. l To install a platform/security update: a. Select one or more of the targets in the Targets Table that you want to upgrade. b. Select the Platform/Security Update check box. c. Select the service update you want to install. d. Click Download.
Upgrading Avaya Aura™ Communication Manager devices 54 Network Management Configuration
Overview Chapter 6: Post installation tasks for IP Office devices Overview This chapter describes the tasks you should perform after installing Avaya Network Management with IP Office. Initial configuration consists of the following steps: 1. Enable SNMP for each IP Office device. 2. Add IP Office devices to Avaya Network Management Console. 3. Configure access parameters for IP Office devices. 4. Upgrade the IP Office devices using Avaya Software Update Manager.
Post installation tasks for IP Office devices Step 2: Add IP Office devices to Avaya Network Management Console Use this procedure to populate all of the IP Office devices in your network in Avaya Network Management Console. You can populate Avaya Network Management Console using the following methods: l discover devices automatically Use this method if your IP Office devices are accessible through the web and answer to SNMP.
Step 2: Add IP Office devices to Avaya Network Management Console 9. Select Actions > Start Network Discovery. The system displays a progress bar displaying the progress of the discovery process. When the process is complete, the devices appear in the left panel. Adding devices manually If your IP Office devices answer to SNMP and you want to discover them manually, perform the following steps: 1. Log into Network Management Console.
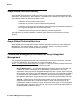
Post installation tasks for IP Office devices Table 2: CSV Import File Fields Field Description Type The sysObjectID of the IP Office device. Table 3 shows the sysObjectIDs of the supported IP Office devices. IP The IP address of the IP Office device. Mask The IP subnet mask of the IP Office device. MAC The MAC address of the IP Office device. Name The name of the IP Office device. Read Community The read community string of the IP Office device.
Step 2: Add IP Office devices to Avaya Network Management Console Figure 2 shows a sample CSV file that contains 15 IP Office devices. Figure 2: Sample CSV File ################################################################## # Avaya Map Export File # Map name: default.nrf # Created: Mar 7 2007 6:05:35 PM # Copyright 2007 Avaya Inc. All Rights Reserved. #################################################################### # Type,IP,Mask,MAC,Name,Read Community,Write Community,Timeout,Retry .1.3.6.1.4.1.
Post installation tasks for IP Office devices Step 3: Configure the Access parameters for IP Office devices You must provide user names and passwords to the Avaya Network Management server to access IP Office devices. These user names and passwords must match the security administrator name and password in the IP Office device. In this section, you will: 1. Create a new IP Office User in Avaya Secure Access Administration.
Step 3: Configure the Access parameters for IP Office devices 5. In the Confirm Password field, reenter the password for this user. 6. In the TFTP Password field, enter the TFTP password for the IP Office device being administered. This password must match the system password for the IP Office device. This password will be used to upgrade the IP Office device. 7. In the Confirm TFTP Password field, reenter the TFTP password. 8. Click Apply to add the Secure Access Administration IP Office user. 9.
Post installation tasks for IP Office devices 13. Click Apply. Avaya Secure Access Administration will try to contact the IP Office devices, change the TFTP password on each device, and define a service user called AIMAdmin. Note: Note: The AIMAdmin password is common to all IP Office devices. You can change this password using File > Options in Avaya Secure Access Administration. 14. Click Close. 15. Close Avaya Secure Access Administration. IP Office devices running Firmware 4.0.
Step 3: Configure the Access parameters for IP Office devices Step 2: Assigning users to IP Office devices Perform the following steps: 1. Select Action > Assign Users to IP Office Devices. The system displays the Assign IP Office Security Administration dialog box. 2. Select all of the IP Office devices running firmware 4.0.307 or later that you want to assign to an IP Office user. 3. From the User Name field, select the user you just created in the previous section. 4.
Post installation tasks for IP Office devices Step 4: Upgrade the IP Office devices using Avaya Software Update Manager In this section, you will start Avaya Software Update Manager and update all of the IP Office devices. ! Important: Important: For Avaya Software Update Manager to update IP Office devices, the IP Office devices must be assigned to an IP Office user in Avaya Secure Access Administration. Perform the following steps to upgrade the IP Office devices: 1.
Step 4: Upgrade the IP Office devices using Avaya Software Update Manager i. From the Sold To drop-down list, select the Sold To you want to use. j. Click OK to save the changes and close the dialog box. 3. Select Actions > Download Targets Detection. The system displays the Download Targets Detection dialog box. 4. Select the Detect using filter option button. 5. In the Product Filter area, select the IP Office devices you want to update. 6. Click OK. The system displays a warning dialog box. 7.
Post installation tasks for IP Office devices 15. Select Actions > Download Now. The selected IP Office devices are updated. 16. After all of the devices have been updated successfully (see the Current Version column), select Tools > Image Analyzer. All of the status icons should be green or purple. Go to Accessing IP Office Systems on page 67 to start managing the IP Office devices from Avaya Network Management Console.
Overview Chapter 7: Managing IP Office devices in your network Overview This chapter provides procedures for managing your IP Office devices from Avaya Network Management Console. Accessing IP Office Systems Avaya Network Management Console shows the connected and registered endpoints associated with each of your IP Office devices.
Managing IP Office devices in your network Backing Up the configurations of all the IP Office devices You should back up the configurations of all your IP Office devices before making any configuration changes. To back up the configurations of all the IP Office devices, perform the following steps: 1. From the Avaya Network Management Console window, select Tools > Avaya Provisioning and Installation Manager For IPO Devices. The system displays the Provisioning and Installation Manager window. 2.
Working with templates Working with templates You can create and use templates to manage and maintain branches that have similar configurations. With templates, you can make your changes in one file and then propagate this file to a group of branches. Note: To create templates, IP Office Manager must be installed on the PC you are using. Note: When you create a template, you can specify configuration parameters manually.
Managing IP Office devices in your network - associations of WAV files from the Voice Files library to time profiles. Avaya Provisioning and Installation Manager for IP Office enables you to upload WAV files from PCs to the Voice Files library. (You manage the Voice Files library from Avaya Provisioning and Installation Manager for IP Office.
Working with templates 7. Using IP Office Manager, complete the General template. Use the online help for more information about the General template. 8. When you are finished creating the General template in IP Office Manager, select File > Save Template and Exit. The system closes the IP Office Manager window, and displays the Summary dialog box. 9. Click Next. The system displays the Finish Up dialog box. 10. Click Finish.
Managing IP Office devices in your network 10. Click Next. The system displays the Finish Up dialog box. 11. Click Finish. Creating an Auto Attendant template Before creating an Auto Attendant template, you must upload the Auto Attendant voice files (WAV files) to Provisioning and Installation Manager for IP Office. To upload voice files, perform the following steps: 1. From the Avaya Network Management Console window, select Tools > Avaya Provisioning and Installation Manager For IPO Devices.
Working with templates 6. Click Next. The IPO Manager dialog box appears, and IP Office Manager starts in template mode. The IP Office Manager window appears. 7. Using IP Office Manager, complete the Auto Attendant template. Use the online help for more information about the Auto Attendant template. 8. When you are finished creating the Auto Attendant template in IP Office Manager, select File > Save Template and Exit. The system closes the IP Office Manager window, and displays the Summary dialog box. 9.
Managing IP Office devices in your network 9. Click Next. The system displays the Finish Up dialog box. 10. Click Finish. Distributing templates To distribute templates, perform the following steps: 1. From the Avaya Network Management Console window, select Tools > Avaya Provisioning and Installation Manager For IPO Devices. The system displays the Provisioning and Installation Manager window. 2. Click the Templates folder in the left panel of the window.
Working with templates 13. Click Next. The job is created, and the system displays the Finish Up dialog box. 14. Click Finish. The job runs at the time you specified.
Managing IP Office devices in your network Working with device Profiles When Avaya Network Management Console discovers an IP Office device, it automatically creates a device profile.
Working with device Profiles 4. Perform one of the following steps: l If you want to enter the IP address manually: a. Click the Enter manually option button, and then click Next. The system displays the Device Type dialog box. b. Select the device type for which you want to create a profile, and then click Next. The system displays the Profile Details dialog box. c. Enter the appropriate information for the selected device, and then click Next. The system displays the Template Associations dialog box. d.
Managing IP Office devices in your network Working with Groups A group is a collection of devices and is used in conjunction with templates to make it easy for you to change multiple devices at a time. There are two types of groups: l Static group A static group enables you to manage your branch offices logically. You can create static groups according to arbitrary criteria such as geographic location, device type, and type and/or size of the branch office.
Working with Groups 9. From the Available list box, select the device(s) you want to add to the group, and then click >. The selected devices appear in the Selected list box. If you want to select all of the devices from the Available list box, click >>. 10. Click Next. The system displays the Summary dialog box. 11. Click Next. The static group is created, and the Finish Up dialog box appears. 12. Click Finish.
Managing IP Office devices in your network 11. From the Condition box in the new row, select the condition you want to use. 12. From the Group Name box in the new row, select the static group you want to use. 13. If you want to include parentheses around two or more groups, click ( and ) on the appropriate rows. The text box at the bottom of the dialog box shows the query you have built so far. 14. Repeat Steps 10 through 13 to add more conditions to this query. 15. When finished, click Next.
Importing Licenses Importing Licenses You can import a CSV file that contains the license information for IP Office devices. Each record in the CSV file must contain the following information for each device: l IP address l the list of license keys for the device To import licenses, perform the following steps: 1. From the Avaya Network Management Console window, select Tools > Avaya Provisioning and Installation Manager For IPO Devices.
Managing IP Office devices in your network Backing up Provisioning and Installation Manager files During a backup session, files are archived in a zip file.
Chapter 8: Backup and Restore of device configurations The Avaya Configuration Backup Restore is an application that allows you to backup and restore device configurations and configure multiple devices. The Avaya Configuration Backup Restore uses Secure Copy Protocol (SCP), File Transfer Protocol (FTP), or Trivial File Transfer Protocol (TFTP) to exchange information with the devices in the network.
Backup and Restore of device configurations 4. Click Login. The system displays the Avaya Configuration Backup Restore window. Setting the Avaya Configuration Backup Restore options Using the Options dialog box, you can configure the Avaya Configuration Backup Restore options. 1. Start the Configuration Backup Restore. For information on how to start the Configuration Backup Restore, see Starting the Avaya Configuration Backup Restore on page 83. 2. Select File > Options.
Setting the Avaya Configuration Backup Restore options Table 4: The Configuration Backup Restore - Options Field Description SCP Global Use The state of SCP usage for Avaya Configuration Backup Restore. Possible values: l l Enabled - SCP is used for devices that support SCP. Devices that do not support SCP use FTP if FTP Global Use is enabled, otherwise TFTP is used. Disabled - SCP is not used. FTP is used for all devices if FTP Global Use is enabled, otherwise TFTP is used.
Backup and Restore of device configurations Saving device configurations This section explains how to save the device configurations. The Avaya Configuration Backup Restore enables you to manually save the configurations of selected devices and to create backup jobs for automatically saving the configuration of all or some of the devices listed in the Device Table. The Device Table lists discovered devices and displays information about them.
Saving device configurations Note: Note: If you configure a backup job from a workstation working via remote access, the backup files are saved on the server. To create a new backup job: 1. Start the Avaya Configuration Backup Restore. 2. Click Backup Tab to display the Device table. 3. Select the Avaya Aura™ Communication Manager device from the table. 4. Select Action > Backup. The system displays the Welcome screen. 5. Click Next. The system displays the Device to upload from screen.
Backup and Restore of device configurations 1.Enter a number in the recur every x week(s) on field. 2.Select the check boxes next to the days of the week on which you want the backup job to run. - If you selected Monthly option: 1.Enter a number in the Day x field. This is the day of the month on which the backup job will run. If the day does not exist in a given month, (example, the 30th day of February), the last day of the month will be substituted. 2.Enter a number in the Every y month(s) field. d.
Downloading configuration files 3. Select the configuration file you want to download to one or more devices. 4. Select Action > Download. The Download dialog box displays the file name and source and possible destinations of the file. 5. Select the modules or devices to which you want to download the selected configuration file. The Possible Destinations list contains a list of all modules and devices to which it is appropriate to download the selected configuration file.
Backup and Restore of device configurations l l l To edit the configuration file with the Configuration Editor, click Edit file. The Configuration Editor appears. After editing the file, you can initiate the download process from the Configuration Editor. For more information on the Configuration Editor, refer to the section Editing Configuration Files of the Avaya Integrated Management Configuration Backup Restore online help. To cancel the download, click Cancel. The download is cancelled.
Downloading configuration files 9. Click Finish. For more information on topics like Device table, Library table, Editing Configuration files, Comparing Configuration files, Generating reports, Filtering tables and Managing jobs, refer to the Avaya Integrated Management Configuration Backup Restore online help.
Backup and Restore of device configurations 92 Network Management Configuration
Chapter 9: Backup and Restore of administered data of Network Management applications Overview This Chapter provides instructions on how to backup your Network Management Console and Provisioning and Installation Manager database and administered data and settings using the NM Backup Utility and restoring the backup using NM Easy Restore Utility. For more information, see NM Backup Utility on page 20.
Backup and Restore of administered data of Network Management applications 4. Enter the Server parameters in the Options dialog box. 5. Click Apply. The parameters are saved. These parameters will be used as defaults while setting up a backup job.
Backing up the data using the NM Backup Utility wizard b. Click Next. Go to step 12. To run the job periodically: a. Select Periodic. b. Click Next. The system displays the Schedule Backup Job dialog box. c. Select the time when you want to start the backup from the Start hour drop-down list under the Job Start time section of the dialog box. d. Perform one of the following steps under the Recurrence Pattern section of the dialog box: l If you want to schedule the backup daily, select Daily.
Backup and Restore of administered data of Network Management applications l l l l Backup Name – This displays the name of the Backup you entered in the Configure Backup Items dialog box. Application Types – This displays the application you choose to backup in the Configure Backup Items dialog box. Backup Destination – This displays the backup destination you choose in the Select Backup Destination dialog box.
Restoring the data using NM Easy Restore Utility Note: Note: The NM Easy Restore Utility can be launched only from the NM Server. 2. Depending on the server you chose to store the backup file you can choose to restore the data using the NM Easy Restore Utility. l To restore the backup from the file stored on the NM server: l To restore the backup from the file stored on the FTP server: To restore the backup from the file stored on the NM server: 1.
Backup and Restore of administered data of Network Management applications backup the data using the NM Backup Utility the data from the PostgreSQL database also gets backed up. When you restore the backed up data using the NM Easy Restore utility, all the data entered in the database after the backup operation is not included in the restore. It is lost. However, it is possible to recover this data using the PostgreSQL database feature called WAL (Write Ahead log) archiving.
Appendix A: Supported Devices Table 6 provides a list of Avaya Network Management applications and shows the devices that are supported by each application.
Supported Devices Table 6: Supported Devices for the Avaya Network Management Applications Application Supported Devices Avaya Network Management Console Communication Manager: Avaya Aura(TM) Communication Manager, Avaya Communication Manager Express, Avaya HS20, Avaya S8100, Avaya S8300, Avaya S8400, Avaya S8500, Avaya S8700, Avaya VAL, CLAN, Definity Audix, Intuity Audix, SES.
Table 6: Supported Devices for the Avaya Network Management Applications (continued) Application Supported Devices Avaya Network Management Console Partner Devices: Extreme Summit 300-48, Extreme Summit 400-24f Extreme Summit 400-24p, Extreme Summit 400-24t, Extreme Summit 400-48t, Extreme Summit 450-24t, Extreme Summit 450-24x, Extreme Summit Stack, Extreme Summit WM200, Extreme Summit X150-24p, Extreme Summit X150-24t, Extreme Summit X150-48t, Extreme Summit X250-24x, Extreme Summit X250e-24p, Extreme
Supported Devices Table 6: Supported Devices for the Avaya Network Management Applications (continued) Application Supported Devices Avaya Configuration Backup Restore P330: Avaya G700, Avaya P332G-ML, Avaya P332GT-ML, Avaya 332MF, Avaya 333R, Avaya P333RLB, Avaya P333T, Avaya 333T-PWR, Avaya P334T, Avaya P334T-ML. C360: C363T, C364T, C363T-PWR, C364T-PWR. G250: G250-BRI, G250-DS1, G250-DCP. G350: Avaya G350. G430: Avaya G430. G450: G450. TGM 550 TGM 550.
Table 6: Supported Devices for the Avaya Network Management Applications (continued) Application Supported Devices Avaya Software Update Manager P330: Avaya G700, Avaya P332G-ML, Avaya P332GT-ML, Avaya 332MF, Avaya 333R, Avaya 333T-PWR, Avaya P334T, and Avaya P334T-ML. G250: G250-BRI, G250-DS1, G250-DCP. G350: Avaya G350, Avaya Integrated Analog, Avaya MM312, Avaya MM710, Avaya 710B, Avaya MM711, Avaya MM714, Avaya MM714B, Avaya MM716, Avaya MM717, Avaya MM720, and Avaya MM722.
Supported Devices Table 6: Supported Devices for the Avaya Network Management Applications (continued) Application Supported Devices Avaya Provisioning and Installation Manager for Gateways G250, G250-DCP, G250-BRI, G250-DS1, G350, G430, G450, TMG550.
Index Index Symbols L >, meaning of in text . . . . . . . . . . . . . . . . . 8 Local Area Network . . . . . . . . . . . . . . . . . 19 A M Avaya support resources . . . . . . . . . . . . support Web site . . . . . . . . . . . . . Avaya Network Management Applications . . . Avaya Configuration Backup Restore . . . Avaya Provisioning and Installation Manager Avaya SMON Manager . . . . . . . . . . Avaya Software Update Manager . . . . . Network Management Console . . . . . . . . . . . . . . . . . .
Index W Wide Area Network . . . . . . . . . . . . . . . .