Implementing Standalone Voice Mail for the Avaya B5800 Branch Gateway Release 6.
© 2012 Avaya Inc. All Rights Reserved. Notice While reasonable efforts have been made to ensure that the information in this document is complete and accurate at the time of printing, Avaya assumes no liability for any errors. Avaya reserves the right to make changes and corrections to the information in this document without the obligation to notify any person or organization of such changes.
The trademarks, logos and service marks (“Marks”) displayed in this site, the Documentation and Product(s) provided by Avaya are the registered or unregistered Marks of Avaya, its affiliates, or other third parties. Users are not permitted to use such Marks without prior written consent from Avaya or such third party which may own the Mark.
Implementing Standalone Voice Mail for the Avaya B5800 Branch Gateway Comments? infodev@avaya.
Contents Chapter 1: Standalone Voice Mail overview..................................................................... 7 Mailbox features........................................................................................................................................ 7 Supported languages................................................................................................................................ 8 Fallback languages...................................................................
Programmed buttons........................................................................................................................ 48 Short codes...................................................................................................................................... 49 Using an auto attendant to access voicemail............................................................................................ 50 Configuring Park and Page for an auto attendant...................................
Chapter 1: Standalone Voice Mail overview Standalone Voice Mail provides basic voice mail mailbox services for all users and hunt groups created on the B5800 Branch Gateway. In addition to basic voice mail mailbox services, Standalone Voice Mail provides auto attendant services. It is installed on a separate Linux server and provides a maximum capacity of 40 voice mail ports.
Standalone Voice Mail overview Supported languages • Arabic (ara) • Chinese (Hong Kong) • Chinese–Mandarin (chs) • Danish (dan) • Dutch (nld) • English UK (eng) • English US (enu) • Finnish (fin) • French (fra) • French Canadian (frc) • German (deu) • Greek • Hungarian • Italian (ita) • Korean (kor) • Latin Spanish • Norwegian (nor) • Polish • Portuguese (ptg) • Portuguese-Brazilian (ptb) • Russian (rus) • Spanish (esp) • Swedish (sve) The B5800 Branch Gateway system Locale setting is used to determine the
Fallback languages • If no user or incoming call route Locale is applicable, the system Locale is used. • A short code Locale, if set, is used and overrides the options above if the call is routed to voicemail using the short code. Fallback languages If a selected locale is not supported, Standalone Voice Mail uses a fallback language. If your voicemail configuration requires a locale that has not been downloaded to the B5800 Branch Gateway, a warning message displays to indicate which locale is missing.
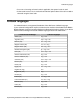
Standalone Voice Mail overview Locale selected in Manager Fallback Languages Kuwait (ark) ara > eng > enu Latin Spanish (esm) esp > enu > eng Morocco–French (arm) fra > frc > eng Norwegian (nor) eng > enu Oman (aro) ara > eng > enu Peru (esr) esm > esp > enu Polish (pl) eng > enu > Portuguese (ptg) ptb > eng > enu Qatar (arq) ara > eng > enu Russian (rus) eng > enu > Spanish (esp) esm > eng > enu Swedish (sve) eng > enu Switzerland–French (frs) eng Switzerland–German (des) deu
Standalone Voice Mail auto attendant with central voicemail system configured timeout occurs. If the park timeout occurs, the caller hears the Park and Page error prompt and is then returned to the call flow that initiated the Park and Page and hears either the subscriber's personal greeting or the auto attendant main menu prompt. The called party can use a short code or a programmed button on their phone to park and unpark incoming calls.
Standalone Voice Mail overview For more information about managing B5800 Branch Gateway systems, see Implementing the Avaya B5800 Branch Gateway for an Avaya Aura ® Configuration, document number 18-603853. To launch IP Office Manager from System Manager to edit a B5800 Branch Gateway system configuration, including configuring Standalone Voice Mail for a branch, see Editing a B5800 Branch Gateway system configuration from System Manager on page 12.
Related resources Related resources Related documents Ensure that you have read this document before starting the installation.
Standalone Voice Mail overview 14 Implementing Standalone Voice Mail for the Avaya B5800 Branch Gateway Comments? infodev@avaya.
Chapter 2: Software installation The Standalone Voice Mail application is one of the Linux components installable as part of the IP Office Application Server DVD installation. Server requirements Compatible servers Important: The compatibility of any particular server PC for the operating system cannot be guaranteed. It is the installers responsibility to ensure that the server platform is compatible with CentOS 5 http://www.centos.org. A list of tested servers is available at https:// hardware.redhat.
Software installation Drives The server PC must be configurable to boot from a DVD or another external source in order to overwrite any existing operating system. This may require access to the BIOS in order to change the boot order if the PC is supplied with an operating system already installed. Other requirements The Linux server is intended to operate as a headless server, that is, without requiring any keyboard, video and mouse (KVM) connections after initial installation.
Installing the Standalone Voice Mail software Note: If the PC does not boot from the DVD and instead starts an existing operating system, that indicates that the boot order of the server PC needs to be changed. Follow the PC manufacturer's instructions for accessing the PCs BIOS and setting it to boot from the DVD before booting from the hard disk. If the server PC already has IP Office server applications installed, the options to upgrade or perform a new installation are displayed.
Software installation 7. In the Install confirmation dialog box, select Yes. 8. In the Package Selection dialog box, select OK. 9. In the Configure Network Interface dialog box, select Yes. Note: B5800 Branch Gateway supports only a single network interface. 10. In the Network Configuration for eth0 dialog box, select Activate on boot and Enable IPv4 support. Note: IPv6 is not currently supported. 11. In the IPv4 Configuration for eth0 dialog box, select Manual address configuration.
Installing the Standalone Voice Mail software • To have the DHCP server automatically provide the hostname. select automatically via DHCP, Note: Not all DHCP servers support issuing hostnames. • To enter the hostname yourself, select manually, and then enter the appropriate hostname. 17. In the Hostname Configuration dialog box, select OK. 18. In the Time Zone Selection dialog box, select the time zone in which the system resides, and then select OK.
Software installation Configuring Standalone Voice Mail Procedure 1. From the System Manager console, select the B5800 Branch Gateway device and click Edit. IP Office Manager will be launched on your PC. For more information, see Editing a B5800 Branch Gateway system configuration from System Manager on page 12. 2. In the left navigation pane, click System. 3. Click the Voicemail tab. 4. In the Voicemail Type drop-down box, select Standalone Voice Mail.
Configuring Standalone Voice Mail iii. In the Retry timeout field, use the up and down arrows to set the amount of time to elapse before the page is repeated. The time is set in 15–second increments. b. To configure Centrex Transfer for this DTMF breakout, select Centrex Transfer and then enter the transfer number in the Transfer Number field. c. To configure an extension number for this DTMF breakout, select the appropriate extension number from the Reception/Breakout (DTMF 0) dropdown box. 11.
Software installation 22 Implementing Standalone Voice Mail for the Avaya B5800 Branch Gateway Comments? infodev@avaya.
Chapter 3: User mailbox configuration Standalone Voice Mail creates a mailbox for each user on the B5800 Branch Gateway system. Calls are routed to the mailbox whenever the user's extension is busy or does not answer within the users allocated No Answer Time. This includes calls that are forwarded to another internal destination. This chapter describes how to configure an individual user's mailbox by configuring the user settings in IP Office Manager.
User mailbox configuration can be sent if required. See Configuring voicemail email integration on page 27 for more information. Changing a user's voicemail configuration About this task Perform this task using IP Office Manager that is installed on a PC for the branch. You cannot perform this task from Manager that is accessed from System Manager.
Changing a user's voicemail configuration Voicemail tab field descriptions Name Description Voicemail Code Default = Blank, Range = 0 (no code) to 15 digits. This field can be used to set a mailbox access code. That code must then be entered by anyone attempting to retrieve messages from the mailbox. If remote access is attempted to a mailbox that has no voicemail code set, the prompt, "Remote access is not configured on this mailbox" is played.
User mailbox configuration 26 Name Description UMS Web Services Default = Off. This setting is not used for Standalone Voice Mail. Voicemail Email Default = Blank (No voicemail email features). This field is used to set the user or group email address used for voicemail email operation. When an address is entered, additional Voicemail Email controls described below are selectable. Voicemail Email Default = Off.
Configuring voicemail email integration Name Description transferred to are entered in the DTMF breakout fields described below. System default values can be set for these numbers and are used unless a different number is set within these user settings. These values can also be set using User Rights. Reception / Breakout (DTMF 0) The number to which a caller is transferred if they press 0 or *0 while listening to the mailbox greeting rather than leaving a message.
User mailbox configuration Voicemail email integration uses the B5800 Branch Gateway system's SMTP settings to send messages to the customer's email server. That server then forwards those messages into the user email mailboxes. Once enabled, users can select to have an email alert about each new voicemail message or to have the voicemail message forwarded to their email mailbox. In addition, when listening to a message in their voicemail mailbox, they can forward it to their email mailbox. Caution: Any .
Announcements 11. Select File > Save Configuration to merge the changes back to the system. 12. If the SNMP configuration was changed, restart the system. SMTP tab field descriptions Name Description IP Address The IP address of the customer's SMTP server. If not on the same subnet as the B5800 Branch Gateway LAN, an IP route must also be added. Port The SMTP listening port of the server. The default is 25. Email From Address This is the address used by the B5800 Branch Gateway.
User mailbox configuration • For announcements configured for hunt groups to be used effectively, the hunt group's Voicemail Answer Time must be extended or Voicemail On must be unselected. • For announcements configured for users to be used effectively, the user's No Answer Time must be extended or Voicemail On must be unselected. Configuring announcements Procedure 1. Open IP Office Manager and receive the B5800 Branch Gateway configuration. 2.
Announcements Name Description Wait before 2nd announcement Default = 20 seconds. Range = 0 to 9999 seconds. This setting sets the wait between the first and the second announcement. If Synchronize Calls is selected, the actual wait may differ. Repeat last announcement Default = On. If selected, the last announcement played to the caller is repeated until the call is answered or the caller hangs up. Wait before repeat Default = 20 seconds. Range = 0 to 9999 seconds.
User mailbox configuration Record Time field provided in the System > Voicemail tab. The maximum value that can be configured in the Maximum Record Time field is 180 seconds. There are two default short codes that enable you to record announcements. On existing and upgraded systems these or similar short codes need to be added manually. The default short codes are: *91N; / N “.1” / Record Message: Used to record an announcement 1.
Configuring Park and Page for a voicemail mailbox b. In the Retries field, use the up and down arrows to set the number of times to repeat the page. c. In the Retry timeout field, use the up and down arrows to set the amount of time to elapse before the page is repeated. The time is set in 15–second increments. 6. To configure Park and Page for the extension the caller is transferred to when the caller presses 2, in the Breakout (DTMF 2) drop-down box, select Park and Page and then do the following: a.
User mailbox configuration 34 Implementing Standalone Voice Mail for the Avaya B5800 Branch Gateway Comments? infodev@avaya.
Chapter 4: Hunt group mailbox configuration Standalone Voice Mail creates a mailbox for each hunt group on the B5800 Branch Gateway system. Calls are sent to the mailbox only when each available group member has been rung for the group's set ring time. This chapter describes how to configure the group mailbox through the hunt group settings in IP Office Manager.
Hunt group mailbox configuration Procedure 1. From the System Manager console, select the B5800 Branch Gateway device and click Edit to edit the system configuration for the device. IP Office Manager will be launched on your PC. For more information, see Editing a B5800 Branch Gateway system configuration from System Manager on page 12. 2. In the left navigation pane, click Hunt Group 3. Select the hunt group for which you want to create a mailbox. 4. Click the Voicemail tab. 5.
Configuring a group mailbox Name Description busy or do not answer within the group's set allocated answer interval. Note that selecting Off does not disable use of the user's mailbox. Messages can still be forward to their mailbox. The mailbox can also still be accessed to collect messages. Voicemail Answer Time (secs) Default = 45 seconds, Range = 1 to 99999 seconds. This setting sets how long a call should be presented to a hunt group and its overflow groups, if set, before going to voicemail.
Hunt group mailbox configuration Name Description Alert If set to Alert, each time a new voicemail message is received in the voicemail mailbox, a simple email message is sent to the email address. This is an email message announcing details of the voicemail message but with no copy of the voicemail message attached. Users can also select this mode by dialing *02 from their extension. Voicemail Help Default = Off. This setting is not used for Standalone Voice Mail.
Hunt group mailbox access 8. Repeats steps 3 through 7 for any other hunt groups for which the user requires message waiting indication. 9. Select File > Save Configuration to merge the changes back to the system. Hunt group mailbox access By default, no user has access to a hunt group mailbox until specifically configured for such access.
Hunt group mailbox configuration Field Contains… Code *99 Feature Voicemail Collect Telephone Number “?Sales” Line Group Id 0 The Voicemail Collect feature and hunt group mailbox name can also be assigned to a user's programmable button. Remote access The standard methods for remote mailbox access apply to users or to hunt groups. See Remote mailbox access on page 55 for more information. Announcements Announcements are played to callers waiting to be answered.
Announcements 2. In the left navigation pane, do one of the following: • To configure an announcement for a user, click User. • To configure an announcement for a hunt group, click Hunt Group. 3. Click the Announcements tab. 4. Set the fields to the appropriate values. See Announcements tab field descriptions on page 30 for more information. 5. Click OK to save the changes. 6. Select File > Save Configuration to merge the changes back to the system.
Hunt group mailbox configuration 42 Implementing Standalone Voice Mail for the Avaya B5800 Branch Gateway Comments? infodev@avaya.
Chapter 5: Auto attendant configuration In addition to basic voicemail operation, Standalone Voice Mail supports auto attendant services. Up to 40 auto attendants are supported. Each auto attendant consists of: • Actions – Each of the normal DTMF dialing keys; *, # and 0 to 9, can be assigned to an action. Callers can dial through prompts, that is, press an action key while listening to the greeting prompts. You can also assign an action to the Fax key.
Auto attendant configuration Creating an auto attendant About this task Note: If you are going to use time profiles in the auto attendant, the time profile has to be created before creating the auto attendant. For more information, see the IP Office Manager on-line help. Procedure 1. From the System Manager console, select the B5800 Branch Gateway device and click Edit to edit the system configuration for the device. IP Office Manager will be launched on your PC.
Creating an auto attendant Auto Attendant tab field descriptions Name Description Name Range = Up to 15 characters. This field sets the name for the auto-attendant service. External calls can be routed to the auto attendant by entering AA: Name in the destination field of an Incoming Call Route. Maximum Inactivity Default = 8 seconds; Range = 1 to 20 seconds. This field sets how long after playing the prompts the Auto Attendant should wait for a valid key press.
Auto attendant configuration Name Description Time Profile The time profile that defines each period of auto attendant operation. When there are overlaps or gaps between time profiles, precedence is given in the order morning, afternoon and then evening. Recording Name Default = Blank. Range = Up to 31 characters. This field appears next to the short code used for manually recording auto attendant prompts. It is only used if using pre-recorded .
Routing incoming calls to an auto attendant the auto attendant number that is dialed and Y is from 00 to 11 for the key programmed for Park and Page. Note: • To prevent abuse of these default short codes, they can be deleted or changed. They can also be removed from the system short codes section and rebuilt in the user short codes of a trusted user. Alternately, disabling the Enabling Local Recording option stops the use of short codes to record the auto attendant greetings.
Auto attendant configuration do not make a valid key press within the auto attendant's Maximum Inactivity time. Using time profiles, you can add additional destination sets to use the auto attendant at certain times of day or to use different auto attendants at different times. 7. Click OK. 8. Select File > Save Configuration to save the changes back to the system. About transferring calls to an auto attendant Normally calls are directed to an auto attendant by an B5800 Branch Gateway incoming call route.
About transferring calls to an auto attendant 3. Select File > Save Configuration to save the changes back to the system. Transferring a call using a programmed button Procedure 1. Place the call on hold. 2. Press the button programmed for the auto attendant. 3. Hang up the call at their extension. A blind transfer of the held call to the auto attendant occurs. Short codes The Auto Attendant short code feature can be used to connect to a particular auto attendant.
Auto attendant configuration 3. Press TRANSFER again to complete the process. Using an auto attendant to access voicemail About this task A useful function in auto attendants is to let callers access their own voicemail mailbox. This can be achieved by first creating a short code and then using the short code as an auto attendant destination. Use this procedure to create a short code for remote access. Perform this task using IP Office Manager that is installed on a PC for the branch.
Configuring Park and Page for an auto attendant 8. Create an auto attendant and select the key that the caller should use. See Creating an auto attendant on page 44 for more information. a. Set the Action to Normal Transfer. b. In the Destination drop-down box, type the short code. Following the example shown in step 6, type *99. 9. Click OK. 10. Select File > Save Configuration to save the changes back to the system.
Auto attendant configuration 11. In the Retry timeout field, use the up and down arrows to set the amount of time to elapse before the page is repeated. The time is set in 15–second increments. 12. If you are using a pre-recorded .wav file as a greeting, in the Recording Name dropdown box, select the appropriate file (the .wav file converted into a .c11 file). Note: Standalone Voice Mail does not support using pre-recorded .wav files as greetings. 13. Click OK. 14. Select File > Save Configuration.
Dial By Name • Are marked as Ex Directory (User > User) in the B5800 Branch Gateway configuration. • Do not have a recorded mailbox name prompt. They can record their own name by dialing *05 after accessing their mailbox. The Dial By Name feature assumes that a standard ITU lettered dialing pad is being used. How Dial By Name works 1. The caller gets a prompt to dial the name they require and then press #.
Auto attendant configuration 54 Implementing Standalone Voice Mail for the Avaya B5800 Branch Gateway Comments? infodev@avaya.
Chapter 6: Miscellaneous Remote mailbox access Remote mailbox access is accessing a mailbox from any location that does not match the mailbox user's or hunt group's number. That includes both internal and external access. Remote access is possible only if the mailbox user or hunt group has a voicemail code set in the B5800 Branch Gateway configuration.
Miscellaneous Configuring buttons About this task The same features used for Standalone Voice Mail short codes can also be assigned to telephone buttons. Perform this task using IP Office Manager that is installed on a PC for the branch. You cannot perform this task from Manager that is accessed from System Manager.
Button Programming tab field descriptions Button Programming tab field descriptions Name Description Voicemail Collect Allows access to a mailbox to collect or leave messages. The mailbox and action are determined by the associated telephone number. This takes the form ? Name for message collection and #Name for leaving a message. The Name variable must match the user or hunt group name set in the B5800 Branch Gateway configuration. On suitable phones the DSS key displays VMCol followed by the name.
Miscellaneous Gateway is centrally managed by System Manager, you must disable the System Manager administration feature for the branch (by disabling Under SMGR Administration in Security Settings) before you perform this task. For more information, see “Disabling the System Manager administration feature for the branch” in Implementing the B5800 Branch Gateway for an Avaya Aura ® Configuration, document number 18-603853. Note: The Visual Voice feature is not available on all telephones.
Default short codes 5. Click OK. 6. Select File > Save Configuration to save the changes back to the system. Default short codes The following default system short codes can be used with Standalone Voice Mail. Feature Code Description Collect Messages *17 Users can access the mailbox associated with their extension. Voicemail On/Off *18/*19 Switches the diverting of callers to the user's mailbox on or off. Voicemail Ringback On/Off *48/*49 Switches new message ringback to the user on or off.
Miscellaneous Field Contains… Code *99 Feature Voicemail Collect Telephone Number “?Main” Line Group Id 0 Question mark Using just ? in the Telephone Number without quote marks and without a mailbox name allows remote access. The user would be prompted to enter the mailbox number and then the mailbox access code if set. Voicemail On/Voicemail Off These two features switch the diversion of calls to the user mailbox on/off. No telephone number is required for either of these features.
Index A Access code ...............................................................23 Announcements ..............................................23, 29, 40 Announcements fields ................................................30 Auto attendant ............................................................47 Auto attendant button .................................................48 Auto attendant configuration ......................................43 Auto attendant fields .......................................
Software installation ...................................................15 Standalone Voice Mail overview ..................................7 Supported languages ...................................................8 T Transferring a call using a programmed bButton .......49 Transferring calls to an auto attendant .......................48 U User mailbox configuration .........................................23 62 Using an auto attendant to access voicemail .............50 V videos .....................