Implementing Embedded Voicemail for Avaya B5800 Branch Gateway Release 6.
© 2012 Avaya Inc. All Rights Reserved. Notice While reasonable efforts have been made to ensure that the information in this document is complete and accurate at the time of printing, Avaya assumes no liability for any errors. Avaya reserves the right to make changes and corrections to the information in this document without the obligation to notify any person or organization of such changes.
any license or right in and to the Marks without the express written permission of Avaya or the applicable third party. Avaya is a registered trademark of Avaya Inc. All non-Avaya trademarks are the property of their respective owners, and “Linux” is a registered trademark of Linus Torvalds. Downloading Documentation For the most current versions of Documentation, see the Avaya Support Web site: http://support.avaya.com. Contact Avaya Support See the Avaya Support Web site: http://support.avaya.
Implementing Embedded Voicemail for Avaya B5800 Branch Gateway Comments? infodev@avaya.
Contents Chapter 1: Embedded Voicemail overview....................................................................... 7 Mailbox features........................................................................................................................................ 7 Embedded Voicemail capacities............................................................................................................... 8 Supported languages..........................................................................
Auto Attendant tab field descriptions................................................................................................ 45 Prompt recordings..................................................................................................................................... 46 Routing incoming calls to an auto attendant............................................................................................. 47 About transferring calls to an auto attendant....................................
Chapter 1: Embedded Voicemail overview Embedded Voicemail provides basic voice mail mailbox services for all users and hunt groups created on the B5800 Branch Gateway without requiring a separate server PC. In addition to basic voice mail mailbox services, Embedded Voicemail provides auto attendant services. The B5800 Branch Gateway System SD card stores the prompts for the auto attendant operation and acts as the message store for Embedded Voicemail messages.
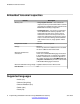
Embedded Voicemail overview Embedded Voicemail capacities Feature Description Memory card • Avaya System SD card — must contain the unique Feature Key serial number which is used for generating and validating licenses entered into the B5800 Branch Gateway configuration. • Optional SD card — this card is not required for normal B5800 Branch Gateway operation. The Optional SD card slot can be used for various maintenance actions.
Fallback languages • English UK (eng) • English US (enu) • Finnish (fin) • French (fra) • French Canadian (frc) • German (deu) • Italian (ita) • Korean (kor) • Norwegian (nor) • Portuguese (ptg) • Portuguese-Brazilian (ptb) • Russian (rus) • Spanish (esp) • Spanish–Argentina (ess) • Spanish–Mexico (esm) • Swedish (sve) The B5800 Branch Gateway system Locale setting is used to determine the default language prompts used. A Locale setting is set for the whole B5800 Branch Gateway system.
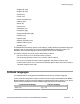
Embedded Voicemail overview Locale selected in Manager 10 Fallback Languages Argentina (ess) esp > eng > enu Bahrain (arh) ara > eng > enu Belgium–French (frb) fra > frc > eng Belgium–Dutch (nlb) nld > eng > enu Brazilian Portuguese (ptb) pt > eng > enu Chile (esl) esm > esp > enu Chinese–Cantonese (zzh) eng > enu Chinese–Madarin (chs) eng > enu Colombia (eso) esm > esp > enu Danish (dan) eng > enu Dutch (nld) eng > enu Egypt (are) ara > eng > enu English UK (eng) enu English U
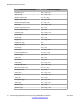
Licensing Locale selected in Manager Fallback Languages Swedish (sve) eng > enu Switzerland–French (frs) eng Switzerland–German (des) deu > eng > enu Switzerland–Italian (its) ita > eng > enu Taiwan (cht) chs > eng> enu Venezuela (esv) esm > esp > enu Licensing The B5800 Branch Gateway Embedded Messaging Ports license is required to support Embedded Voicemail. Embedded Messaging Port licenses must be purchased with sufficient quantity to support the configured number of ports.
Embedded Voicemail overview Management The primary method for configuring and managing the branches in a B5800 Branch Gateway system is centrally using Avaya Aura® System Manager R6.2. Avaya Aura® System Manager is a central management system that delivers a set of shared management services and a common console for different components of the Avaya Aura® solution. System Manager provides a single access interface to administer multiple branch locations and multiple distributed B5800 Branch Gateway users.
Related resources Related resources Related documents Ensure that you have read this document before starting the installation. Additional documents you may need to consult are as follows: • Implementing the B5800 Branch Gateway for an Avaya Aura ® Configuration, document number 18-603853 • Implementing the B5800 Branch Gateway for a Communication Server 1000 Configuration, document number 03-604053 All documentation for B5800 Branch Gateway is available on the Avaya support web site, http://support.avaya.
Embedded Voicemail overview 14 Implementing Embedded Voicemail for Avaya B5800 Branch Gateway Comments? infodev@avaya.
Chapter 2: Embedded Voicemail implementation Embedded Voicemail uses the System SD card that is installed in the B5800 Branch Gateway control unit. Installation of an additional memory card is not required. The System SD card stores the prompts for the auto attendant operation and acts as the message store for Embedded Voicemail messages. Embedded Voicemail is configured from IP Office Manager.
Embedded Voicemail implementation 2. Configure Embedded Voicemail to set features such as number of voicemail ports that are licensed for the system, Maximum Record Time, and Locale. See Configuring Embedded Voicemail on page 19. 3. Upload a PLDS license file that contains the Embedded Messaging ports licenses. See Implementing the B5800 Branch Gateway for an Avaya Aura ® Configuration, document number 18-603853, for more information.
About upgrading prompts You can also reload languages that are already installed on the System SD card. For example, you can reload languages if new prompts have been added in a maintenance release. See Reloading language prompts on page 17 for more information. All the prompts for Embedded Voicemail are found in the LVMSound folder after the IP Office Administrator Applications are installed. Uploading additional language prompts About this task You can perform this task on active systems only.
Embedded Voicemail implementation 3. In the IP Office Upgrade Wizard window, click the check box for the appropriate system. 4. Click Upgrade. 5. Click the Upload System Files check box to select this option. 6. Click OK to save the changes. 7. Select File > Save Configuration to merge the changes back to the system. Checking the prompt sets About this task The additional Embedded Voicemail features added in new B5800 Branch Gateway releases require new prompts.
Configuring Embedded Voicemail Manager administration feature for the branch” in Implementing the B5800 Branch Gateway for an Avaya Aura ® Configuration, document number 18-603853. Procedure 1. Open IP Office Manager and receive the B5800 Branch Gateway configuration. 2. Select File > Advanced > Embedded File Management. 3. In the Select IP Office window, click the check box for the appropriate system. 4. Click OK. 5.
Embedded Voicemail implementation Note: Fields applicable to this mode of voicemail support are enabled. If the field is not applicable, the field is disabled. 5. If you want the users to be presented with a display menu for access to their mailbox, check the Messages Button Goes to Visual Voice check box. For more information, see the IP Office Manager on-line help. 6. In the Minimum Password Length field, use the up and down arrows to set the appropriate minimum password length. 7.
Configuring Embedded Voicemail 14. In the Contact field, enter the appropriate name. 15. Configure the Anonymous check box as appropriate. This feature is enabled when this check box is selected. Note: For more information about the fields in the SIP Settings section, see the IP Office Manager on-line help.
Embedded Voicemail implementation 22 Implementing Embedded Voicemail for Avaya B5800 Branch Gateway Comments? infodev@avaya.
Chapter 3: User mailbox configuration Embedded Voicemail creates a mailbox for each user on the B5800 Branch Gateway system. Calls are routed to the mailbox whenever the user's extension is busy or does not answer within the users allocated No Answer Time. This includes calls that are forwarded to another internal destination. This chapter describes how to configure an individual user's mailbox by configuring the user settings in IP Office Manager.
User mailbox configuration can be sent if required. See Configuring voicemail email integration on page 27 for more information. Changing a user's voicemail configuration About this task Perform this task using IP Office Manager that is installed on a PC for the branch. You cannot perform this task from Manager that is accessed from System Manager.
Changing a user's voicemail configuration Voicemail tab field descriptions Name Description Voicemail Code Default = Blank, Range = 0 (no code) to 15 digits. This field can be used to set a mailbox access code. That code must then be entered by anyone attempting to retrieve messages from the mailbox. If remote access is attempted to a mailbox that has no voicemail code set, the prompt, "Remote access is not configured on this mailbox" is played.
User mailbox configuration 26 Name Description UMS Web Services Default = Off. This setting is not used for Embedded Voicemail. Voicemail Email Default = Blank (No voicemail email features). This field is used to set the user or group email address used for voicemail email operation. When an address is entered, additional Voicemail Email controls described below are selectable. Voicemail Email Default = Off.
Configuring voicemail email integration Name Description transferred to are entered in the DTMF breakout fields described below. System default values can be set for these numbers and are used unless a different number is set within these user settings. These values can also be set using User Rights. Reception / Breakout (DTMF 0) The number to which a caller is transferred if they press 0 or *0 while listening to the mailbox greeting rather than leaving a message.
User mailbox configuration Voicemail email integration uses the B5800 Branch Gateway system's SMTP settings to send messages to the customer's email server. That server then forwards those messages into the user email mailboxes. Once enabled, users can select to have an email alert about each new voicemail message or to have the voicemail message forwarded to their email mailbox. In addition, when listening to a message in their voicemail mailbox, they can forward it to their email mailbox. Caution: Any .
Announcements 11. Select File > Save Configuration to merge the changes back to the system. 12. If the SNMP configuration was changed, restart the system. SMTP tab field descriptions Name Description IP Address The IP address of the customer's SMTP server. If not on the same subnet as the B5800 Branch Gateway LAN, an IP route must also be added. Port The SMTP listening port of the server. The default is 25. Email From Address This is the address used by the B5800 Branch Gateway.
User mailbox configuration • For announcements configured for hunt groups to be used effectively, the hunt group's Voicemail Answer Time must be extended or Voicemail On must be unselected. • For announcements configured for users to be used effectively, the user's No Answer Time must be extended or Voicemail On must be unselected. Configuring announcements Procedure 1. Open IP Office Manager and receive the B5800 Branch Gateway configuration. 2.
Announcements Name Description Wait before 2nd announcement Default = 20 seconds. Range = 0 to 9999 seconds. This setting sets the wait between the first and the second announcement. If Synchronize Calls is selected, the actual wait may differ. Repeat last announcement Default = On. If selected, the last announcement played to the caller is repeated until the call is answered or the caller hangs up. Wait before repeat Default = 20 seconds. Range = 0 to 9999 seconds.
User mailbox configuration Record Time field provided in the System > Voicemail tab. The maximum value that can be configured in the Maximum Record Time field is 180 seconds. There are two default short codes that enable you to record announcements. On existing and upgraded systems these or similar short codes need to be added manually. The default short codes are: *91N; / N “.1” / Record Message: Used to record an announcement 1.
Configuring Park and Page for a voicemail mailbox b. In the Retries field, use the up and down arrows to set the number of times to repeat the page. c. In the Retry timeout field, use the up and down arrows to set the amount of time to elapse before the page is repeated. The time is set in 15–second increments. 6. To configure Park and Page for the extension the caller is transferred to when the caller presses 2, in the Breakout (DTMF 2) drop-down box, select Park and Page and then do the following: a.
User mailbox configuration 34 Implementing Embedded Voicemail for Avaya B5800 Branch Gateway Comments? infodev@avaya.
Chapter 4: Hunt group mailbox configuration Embedded Voicemail creates a mailbox for each hunt group on the B5800 Branch Gateway system. Calls are sent to the mailbox only when each available group member has been rung for the group's set ring time. This chapter describes how to configure the group mailbox through the hunt group settings in IP Office Manager.
Hunt group mailbox configuration messages first. If a group name is changed without clearing the original mailbox, you must create a short code based on the old group name in order to access the old mailbox. Procedure 1. From the System Manager console, select the B5800 Branch Gateway device and click Edit to edit the system configuration for the device. IP Office Manager will be launched on your PC.
Configuring a group mailbox Name Description Voicemail On Default = On. When on, calls to the hunt group's number will divert to voicemail if all available group members are busy or do not answer within the group's set allocated answer interval. Note that selecting Off does not disable use of the user's mailbox. Messages can still be forward to their mailbox. The mailbox can also still be accessed to collect messages. Voicemail Answer Time (secs) Default = 45 seconds, Range = 1 to 99999 seconds.
Hunt group mailbox configuration Name Description mailboxes. Users can also select this mode by dialing *01 from their extension. Alert If set to Alert, each time a new voicemail message is received in the voicemail mailbox, a simple email message is sent to the email address. This is an email message announcing details of the voicemail message but with no copy of the voicemail message attached. Users can also select this mode by dialing *02 from their extension. Voicemail Help Default = Off.
Hunt group mailbox access For example, for the hunt group Main, enter HMain. 7. Click OK. 8. Repeats steps 3 through 7 for any other hunt groups for which the user requires message waiting indication. 9. Select File > Save Configuration to merge the changes back to the system. Hunt group mailbox access By default, no user has access to a hunt group mailbox until specifically configured for such access.
Hunt group mailbox configuration Short code and button access A short code can be created for hunt group mailbox access, as shown in the following table. This can be a system-wide or user-specific short code. For information about setting up short codes, see the IP Office Manager on-line help or user guide.
Announcements Configuring announcements Procedure 1. Open IP Office Manager and receive the B5800 Branch Gateway configuration. 2. In the left navigation pane, do one of the following: • To configure an announcement for a user, click User. • To configure an announcement for a hunt group, click Hunt Group. 3. Click the Announcements tab. 4. Set the fields to the appropriate values. See Announcements tab field descriptions on page 30 for more information. 5. Click OK to save the changes. 6.
Hunt group mailbox configuration 42 Implementing Embedded Voicemail for Avaya B5800 Branch Gateway Comments? infodev@avaya.
Chapter 5: Auto attendant configuration In addition to basic voicemail operation, Embedded Voicemail supports auto attendant services. Up to 40 auto attendants are supported. Each auto attendant consists of: • Actions – Each of the normal DTMF dialing keys; *, # and 0 to 9, can be assigned to an action. Callers can dial through prompts, that is, press an action key while listening to the greeting prompts. You can also assign an action to the Fax key.
Auto attendant configuration Creating an auto attendant About this task Note: If you are going to use time profiles in the auto attendant, the time profile has to be created before creating the auto attendant. For more information, see the IP Office Manager on-line help. Procedure 1. From the System Manager console, select the B5800 Branch Gateway device and click Edit to edit the system configuration for the device. IP Office Manager will be launched on your PC.
Creating an auto attendant Auto Attendant tab field descriptions Name Description Name Range = Up to 15 characters. This field sets the name for the auto-attendant service. External calls can be routed to the auto attendant by entering AA: Name in the destination field of an Incoming Call Route. Maximum Inactivity Default = 8 seconds; Range = 1 to 20 seconds. This field sets how long after playing the prompts the Auto Attendant should wait for a valid key press.
Auto attendant configuration Name Description Time Profile The time profile that defines each period of auto attendant operation. When there are overlaps or gaps between time profiles, precedence is given in the order morning, afternoon and then evening. Recording Name Default = Blank. Range = Up to 31 characters. This field appears next to the short code used for manually recording auto attendant prompts. It is only used if using pre-recorded .
Routing incoming calls to an auto attendant the auto attendant number that is dialed and Y is from 00 to 11 for the key programmed for Park and Page. Note: • To prevent abuse of these default short codes, they can be deleted or changed. They can also be removed from the system short codes section and rebuilt in the user short codes of a trusted user. Alternately, disabling the Enabling Local Recording option stops the use of short codes to record the auto attendant greetings.
Auto attendant configuration do not make a valid key press within the auto attendant's Maximum Inactivity time. Using time profiles, you can add additional destination sets to use the auto attendant at certain times of day or to use different auto attendants at different times. 7. Click OK. 8. Select File > Save Configuration to save the changes back to the system. About transferring calls to an auto attendant Normally calls are directed to an auto attendant by an B5800 Branch Gateway incoming call route.
About transferring calls to an auto attendant 3. Select File > Save Configuration to save the changes back to the system. Transferring a call using a programmed button Procedure 1. Place the call on hold. 2. Press the button programmed for the auto attendant. 3. Hang up the call at their extension. A blind transfer of the held call to the auto attendant occurs. Short codes The Auto Attendant short code feature can be used to connect to a particular auto attendant.
Auto attendant configuration 3. Press TRANSFER again to complete the process. Using an auto attendant to access voicemail About this task A useful function in auto attendants is to let callers access their own voicemail mailbox. This can be achieved by first creating a short code and then using the short code as an auto attendant destination. Use this procedure to create a short code for remote access. Perform this task using IP Office Manager that is installed on a PC for the branch.
Configuring Park and Page for an auto attendant 8. Create an auto attendant and select the key that the caller should use. See Creating an auto attendant on page 44 for more information. a. Set the Action to Normal Transfer. b. In the Destination drop-down box, type the short code. Following the example shown in step 6, type *99. 9. Click OK. 10. Select File > Save Configuration to save the changes back to the system.
Auto attendant configuration 11. In the Retry timeout field, use the up and down arrows to set the amount of time to elapse before the page is repeated. The time is set in 15–second increments. 12. If you are using a pre-recorded .wav file as a greeting, in the Recording Name dropdown box, select the appropriate file (the .wav file converted into a .c11 file). Note: This field is case sensitive and uses the name embedded within the .wav file header rather than the actual file name. 13. Click OK. 14.
Named announcement files Procedure 1. From the System Manager console, select the B5800 Branch Gateway device and click Edit to edit the system configuration for the device. IP Office Manager will be launched on your PC. For more information, see Editing a B5800 Branch Gateway system configuration from System Manager on page 16. 2. In the left navigation pane, click Auto Attendant. 3. Select the appropriate auto attendant. 4.
Auto attendant configuration 5. In the Recording Name field, enter a name for the file (up to 8 characters with no spaces) and end the file name with .c11. This is the name that will be entered into the B5800 Branch Gateway configuration to use the recording. Note: The name value is case sensitive. 6. Ensure that the Format matches that selected for the Output File settings chosen above. 7. In the Format drop-down box, select G711. 8. Click OK.
Dial By Name Manager administration feature for the branch” in Implementing the B5800 Branch Gateway for an Avaya Aura ® Configuration, document number 18-603853. Procedure 1. Open IP Office Manager and receive the B5800 Branch Gateway configuration. 2. Select File > Advanced > Embedded File Management. 3. In the Select IP Office window, click the check box for the appropriate system. 4. Click OK. 5. In the IP Office Embedded File Management window, enter the service user name and password. 6. Click OK.
Auto attendant configuration How Dial By Name works 1. The caller gets a prompt to dial the name they require and then press #. For example, dialing 527 matches names starting with JAS (for example “Jason”) and KAR (for example “Karl”). Callers can also press *# to exit without making a selection. 2. If no matches are found, the caller is given the option to retry. 3. If 10 or less matches are found, the matching mailbox name greetings are played as part of a selection list.
Chapter 6: Miscellaneous Remote mailbox access Remote mailbox access is accessing a mailbox from any location that does not match the mailbox user's or hunt group's number. That includes both internal and external access. Remote access is possible only if the mailbox user or hunt group has a voicemail code set in the B5800 Branch Gateway configuration.
Miscellaneous Monitoring Embedded Voicemail About this task Use the IP Office Monitor application to observe the operation of Embedded Voicemail. Procedure 1. From the Start menu select Programs > IP Office. 2. Select Monitor. 3. From the File menu, click Select Unit. The Select System to Monitor window opens. 4. Enter the Control Unit IP Address and password. Depending on how the system is configured, the password required is either the system password or the separate monitor password if set. 5.
Monitoring Embedded Voicemail housekeeping a. On the Call tab, select the options that you want to monitor in the Embedded Voicemail section. b. On the System tab, select Print. The Trace Color selection on the System tab is applied to Embedded Voicemail events. 9. Click OK. Result Embedded Voicemail events are now shown in the Monitor trace when running. These events are all prefixed LVM.
Miscellaneous Remaining 156165796mS LVM(housekeeping): FMML Size: 35 Result Embedded Voicemail events are now shown in the Monitor trace when running. These events are all prefixed LVM. Configuring buttons About this task The same features used for Embedded Voicemail short codes can also be assigned to telephone buttons. Perform this task using IP Office Manager that is installed on a PC for the branch. You cannot perform this task from Manager that is accessed from System Manager.
Button Programming tab field descriptions Button Programming tab field descriptions Name Description Voicemail Collect Allows access to a mailbox to collect or leave messages. The mailbox and action are determined by the associated telephone number. This takes the form ? Name for message collection and #Name for leaving a message. The Name variable must match the user or hunt group name set in the B5800 Branch Gateway configuration. On suitable phones the DSS key displays VMCol followed by the name.
Miscellaneous Gateway is centrally managed by System Manager, you must disable the System Manager administration feature for the branch (by disabling Under SMGR Administration in Security Settings) before you perform this task. For more information, see “Disabling the System Manager administration feature for the branch” in Implementing the B5800 Branch Gateway for an Avaya Aura ® Configuration, document number 18-603853. Note: The Visual Voice feature is not available on all telephones.
Default short codes 5. Click OK. 6. Select File > Save Configuration to save the changes back to the system. Default short codes The following default system short codes can be used with Embedded Voicemail. Feature Code Description Collect Messages *17 Users can access the mailbox associated with their extension. Voicemail On/Off *18/*19 Switches the diverting of callers to the user's mailbox on or off. Voicemail Ringback On/Off *48/*49 Switches new message ringback to the user on or off.
Miscellaneous Field Contains… Code *99 Feature Voicemail Collect Telephone Number “?Main” Line Group Id 0 Question mark Using just ? in the Telephone Number without quote marks and without a mailbox name allows remote access. The user would be prompted to enter the mailbox number and then the mailbox access code if set. Voicemail On/Voicemail Off These two features switch the diversion of calls to the user mailbox on/off. No telephone number is required for either of these features.
Memory card removal voicemail if being used. If the System SD card is removed, features licensed by the card's Feature Key serial number will continue operating for up to 2 hours. Card services can be restarted by either reinserting the card or using a Start Up command. Shutting down a memory card using Manager Procedure 1. From the System Manager console, select the B5800 Branch Gateway device and click Edit. IP Office Manager will be launched on your PC.
Miscellaneous Shutting down a memory card using a system phone About this task To shut down a memory card using a system phone, you must be administered as a System Phone user. You can shut down a memory card using a 1400, 1600, or 9600 series phone. Your Login Code is used to restrict access to some system administration functions on the phone. Procedure 1. Select Features > Phone User > System Admin. 2. Enter your B5800 Branch Gateway user login code. 3. Select Memory Card. 4.
Memory card startup Procedure 1. Open IP Office Manager and receive the B5800 Branch Gateway configuration. 2. Select File > Advanced > Memory Card Command > Startup. 3. In the Select IP Office window, click the check box for the appropriate system. 4. Click OK. Starting up a memory card using System Status About this task Use this task to restart a memory card without removing and reinserting it. Procedure 1. Open System Status and access the status output. 2.
Miscellaneous 5. Select Startup. 68 Implementing Embedded Voicemail for Avaya B5800 Branch Gateway Comments? infodev@avaya.
Index A Access code ...............................................................23 Announcements ..............................................23, 29, 40 Announcements fields ................................................30 Auto attendant ............................................................47 Auto attendant button .................................................48 Auto attendant configuration ......................................43 Auto attendant fields .......................................
R Transferring calls to an auto attendant .......................48 Recording ...................................................................46 Prompts ................................................................46 Related documents ....................................................13 related resources ........................................................13 Avaya Mentor videos ...........................................13 Reloading language prompts .....................................