
User's Manual


Centralized Branch configuration checklist
Use this checklist to monitor your progress as you configure a B5800 Branch Gateway system
deployed as Centralized Branch.
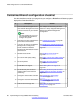
# Description Section
1 Launch Network Management and
start Network Management Console
to discover devices in your network.
Note:
This step applies only if you are
using Network Management to
configure the system.
See “Chapter 3: Discovering the Voice
Network” in Avaya Integrated Management
Release 6.0 Network Management
Configuration.
2 Activate license files and deliver the
license files to the branches.
See Activating license files on page 98.
3 If you are not going to use Network
Management to configure the
branch, disable the Network
Management administration feature
for the branch.
See Disabling the Network Management
administration feature for the branch on
page 103.
4 Disable unused trunks. See Disabling unused trunks on
page 104.
5 Set a trunk clock quality setting. See Setting a trunk clock quality setting on
page 106.
6 Set trunk prefixes. See Setting the trunk prefixes on
page 106.
7 Enable SIP trunk support. See Enabling SIP trunk support on
page 109.
8 Set the branch prefix and local
number length for the extension
numbering.
See Setting the branch prefix and local
number length for extension numbering on
page 110.
9 Change the default codec selection. See Changing the default codec
selection on page 112.
10 Change the maximum SIP sessions. See Changing the maximum SIP
sessions on page 113.
11 Add a Session Manager line. See Adding an Avaya Aura Session
Manager line on page 114.
Initial configuration for a Centralized Branch
96 Implementing the Avaya B5800 Branch Gateway November 2011
Comments? infodev@avaya.com