
User's Manual


Consult the work order to determine the DMC8 Relay card location, then perform the steps in
Connecting the DMC8 Relay card to a configuring PC on page 185
.
Note:
The Relay card can be any of the DMC8 or DMC8-E cards. Usually, the lowest-numbered
card is used.
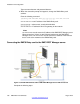
Connecting the DMC8 Relay card to a configuring PC
1. Connect the NTCW12DA cable to the connector on the backplane of the DMC8
Relay card.
Insert P1 into the DMC8 Relay card backplane connector located on the PBX shelf/
module or Cabinet.
2. If the Configuring PC is on a captive LAN, link the DMC8 Relay card to the
Configuring PC.
Insert P3 into the captive LAN RJ45 connector.
3. If the Configuring PC is on the DMC DECT Manager server dedicated LAN,
Insert P3 into the DMC DECT Manager server dedicated LAN RJ45 connector. See
Connecting the DMC8 Relay card to the DMC DECT Manager server on
page 186.
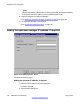
Resetting the DMC8 Relay card default IP address to the LAN IP address
The DMC8 Relay card default IP address 192.168.1.1 must be changed to conform to the
server network IP address plan.
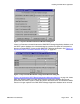
Figure 118: Telnet 192.168.1.1
Complete the following steps.
Resetting the DMC8 Relay card default IP
address to the LAN IP address
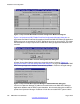
1. Open the Telnet dialog box.
Click Start on the Windows taskbar and choose Accessories > Telnet.
2. Enter username and password.
Installing the DMC DECT application
DMC DECT Fundamentals August 2012 185