
User's Manual


4. Walk briskly into the coverage area within range of either of the first two critical
points until the cell boundary is reached.
5.
Record the cell boundary by marking a small X on the floor plan where the cell
boundary is located.
6. Repeat step 4 and 5 several times, walking in different directions to determine where
the cell centre can be located and still be within range of the critical point.
7. Draw a thin contour line through the Xs to mark an arc on the floor plan.
8. Repeat steps 2 through 5 walking into the coverage area of the other of the first two
critical points.
9. If the contour lines do not cross, or if the amount of overlap between the cells is less
than 1/2 the distance between the cell centre and the cell boundary, then see
Multi
cell deployment on page 100.
10. Choose a position on the floor plan for the cell centre that:
a. is furthest from the critical points and still provides good audio quality at
the critical point,
b. complies with the Rules and guidelines for selecting cell centres on
page 60, and
c. is in the coverage area.
11. Mark each cell centre on the floor plan and label them 1C1 and 1C2.
12. Place the deployment tool at each cell centre to find the cell boundary and mark it
on the floor plan.
13. Repeat this technique for the remaining coverage area from the outer extremes of
the coverage area toward the centre until the entire floor has been covered. If the
cell boundary covers any other critical points, ignore these critical points when
proceeding with coverage deploying.
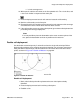
Multi cell deployment
Use the multi cell technique only if referred here from the double cell technique. Before
beginning this technique, there must be two critical points that one cell centre cannot serve.
Using the multi cell technique, two cell centres, each one serving one of the two critical points,
are found, as shown in Figure 62: Multi-cell distance on page 101
.
Site planning
100 DMC DECT Fundamentals August 2012
Comments? infodev@avaya.com