
User's Manual


244 Location builder tool
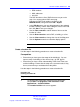
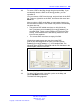
A view of the building appears in the map panel. The Control
pane in the bottom part of the Location Builder shows the Floor
controls, as shown in the following figure.
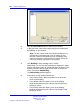
9 Click Add Floor .
The Add Floor dialog appears.
10 Enter the relevant data in the Add Floor dialog and click OK.
You can also add multiple floors at once, and copy the lines of
the current floor to the newly created floors. As well, you can add
lines to the new floors or edit existing lines.
Note: At this point the location is filled with buildings, the
buildings have floors and the floors have lines. This is all the
information you require to provide a reference framework for
the position of the DAPs.
11 Choose one of the following:
• If you have not populated a RPNadm.txt file, go to step 17,
and add DAPs manually.
If you have populated a PRNadm.txt file, go to step 12. and
import the PRNadm.txt file
12 In the menu, choose File > Import.
The Import dialog appears.
13 Browse to the RPNadm.txt file, and select it. Click Open.
A dialogue appears and prompts you to indicate your
preferences for the importing the RPNadm.txt file.
14 Ensure that Update DAPs already located is not checked, and
click OK.
A list of DAPs appears on the left side of the program window.
Note: You can change the view mode using the view mode
select box, located above the DAP list.
Nortel Communication Server 1000
SIP DECT Fundamentals
NN43120-123 01.07
6 January 2009
Copyright © 2008-2009 Nortel Networks
.