
User's Manual


Use the Location builder tool 243
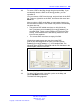
After entering values for the building size and location, you can
make changes by selecting the building and editing the values
that appear in the
Edit pane.
Note: There are two view modes. The first is the Location
View, which shows one whole floor with multiple buildings
visible. The second is the Building view, which shows only a
floor inside a building. Double-clicking on a building switches
between views.
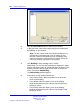
6 To add lines to a building, double-click on the building to which
you want to add lines.
The Building view is activated.
Note: Lines are used to add contours and shapes to buildings.
The lines can provide a reference to items on the maps like
stairwells, elevator shafts or oddly shaped (non rectangular)
buildings.
7 In the Building view, add lines using either of the following
methods:
• Add lines using the Add lines tool:
— Right click in the Location area.
A menu appears.
— Choose Add lines from the menu.
OR
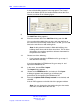
• Add lines in freehand mode:
— Click Line in the draw controls box.
— With your mouse pointer in the position where you want
the line to begin, click and hold down the left mouse
button.
— Move your mouse pointer to the point where you want the
line to end, and release the mouse button.
— Repeat these steps to draw additional lines.
Note: To make it easier to create straight lines in freehand
mode, first click snap to grid, which will make it easier to
draw straight lines. Adjust the Grid Size if necessary.
8 If your buildings have only one floor, skip this step.
To add a floor, double-click the border line of the building to
which you want to add a floor.
Nortel Communication Server 1000
SIP DECT Fundamentals
NN43120-123 01.07
6 January 2009
Copyright © 2008-2009 Nortel Networks
.