
User's Manual


Uninstalling DECT Messenger
DECT Messenger can be uninstalled using one of the following procedures. The procedures
are applicable for both Server and Client installs.
Note:
During uninstall, the DECT Messenger databases and module configuration files (*.ini) are
automatically removed. Make backups if you intend to restore them at a later point in time.
Uninstalling from Control Panel (Windows XP/2003)
1. Go to Start > Settings > Control Panel and open ‘Add or Remove Programs’.
2. Select DECT Messenger from the list of programs and click ‘Remove’. Wait until the
product is completely removed.
Uninstalling from Control Panel (Windows 2008)
1. Go to Start > Control Panel and select ‘Uninstall a program’ (below ‘Programs’)
2. In the Uninstall or change a program window, select DECT Messenger and click
‘Uninstall’. Wait until the product is completely removed.
Uninstalling from the DVD
1. Insert the DECT Messenger product DVD. The DVD Main Menu window appears.
If not, double click D:\Autorun.exe (where D is the drive letter of your DVD drive).
2. Select ‘Server’ from the DVD Main Menu (or ‘Client’ if this is a client installation).
3. The Requirements Setup Wizard checks that the server meets the configuration
requirements.
4. Click ‘Next’ to continue to the Install Prerequisites page.
5. Click ‘Next’.
6. The Welcome to the InstallShield Wizard for Messenger@Net window appears.
Click ‘Next’.
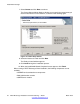
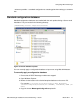
7. The Program Maintenance window appears.
8. Select ‘Remove’ and click ‘Next’.
9. On the following window, click ‘Remove’ to begin uninstalling.
10. When done, click ‘Finish’ to close the wizard.
Uninstalling DECT Messenger
DECT Messenger Installation and Commissioning — Book 1 March 2012 43