
User's Manual
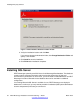
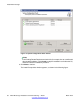
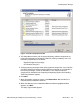


9. Select Complete to install all available components in the default installation path
and click Next to continue.
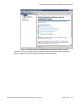
The Database Installation window appears, as shown in the following figure.
Figure 15: Database Installation selection window
Note:
On Windows Server 2008, you might get a Files in Use warning window. If this
happens, select Automatically close and attempt to restart applications and
click OK.
Note:
The default installation path is C:\Program Files\Avaya\Avaya DECT
Messenger on 32-bit platforms and C:\Program Files (x86)\Avaya
\Avaya DECT Messenger on 64-bit platforms.
10. Choose whether to use a Microsoft Access-only database or to use an existing
Microsoft SQL Server. If using Microsoft SQL Server, also enter the location of the
database server and the credentials required to connect to it.
11. Click Next to validate the database connection and continue.
The Ready to Install window appears.
12. Click Install to begin the installation process.
Install DECT Manager
40 DECT Messenger Installation and Commissioning — Book 1 March 2012
Comments? infodev@avaya.com