
User Guide
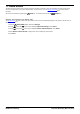
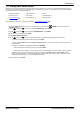
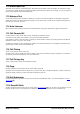

Table Of Contents
- Introduction
- Making Calls
- Answering Calls
- Redialling
- Holding and Parking Calls
- Transferring Calls
- Account Codes
- Conference Calls
- Headset/Handsfree Operation
- Contacts/Directory
- Call History
- Voicemail
- Logging In/Out
- Redirecting Calls
- Groups
- Button Features
- Home Screen
- Phone Settings
- Status Menu
- Short Codes
- System Administration
- Menus
- Glossary
- Abbreviated Ring
- Appearance Button
- Attention Ring
- Auto Hold
- Bridged Appearance Button
- Call Appearance Button
- Call Coverage Button
- Coverage Ring
- Do Not Disturb
- Do Not Disturb Exceptions
- Follow Me
- Follow Me Here
- Follow Me To
- Forward on Busy
- Forward on No Answer
- Forward Unconditional
- Group
- Idle Line Preference
- Internal Twinning
- Line Appearance Button
- Logged Out
- Missed Call
- Missed Group Call
- Login Code
- Mobile Twinning
- Park Call
- Park Slot Number
- Ringing Line Preference
- Short Codes
- System Administrator
- System Phone User
- Twinning

9600 Series User Guide Page 107
Issue 05d (Wednesday, March 07, 2012)B5800 Branch Gateway
Home Screen:
17.1 Editing Your Home Screen
There are a wide range of actions that can be assigned to the buttons. This guide only includes details of those that you
can assign to a button using the self-administer menu. Functions that can only be assigned by your system administrator
will be explained by the system administrator.
· Abbreviated Dial*
· Absence Text*
· Auto Intercom
· Call Forward All*
· Call Pickup*
· Call Pickup Any *
· Page*
· Self Administer*
· Send All Calls*
Those functions marked as * can also be assigned to programmable buttons .
1.Press the Features soft key if shown. To do this during a call, press the PHONE key and then press the
Features soft key.
2.Use the up and down arrow keys to highlight Phone User. Press Select.
3.Use the up and down keys to highlight Self-Administer. Press Select.
4.Enter your security PIN and press Done.
5.Select Home Screen Favorites.
6.Use the up and down keys to scroll through the list of current functions assigned to each button.
· To remove the existing function from a button press Erase.
· You can also press More and use the Copy and Paste options to copy the settings of an existing button to
another button.
· To assign a function to the highlighted button press Replace.
· Select the required function from the list and press Select.
· Depending on the function, you may need to enter some information such as a target extension number.
· The button will be given a default label. To change the label, press More and then select Label. Use the
keyboard to enter the text you want to display for the button label. Note that the label is only shown while
editing the label and after you exit the administration menu.
7.When completed press Back.
108
100