
Configuration manual

Procedure
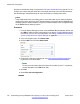
1. From the System Manager console, select the B5800 Branch Gateway device and
click Edit to edit the system configuration for the device. IP Office Manager will be
launched on your PC. For more information, see Editing a B5800 Branch Gateway
system configuration from System Manager on page 157.
2. In the left navigation pane, click System.
3. Click the LAN1 or LAN2 tab, depending on which branch site LAN interface will be
used for the SIP extensions.
4. In the LAN Settings tab, make a note of the IP Address and IP Mask details as
these will be required during the SIP extension configuration.
5. Click the VoIP tab.
6. Check the SIP Registrar Enable check box. This is necessary for support of SIP
extensions directly by the branch or when providing survivability support for Avaya
Aura
®
SIP extensions.
7. Click OK.
8. Click the SIP Registrar tab.
9. Configure the fields on this tab as appropriate. See
SIP Registrar tab field
descriptions on page 155 for more information.
10. Click OK.
11. Select File > Save Configuration.
The Send Configuration window appears and the Configuration Reboot Mode is set
to Immediate. Do not change the reboot mode.
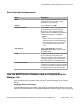
SIP Registrar tab field descriptions
Name
Default Description
Domain Name Default = Blank This is the local SIP registrar
domain name that will be
needed by SIP devices in
order to register with the
B5800 Branch Gateway. If
this field is left blank,
registration is against the
LAN IP address. For our
examples we have been
using a domain,
example.com.
Enabling branch SIP extension support
Implementing the Avaya B5800 Branch Gateway for an Avaya Aura
®
Configuration October 2012 155