
Configuration manual

i. Click the Add End Entity button.
The page refreshes and a message appears at the top of the page stating the
End Entity was added successfully.
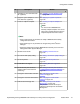
5. In the left navigation pane, click List/Edit End Entities.
6. On the List/Edit End Entities page, in the Or with status drop-down box, select
All.
7. Click the List button.
8. Confirm the B5800 Branch Gateway End Entity that you just added is listed.
Note that New appears in the Status column for this End Entity. This indicates
System Manager has prepared the certificate for exchange with an End Entity.
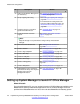
9. In the left navigation pane, click Public Web.
10. On the Welcome to the public EJBCA page, in the left navigation pane, click
Create Keystore.
11. On the EJBCA Certificate Enrollment page, in the Username field, enter the same
username you entered when you created the End Entity in Step 4.
12. In the Password field, enter the same password you entered when you created the
End Entity in Step 4.
13. Click OK.
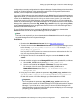
14. In the Options section, accept the default settings for the Key length and
Certificate profile fields, and click OK.
The certificate is installed in your browser.
15. In the Alert dialog box, click OK.
16. From your Firefox browser, to view the certificate, do the following:
a. Select Tools > Options.
b. In the Options window, click Advanced.
c. Click the Encryption tab.
d. Click the View Certificates button.
e. In the Certificate Management window, click the Your Certificates tab.
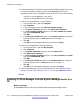
17. From your Firefox browser, to save the certificate in the X.509 PEM format, do the
following:
a. In the Certificate Management window, click the View button.
b. In the Certificate Viewer window, click the Details tab.
c. Click Export.
d. In the Save Certificate to File window, in the Filename field, change the file
name suffix to .cer. The .cer format is required for B5800 Branch Gateway.
e. Click Save.
Initial branch configuration
120 Implementing the Avaya B5800 Branch Gateway for an Avaya Aura
®
Configuration October 2012
Comments? infodev@avaya.com