Avaya B179 SIP Conference Phone User Guide ENGLISH 16-603918 Issue 4 June 2012
Avaya B179 SIP Conference Phone User Guide © 2011 Avaya Inc. All Rights Reserved. Notice While reasonable efforts have been made to ensure that the information in this document is complete and accurate at the time of printing, Avaya assumes no liability for any errors. Avaya reserves the right to make changes and corrections to the information in this document without the obligation to notify any person or organization of such changes.
Avaya B179 SIP Conference Phone User Guide any given time. A “Unit” means the unit on which Avaya, at its sole discretion, bases the pricing of its licenses and can be, without limitation, an agent, port or user, an e-mail or voice mail account in the name of a person or corporate function (e.g., webmaster or helpdesk), or a directory entry in the administrative database utilized by the Software that permits one user to interface with the Software. Units may be linked to a specific, identified Server.
Avaya B179 SIP Conference Phone User Guide The patented audio technology OmniSound® provides impressive audio quality for your distance meetings. Full-duplex audio via the hypersensitive microphone and powerful speakers enables speech in both directions. This natural loudspeaker sound quality is critical for effective, collaborative meetings that keep everyone engaged and contributing.
Avaya B179 SIP Conference Phone User Guide TABLE OF CONTENTS Description 2 External phonebook (LDAP) General................................................... 2 Maintenance........................................... 2 Connections............................................ 2 Keypad................................................... 4 Display screen......................................... 5 Navigation and selection in menus............ 6 Search for and call a contact...................
Avaya B179 SIP Conference Phone User Guide DESCRIPTION GENERAL The Avaya B179 is a conference phone for IP telephony offering a host of innovative features: • OmniSound® audio technology. • IP telephony for flexible and affordable telephony. • Option of using two accounts simultaneously. • Conference feature for automatic multi-party dialling. • Management of lines during a call (dialling new parties, creating a multi-party call, splitting a multi-party call). • Recorder capability.
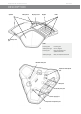
Avaya B179 SIP Conference Phone User Guide DESCRIPTION Speaker Microphone Display screen Keypad LEDs SD memory card port LEDs Flashing blue Incoming call Steady blue light Call in progress Flashing red Hold, microphone and speaker turned off Steady red light Mute, microphone turned off Network cable port Expansion microphone port AUX port Security lock port Power supply port Expansion microphone port 3
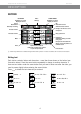
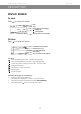
Avaya B179 SIP Conference Phone User Guide DESCRIPTION KEYPAD UP ARROW Navigation in menus Display of call list Menu Settings DOWN ARROW Navigation in menus Display of call list Cancel No/end/back Start/stop recording OK Yes/confirm choice Answer/connect new line During a call: Press to call a new person Increase volume Decrease volume Hang up/end line Conference Automatic dialling of conference groups Mute Hold Alphanumerical buttons Hold down a button for 2 seconds to open the phonebook One
Avaya B179 SIP Conference Phone User Guide DESCRIPTION DISPLAY SCREEN On Hook Press to display this screen. Date Time Display text (can be changed) Registered Not registered Account name (can be changed) Off Hook Press to display this screen.
Avaya B179 SIP Conference Phone User Guide DESCRIPTION Line menu Press to switch to and from this menu. Line/number/name New line Option for creating or splitting conference calls Menu Press to switch to and from a menu.
Avaya B179 SIP Conference Phone User Guide DESCRIPTION Writing style in instructions In the instructions, Press > SETTINGS (6) means you should: . Mark the SETTINGS option using the arrow buttons and confirm by pressing OK to open the menu (or press button number 6). Correspondingly, Phone book > Conference Guide in the web interface means you should select Menu Phone book and the Conference Guide tab. Menu tree 1 2 3 4 5 6 7 8 PROFILES PHONE BOOK EXT.
Avaya B179 SIP Conference Phone User Guide ANSWERING AND MAKING CALLS ANSWERING CALLS A ring tone is heard and the blue LEDs start flashing. Press to answer. The LEDs show a steady blue light. ANSWERING CALLS ON HOLD If a call is made to the conference phone during another call, you will hear a double tone, INCOMING CALL will be displayed on the screen and the blue LEDs start flashing. Press to answer. The original call will automatically be put on hold.
Avaya B179 SIP Conference Phone User Guide ANSWERING AND MAKING CALLS CALLING FROM THE PHONEBOOK Please turn to page 17 for instructions on adding and updating contacts in the phonebook. Press and hold down a number button for two seconds. The phonebook appears on the display screen. The pre-programmed names appear in alphabetical order, starting with the number button’s first letter. Use the arrow buttons to mark the name in the phonebook. Press . The number you have selected is dialled.
Avaya B179 SIP Conference Phone User Guide DURING A CALL ADJUSTING THE SPEAKER VOLUME Adjust the speaker volume using the buttons and . PLACING CALLS ON TEMPORARY HOLD Mute Press to turn off the microphone. The LEDs change from blue to red. The other party cannot hear what you are saying. Press to reconnect the call. Hold Press to put the call on hold. The LEDs change from blue to flashing red. Both the microphone and the speaker are turned off and the call is on hold.
Avaya B179 SIP Conference Phone User Guide MAKING MULTI-PARTY CALLS Turn to “MANAGING PHONE LINES” on the next page for instructions on putting an individual on hold during a multi-party call and other more advanced features. ADDING ANOTHER PARTY TO A CALL If there are free lines, new parties can be added, regardless of whether you have used the button or if you are making a normal call. Press during the call to get a new dialling tone. Calls in progress are put on hold. Dial the new number.
Avaya B179 SIP Conference Phone User Guide MANAGING PHONE LINES SWITCHING BETWEEN LINES DURING MULTI-PARTY CALLS Talking privately with one individual Press . All lines are put on hold. Alternatively, you can press after opening the line menu or you can select SPLIT CONFERENCE from the line menu to put the lines on hold. Press . The line menu is displayed. Mark a party in the line menu and press OK or . The party is reconnected to the call.
Avaya B179 SIP Conference Phone User Guide MANAGING PHONE LINES DROPPING A LINE Individual lines can be dropped out of a multi-party call. Press . The line menu is displayed. Mark the line you want to drop and press . TRANSFERRING CALLS If you wish to transfer a call to another telephone. Select > TRANSFER. Dial the number and press OK to confirm. The call is transferred to the other telephone.
Avaya B179 SIP Conference Phone User Guide PROFILES The Avaya B179 gives you the option of using a password to protect contact information in the phonebook and conference guide. All contacts entered by default can be accessed by all users and cannot be password protected. All contacts entered by Admin are also displayed in default mode. To enter personal contacts, conference groups and settings that are inaccessible to other users, select user profile and enter the PIN code for the profile.
Avaya B179 SIP Conference Phone User Guide PROFILES CHANGING THE PROFILE NAME AND PASSWORD Log in to Avaya B179, see pages 34–35. Select > Basic. Click on the Edit button under the heading Profiles. Enter a name and a new PIN code. Click on Set and save your settings by clicking on Save. Make a note of the name and PIN code and keep them in a safe place. The administrator is able to reset the settings.
Avaya B179 SIP Conference Phone User Guide PHONEBOOK The Avaya B179’s phonebook can hold up to 1000 numbers in each user profile. See page 8 for making calls via the phonebook. Please turn to page 4 for instructions on using the keypad to enter text. SEARCHING FOR CONTACTS The simplest way to search for a contact in the address book is to hold down an alphanumeric button for two seconds (see page 8). You can also search for a contact via the PHONEBOOK menu.
Avaya B179 SIP Conference Phone User Guide PHONEBOOK DELETING CONTACTS Select > PHONE BOOK > ERASE CONTACT (2,4). Mark the contact you want to delete and press OK. Confirm that you really want to delete the contact by pressing OK or cancel the deletion of a contact by pressing . DELETING ALL CONFERENCE GROUPS Select > PHONE BOOK > ERASE ALL (2,5). Confirm that you really want to delete all contacts by pressing OK or cancel the deletion of a contact by pressing .
Avaya B179 SIP Conference Phone User Guide EXTERNAL PHONEBOOK (LDAP) Avaya B179 has support for an external phonebook. This means it can communicate with a catalog server according to LDAP (Lightweight Directory Access Protocol). To make the external phonebook accessible, an administrator must activate and configure the LDAP function in Avaya B179.
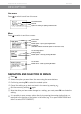
Avaya B179 SIP Conference Phone User Guide EXTERNAL PHONEBOOK (LDAP) SEARCH FOR AND CALL A CONTACT Select > EXT. PHONEBOOK (3). Avaya B179 contacts the database, which sends all the contacts. The first 50 are shown in Avaya B179 (with standard default settings). Enter one or more search characters to filter the list. The number of hits in the database is reduced for each character you enter.
Avaya B179 SIP Conference Phone User Guide CONFERENCE GUIDE The conference guide makes it easy to set up calls with as many as five people, including your own phone. The Avaya B179 automatically dials all the contacts in the conference group. You can create 20 conference groups in each user profile. All systems (PBXs) do not support this feature. Entering text with the keypad Please turn to page 4 for instructions on using the keypad to enter text. MAKING CONFERENCE GROUP CALLS Press the button.
Avaya B179 SIP Conference Phone User Guide CONFERENCE GUIDE DISPLAYING CONFERENCE GROUP PARTICIPANTS Select > CONF GUIDE > SEARCH GROUP (4,1). Mark the group you want and press OK. The names of the conference group participants are displayed. Press OK or to return to the CONFERENCE GUIDE menu or to dial the group. to exit the menu. Press ADDING A CONFERENCE GROUP Select > CONF GUIDE > ADD GROUP (4,2). Enter a group name and press OK to confirm. Press OK to enter the first person.
Avaya B179 SIP Conference Phone User Guide CONFERENCE GUIDE DELETING A CONFERENCE GROUP Select > CONF GUIDE > ERASE GROUP (4,4). Mark the group you want to delete and press OK. Confirm that you really want to delete the group by pressing OK or cancel the deletion of a group by pressing . DELETING ALL CONFERENCE GROUPS Select > CONF GUIDE > ERASE ALL (4,5). Confirm that you really want to delete all groups by pressing OK or cancel the deletion of all groups by pressing .
Avaya B179 SIP Conference Phone User Guide RECORDING It is possible to record a phone conference on an SD (Secure Digital) memory card so you can listen to it later on. It is possible to record a call in progress and use the Avaya B179 as a dictaphone. Avaya B179 supports SD and SDHC cards and the recording capacity is 35 hours per GB. A flashing symbol appears on the display screen during recording. A beep is heard every 20 seconds so that other parties in the call know it is being recorded.
Avaya B179 SIP Conference Phone User Guide RECORDING LISTENING TO A RECORDING You can listen to a recorded phone conference on your Avaya B179 or a computer using an SD memory card reader. Recordings are saved in wav format and can be played back on your choice of media player. Listening to recordings on the Avaya B179: Select > RECORDING > PLAYBACK FILE (5,1). Mark the folder you want (date) and press OK to confirm. A list of all recordings for the specified date is displayed.
Avaya B179 SIP Conference Phone User Guide RECORDING DELETING A RECORDING Select > RECORDING > ERASE FILE (5,3). Mark the folder you want and press OK. Mark the recording to be deleted and press OK. Confirm that you really want to delete the recording by pressing OK again, or cancel the deletion of a recording by pressing . DELETING ALL RECORDINGS Select > RECORDING > ERASE ALL (5,4).
Avaya B179 SIP Conference Phone User Guide SETTINGS The Avaya B179 has two groups of settings: Basic and Advanced. You must enter the Admin. PIN code to access the advanced settings. The simplest way to make settings is using a PC and the Avaya B179 web interface (see page 34). BASIC SETTINGS Selecting languages Select > SETTINGS > BASIC > LANGUAGE (6,1,1). Select the language you want and press OK to confirm.
Avaya B179 SIP Conference Phone User Guide SETTINGS Do not select the PA option unless a PA system is connected. This option turns off the internal microphone and internal speakers. The HEADSET option may be selected whether or not a headset is connected. Settings for external PA system It is assumed that the PA option has been activated in the previous menu before making these settings. Select > SETTINGS > BASIC > PA (6,1,6).
Avaya B179 SIP Conference Phone User Guide SETTINGS Resetting This resets all user settings for the user profile shown to factory default settings. The phonebook, conference guide and all basic settings are reset. Account, network and SIP settings are not reset. Select > SETTINGS > BASIC > DEFAULT. Confirm that you really want to reset the settings to default by pressing OK again, or cancel the resetting procedure by pressing . ADVANCED SETTINGS Only Admin. is able to make these settings.
Avaya B179 SIP Conference Phone User Guide SETTINGS SETTINGS DURING A CALL The HEADSET/PA, PHONE BOOK, TRANSFER and EQUALIZER menus may be accessed during a call and are displayed when the button is pressed. The first option is either HEADSET or PA depending on whether PA is activated or not. These HEADSET/PA settings can only be accessed when a call is connected. Turn off the internal speakers when using a headset PA should not be activated when using the HEADSET menu option.
Avaya B179 SIP Conference Phone User Guide SETTINGS AUTO is the default setting and is recommended in most cases. The figure shown in brackets is the measured calibration value. Select different levels and compare the audio quality to achieve your preferred setting. NB. You must ask the person you are calling to assess the effect of the adjustments you make. SYSTEM The system menu can be used for manual restarts and resets.
Avaya B179 SIP Conference Phone User Guide SETTINGS CHECKING STATUS The status menu can be used for troubleshooting. Only the administrator is able to change these settings. See “Avaya B179 SIP Conference Phone – Installation and Administration Guide” for an explanation of the settings. Main account To check account settings for the SIP account. Select > STATUS > ACCOUNTS > MAIN ACCOUNT (8,1,1). This shows the status for: - ACCOUNT NAME - STATUS - REGISTRAR - SIP ID - AUTH.
Avaya B179 SIP Conference Phone User Guide SETTINGS NAT Traversal To check whether address conversion is activated, which may be necessary if the phone is behind a firewall. Select > STATUS > NAT TRAVERSAL (8,3). This shows the status for: - STUN - TURN - ICE Media To check priorities of audio codecs and DTMF signalling. Select > STATUS > MEDIA (8,4).
Avaya B179 SIP Conference Phone User Guide USING THE WEB INTERFACE You can use the web browser of a PC connected to the same network to manage contacts, conference groups and settings in the Avaya B179. Your choice of language for the Avaya B179 does not affect the web interface, which is only in English. For security reasons, recordings can only be managed directly on the Avaya B179. All other settings that can be made directly on the Avaya B179 can also be made via the web interface.
Avaya B179 SIP Conference Phone User Guide USING THE WEB INTERFACE LOGGING IN TO THE AVAYA B179 Enter the phone’s network address in the web browser address bar. Select Default or an empty user profile in Profile and enter the PIN code. The default code is 0000. You can create a personal password-protected phonebook using a user profile.
Avaya B179 SIP Conference Phone User Guide USING THE WEB INTERFACE MANAGING THE PHONEBOOK Select Phone Book. Here, you can add, change and delete contacts. You can also import existing contacts. When you call or are called by a contact who is already in the phonebook, that person’s name is displayed on the screen. Adding a contact Enter the contact’s name under Name: Enter the contact’s phone number or URI under Number/URI. Information about URI can be found on pages 44–45.
Avaya B179 SIP Conference Phone User Guide USING THE WEB INTERFACE Editing contacts Click on the Edit contact button after the contact you want to change. Edit the contact and click on Save contact. Deleting contacts Click on the Erase contact button after the contact you want to delete. Confirm that you want to delete the contact. You can also delete all contacts by pressing the Erase all button. Importing contacts You can import contacts from a comma separated values (CSV) file.
Avaya B179 SIP Conference Phone User Guide USING THE WEB INTERFACE It is normally possible to export contact books stored in your PC in CSV format. Click on the Scroll… button under the heading Import in the web window. Open your CSV file. Click on Import. The name is limited to 15 characters, since the Avaya B179 screen cannot display more than 15 characters. Exporting contacts You can export your contacts as a CSV document in order to import them into another phone.
Avaya B179 SIP Conference Phone User Guide USING THE WEB INTERFACE MANAGING THE CONFERENCE GUIDE Select Phone Book > Conference guide. Here, you can add, change and delete conference groups. It is also possible to import groups that you have created. When a call is connected to a contact who is already in the phonebook, that person’s name is displayed on the screen. Adding a conference group Give the group a name, enter the names and phone numbers of the group members.
Avaya B179 SIP Conference Phone User Guide USING THE WEB INTERFACE Deleting a conference group Click on the Erase group button next to the group you want to delete. Confirm that you want to delete the group. You can also delete all groups by pressing Erase all groups. Importing conference groups You can import conference groups using a comma separated values (CSV) file. See “Importing contacts” on page 37 for more information.
Avaya B179 SIP Conference Phone User Guide USING THE WEB INTERFACE CHECKING THE CALL LIST Incoming, outgoing and missed calls are displayed in the call list in chronological order. Select Call list > Recent. Select one of the tabs Incoming, Outgoing or Missed to filter the list.
Avaya B179 SIP Conference Phone User Guide USING THE WEB INTERFACE BASIC SETTINGS The settings only affect the user profile you selected when you logged in. Select Settings > Basic. Select Settings > Basic. Changing PIN code and profile name The PIN code can be changed from the default setting to protect against unauthorised use. Click on the Edit button under the heading Profiles. Enter a new PIN code. The code may consist of 8 digits.
Avaya B179 SIP Conference Phone User Guide USING THE WEB INTERFACE Changing the ring tone level Select the tone level from the list under the heading Ring level and click on Save. Changing key tone Select On or Off under the heading Key tone and click on Save. Changing the recording indicator A short beep is heard every 20 seconds so that all the parties in the call know it is being recorded. This feature can be turned off. Select On or Off under the heading Recording tone and click on Save.
Avaya B179 SIP Conference Phone User Guide USING THE WEB INTERFACE RESTARTING THE AVAYA B179 Select Settings > System. Restarting the phone application This only restarts the phone software with the current settings. The restart takes about 30 seconds. Click on Restart. Restarting the phone This shuts down and restarts the phone. This restart takes about three minutes. Click on Reboot.
Avaya B179 SIP Conference Phone User Guide USING THE WEB INTERFACE CHECKING STATUS Although it is not possible to make settings in the Status menu, the information here may be useful when troubleshooting. Select Status. You can find the phone’s serial number, network port address and current software version on the Basic tab. Settings made by the administrator for the network, time server, SIP accounts and media are on other tabs.
Avaya B179 SIP Conference Phone User Guide TECHNICAL SPECIFICATIONS Size Diameter 240 mm, height 77 mm Weight 1 kg Colour Liquorice black Display screen Illuminated graphics (LCD), 128x64 Keypad Alphanumerical 0–9, *, on, off, mute, hold, volume up, volume down, 5 buttons for menu navigation, line, conference guide Anti-theft protection Kensington security slot Memory Support for SD and SDHC memory cards (Recording capacity 35h/GB) Connectivity Network connection RJ45, Ethernet 1
Avaya B179 SIP Conference Phone User Guide TECHNICAL SPECIFICATIONS Environment Temperature: 5°–40°C Relative humidity: 20-80% condensation free Recommended acoustic conditions: Reverberation period: 0.5 S Rt 60 Background noise: 45 dBA Approvals Electrical safety EN 60950-1:2006, ANSI/UL 60950-1-2002, CAN/CSA-C22.2, No. 60950-1-03 EMC/Radio EN 301 489-3 V1.4.1 (2002-08), EN 301 489-1 V1.6.
110225-61-001 Rev 3B